QRCode Reader
Objective
Main objective of this post is to teache you how to make iPhone app in Swift Programming Language and how to detect any QRCode with Swift.
You can create your own QRCode and read through application. For this purpose follow the entire step.
What’s QR code?
If you don’t have any idea about QRCode then let’s has a look on following image.
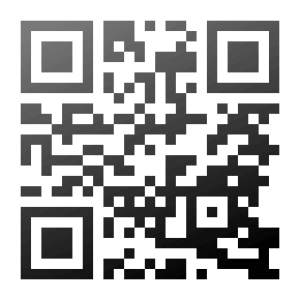
QRCode means Quick Response code is a kind of 2-dimensional bar code. This code designed for tracking parts in manufacturing. We will use AVFoundation framework to read QR code in real-time machine.
So, let’s start.
Step 1 Setting up environment for Swift Project.
Xcode Version 6.1.1 Beta is an IDE to create all iPhone apps using Swift Programming Language but it requires platform OS X 10.9.3 or later to be installed. Now, open Xcode.
The below screen will appear:
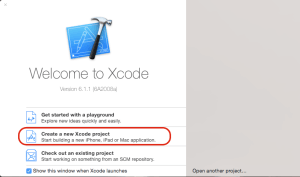
Select Create a new Xcode project options.
It shows a dialog box as shown in below:
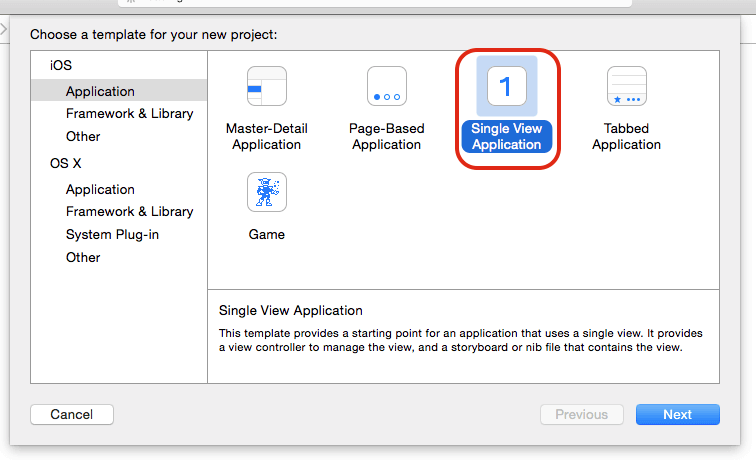
Now, select Single View Application option and press next button.
It appears Project Detail screen:
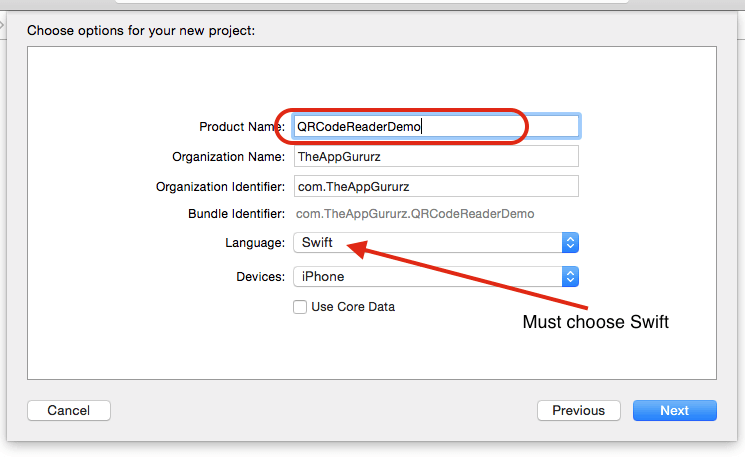
The above screen contains number of fields. User has to provide basic information into specific field, Give application name QRCoderReaderDemo or whatever you want and press next.
Here, Language must choose as Swift. Choose your path and Press Create button for creating project. Your project creates successfully.
Step 2 List of main files of your project
The main files shown in below that is generated when you have created your application. Write code in following file and you can perform various operations to the application.
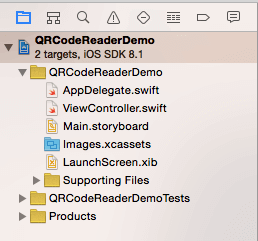
Step 3 Make UI for QRCode Reader
Now, Create simple layout for QRCode reader. Which is shown in below screen. Put simple label at bottom of the screen and make Outlet with ViewController.swift file.
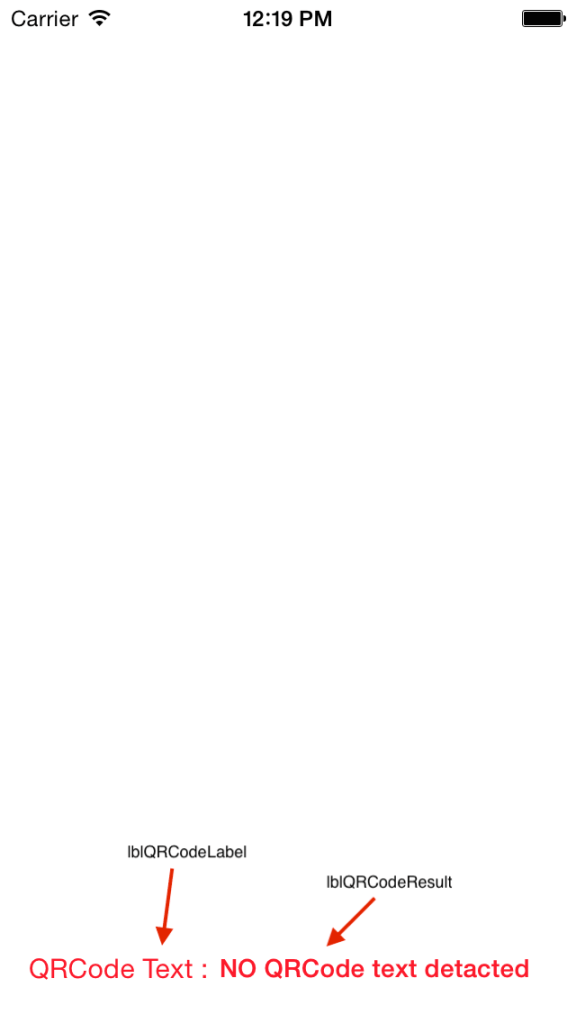
Attach these two labels with ViewController.swift project and make IBOutlet.
You can get more idea from following line of code:
@IBOutlet weak var lblQRCodeResult: UILabel!
@IBOutlet weak var lblQRCodeLabel: UILabel!
Step 4 Import AVFoundation in Project
We will use AVFoundation framework for QRCode Scanning features. For that, we have to import AVFoundation into our project.
For that, in ViewController.swift file write following line of code:
Step 5 Implement AVCaptureMetadataOutputObjectsDelegate Protocol
This protocol is used for intercept any metadata found in the input device. To detect QRCode on any particular object, we must have to detect / found it on device.
So, use following line of code respectively:
Class ViewController: UIViewController, AVCaptureMetadataOutputObjectsDelegate
{
}
Step 6 Make Variables for Project
Make local variables which we will use later on this project as follows:
var objCaptureSession:AVCaptureSession?
var objCaptureVideoPreviewLayer:AVCaptureVideoPreviewLayer?
var vwQRCode:UIView?
Step 7 Configure Video Capture in Device for read QRCode
Now, for this purpose, we will create new function named configureVideoCapture() and after that we will call this function from viewDidLoad() Here, we use AVCaptureDevice class to initialise a device object and provide the video as the media type parameter.
Also, use AVCaptureDeviceInput class using the previous device object. And for the session we use AVCaptureMetadataOutput object and set it as the output device to the capture session.Whole function looks like:func configureVideoCapture()
{ let objCaptureDevice = AVCaptureDevice.defaultDeviceWithMediaType(AVMediaTypeVideo)
var error:NSError?
let objCaptureDeviceInput: AnyObject!
var error:NSError?
let objCaptureDeviceInput: AnyObject!
do {
objCaptureDeviceInput = try AVCaptureDeviceInput(device: objCaptureDevice) as AVCaptureDeviceInput
} catch
let error1 as NSError {
error = error1
objCaptureDeviceInput = nil
}
objCaptureDeviceInput = nil
}
if (error != nil) {
let alertView:UIAlertView = UIAlertView(title: "Device Error", message:"Device not Supported for this Application", delegate: nil, cancelButtonTitle: "Ok Done")
alertView.show()
return
}
objCaptureSession = AVCaptureSession()
objCaptureSession?.addInput(objCaptureDeviceInput as! AVCaptureInput)
let objCaptureMetadataOutput = AVCaptureMetadataOutput()
objCaptureSession?.addOutput(objCaptureMetadataOutput)
objCaptureMetadataOutput.setMetadataObjectsDelegate(self, queue: dispatch_get_main_queue())
objCaptureMetadataOutput.metadataObjectTypes = [AVMetadataObjectTypeQRCode]
}
Step 8 Add Video Preview Layer in Device
After configuring Video capture, we must make Video Preview layer for that QRCode Read & display on device. Here, we use AVCaptureVideoPreviewLayer and initialised it using another function with name addVideoPreviewLayer(), we will call this function from viewDidLoad() after configureVideoCapture()
Whole function looks like:
func addVideoPreviewLayer()
{
objCaptureVideoPreviewLayer = AVCaptureVideoPreviewLayer(session: objCaptureSession)
objCaptureVideoPreviewLayer?.videoGravity = AVLayerVideoGravityResizeAspectFill
objCaptureVideoPreviewLayer?.frame = view.layer.bounds
self.view.layer.addSublayer(objCaptureVideoPreviewLayer)
objCaptureSession?.startRunning()
}
Step 9 Initialised QRCode View
Now, we put the code for QRCode where our QRCode image can detect & Display on device. For this purpose, you have to make another function called initializeQRView() and call this function from viewDidLoad() after addVideoPreviewLayer()
Whole function looks like:
func initializeQRView() {vwQRCode = UIView()
vwQRCode?.layer.borderColor = UIColor.redColor().CGColor
vwQRCode?.layer.borderWidth = 5
self.view.addSubview(vwQRCode!)
self.view.bringSubviewToFront(vwQRCode!)
}
vwQRCode?.layer.borderWidth = 5
self.view.addSubview(vwQRCode!)
self.view.bringSubviewToFront(vwQRCode!)
}
Step 10 Implement AVCaptureMetadataOutputObjectsDelegate
Now, we check for output of the capture. So, for that we must implement delegate method which is described as following:
optional func captureOutput(captureOutput: AVCaptureOutput!, didOutputMetadataObjects metadataObjects: [AnyObject]!, fromConnection connection: AVCaptureConnection!);
In this method, we detect the QRCode text. If there is an error in detecting QRCode than simple Print NO QRCode text detected else we read the QRCode & display it on label.
Code for delegate method given as below:
func captureOutput(captureOutput: AVCaptureOutput!, didOutputMetadataObjects metadataObjects: [AnyObject]!, fromConnection connection: AVCaptureConnection!)
{
if metadataObjects == nil || metadataObjects.count == 0 {
vwQRCode?.frame = CGRectZero
lblQRCodeResult.text = "NO QRCode text detacted"
return
}
let objMetadataMachineReadableCodeObject = metadataObjects[0] as! AVMetadataMachineReadableCodeObject
if objMetadataMachineReadableCodeObject.type == AVMetadataObjectTypeQRCode
{
letobjBarCode=objCaptureVideoPreviewLayer?.transformedMetadataObjectForMetadataObject(objMetadataMachineReadableCodeObject as AVMetadataMachineReadableCodeObject) as! AVMetadataMachineReadableCodeObject
vwQRCode?.frame = objBarCode.bounds;
vwQRCode?.frame = objBarCode.bounds;
if objMetadataMachineReadableCodeObject.stringValue != nil
{
lblQRCodeResult.text = objMetadataMachineReadableCodeObject.stringValue
}
}
}
override func viewDidLoad()
{
super.viewDidLoad()
self.configureVideoCapture()
self.addVideoPreviewLayer()
self.initializeQRView()
}

Wow, its build Successfully.
self.view.bringSubviewToFront(lblQRCodeLabel)
func addVideoPreviewLayer()
{
objCaptureVideoPreviewLayer = AVCaptureVideoPreviewLayer(session: objCaptureSession)
objCaptureVideoPreviewLayer?.videoGravity = AVLayerVideoGravityResizeAspectFill
objCaptureVideoPreviewLayer?.frame = view.layer.bounds
self.view.layer.addSublayer(objCaptureVideoPreviewLayer)
objCaptureSession?.startRunning()
self.view.bringSubviewToFront(lblQRCodeResult)
self.view.bringSubviewToFront(lblQRCodeLabel)
}
lblQRCodeResult.text = objMetadataMachineReadableCodeObject.stringValue
}
}
}
Step 11 Call fucntion from viewDidLoad() method
Now, call all the function one by one in viewDidLoad() method. So, finally your viewDidLoad() method looks like:
override func viewDidLoad()
{
super.viewDidLoad()
self.configureVideoCapture()
self.addVideoPreviewLayer()
self.initializeQRView()
}
Now, build the App (cmd + b) & Run (cmd + r) (Run on Physical Device only).
You will get the message:

Wow, its build Successfully.
But, on output screen there is no any label yet, as we put it at bottom of our screen. Don’t worry, simple add below two line in your addVideoPreviewLayer():
self.view.bringSubviewToFront(lblQRCodeResult)self.view.bringSubviewToFront(lblQRCodeLabel)
So, your addVideoPreviewLayer() looks like :
func addVideoPreviewLayer()
{
objCaptureVideoPreviewLayer = AVCaptureVideoPreviewLayer(session: objCaptureSession)
objCaptureVideoPreviewLayer?.videoGravity = AVLayerVideoGravityResizeAspectFill
objCaptureVideoPreviewLayer?.frame = view.layer.bounds
self.view.layer.addSublayer(objCaptureVideoPreviewLayer)
objCaptureSession?.startRunning()
self.view.bringSubviewToFront(lblQRCodeResult)
self.view.bringSubviewToFront(lblQRCodeLabel)
}
Now, build the App (cmd + b) & Run (cmd + r) (Run on Physical Device only).
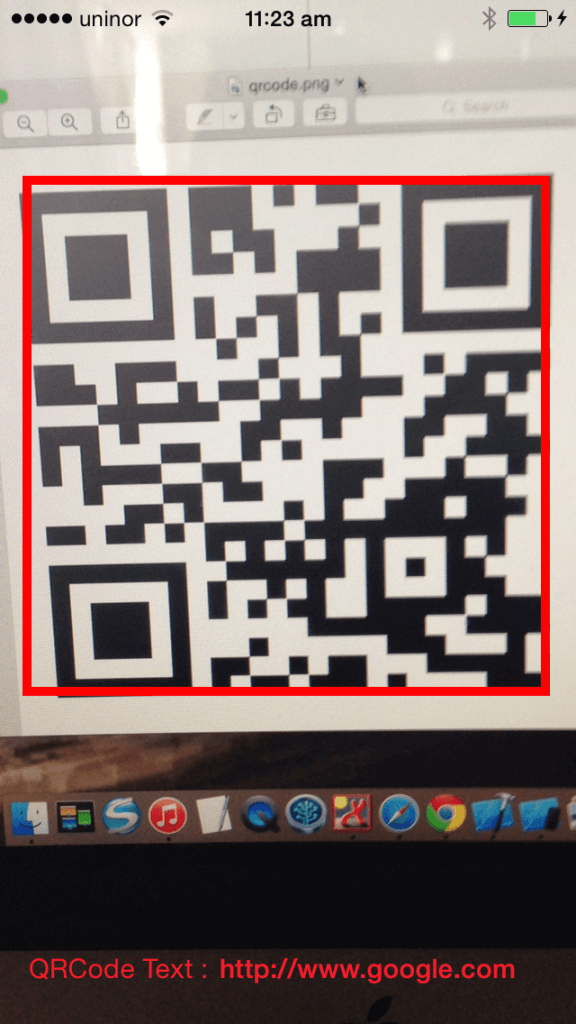
Finally, we read QRCode with above sample QRCode image and our final output looks like:

I hope you find this blog very helpful while working on QRCode Reader in Swift. Let me know in comment if you have any question regarding Swift. I will help you ASAP.

Comments
Post a Comment
Thank You.