
React Native Height and Width

The height and width determine the size of component on the screen. There are two different ways to set the height and width of component: Fixed Dimensions and Flex Dimensions.

Fixed Dimensions

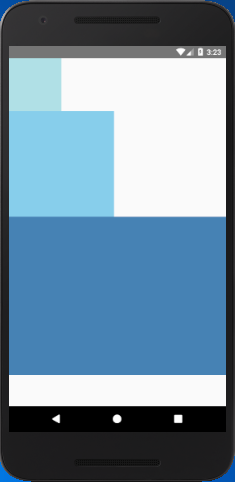
Using fixed height and fixed width in style is the simplest way to set the dimension of the component. The dimensions of React Native component are unit-less, and they represent density-independent pixels.
Setting the dimension of component with fixed size is common and exactly the same size, regardless of screen dimensions.

  1. import React, { Component } from 'react';  
  2. import { StyleSheet, View } from 'react-native';  
  3.   
  4. export default class HeightWidth extends Component {  
  5.     render() {  
  6.         return (  
  7.             <View>  
  8.                 <View style={styles.powderblue} />  
  9.                 <View style={styles.skyblue} />  
  10.                 <View style={styles.steelblue} />  
  11.             </View>  
  12.         );  
  13.     }  
  14. }  
  15. const styles = StyleSheet.create({  
  16.     powderblue:{  
  17.         width: 100, height: 100, backgroundColor: 'powderblue'  
  18.     },  
  19.     skyblue:{  
  20.         width: 200, height: 200, backgroundColor: 'skyblue'  
  21.     },  
  22.     steelblue:{  
  23.         height: 300, backgroundColor: 'steelblue'  
  24.     },  
  25. })  
Output
React Native Height and Width

Flex Dimensions

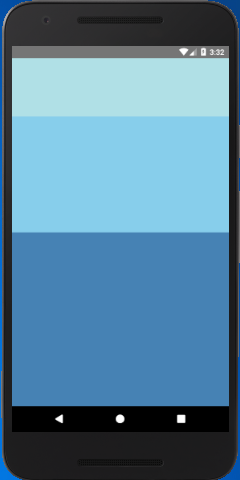
The flex property styles the component to expand and shrink it dynamically according to available space. Setting flex: 1 will fill all the available space to the component, and shared evenly among the other components of same as the parent. Higher the flex value, occupy component higher ratio of space compared to its siblings.
  1.  import React, { Component } from 'react';  
  2. import { StyleSheet, View } from 'react-native';  
  3.   
  4. export default class HeightWidth extends Component {  
  5.     render() {  
  6.         return (  
  7.             <View style={styles.container}>  
  8.                 <View style={styles.powderblue} />  
  9.                 <View style={styles.skyblue} />  
  10.                 <View style={styles.steelblue} />  
  11.             </View>  
  12.         );  
  13.     }  
  14. }  
  15. const styles = StyleSheet.create({  
  16.     container:{  
  17.       flex:1  
  18.     },  
  19.     powderblue:{  
  20.         flex:1,  
  21.         backgroundColor: 'powderblue',  
  22.     },  
  23.     skyblue:{  
  24.         flex:2,  
  25.         backgroundColor: 'skyblue',  
  26.     },  
  27.     steelblue:{  
  28.         flex:3,  
  29.         backgroundColor: 'steelblue',  
  30.     },  
  31. })  
Output
React Native Height and Width

Comments

Popular Posts

How I Reduced the Size of My React Native App by 85%

How and Why You Should Do It I borrowed 25$ from my friend to start a Play Store Developer account to put up my first app. I had already created the app, created the assets and published it in the store. Nobody wants to download a todo list app that costs 25mb of bandwidth and another 25 MB of storage space. So today I am going to share with you how I reduced the size of Tet from 25 MB to around 3.5 MB. Size Matters Like any beginner, I wrote my app using Expo, the awesome React Native platform that makes creating native apps a breeze. There is no native setup, you write javascript and Expo builds the binaries for you. I love everything about Expo except the size of the binaries. Each binary weighs around 25 MB regardless of your app. So the first thing I did was to migrate my existing Expo app to React Native. Migrating to React Native react-native init  a new project with the same name Copy the  source  files over from Expo project Install all de...

How to recover data of your Android KeyStore?

These methods can save you by recovering Key Alias and Key Password and KeyStore Password. This dialog becomes trouble to you? You should always keep the keystore file safe as you will not be able to update your previously uploaded APKs on PlayStore. It always need same keystore file for every version releases. But it’s even worse when you have KeyStore file and you forget any credentials shown in above box. But Good thing is you can recover them with certain tricks [Yes, there are always ways]. So let’s get straight to those ways. 1. Check your log files → For  windows  users, Go to windows file explorer C://Users/your PC name/.AndroidStudio1.4 ( your android studio version )\system\log\idea.log.1 ( or any old log number ) Open your log file in Notepad++ or Any text editor, and search for: android.injected.signing and if you are lucky enough then you will start seeing these. Pandroid.injected.signing.store.file = This is  file path where t...

React Native - Text Input

In this chapter, we will show you how to work with  TextInput  elements in React Native. The Home component will import and render inputs. App.js import React from 'react' ; import Inputs from './inputs.js' const App = () => { return ( < Inputs /> ) } export default App Inputs We will define the initial state. After defining the initial state, we will create the  handleEmail  and the  handlePassword  functions. These functions are used for updating state. The  login()  function will just alert the current value of the state. We will also add some other properties to text inputs to disable auto capitalisation, remove the bottom border on Android devices and set a placeholder. inputs.js import React , { Component } from 'react' import { View , Text , TouchableOpacity , TextInput , StyleSheet } from 'react-native' class Inputs extends Component { state = { ...