
React Native Moving Between Screens

In this section, we will discuss how to navigate from one route screen to another route screen and come back to the initial route. In the previous part of Navigation, we created the stack navigator with two route screens (Home and Profile).
Moving from one screen to another is performed by using the navigation prop, which passes down our screen components. It is similar to write the below code for a web browser:

  1. <a href="profiles.html">Go to Profile</a>  

The other way to write this would be:


  1. <a onClick={() => { document.location.href = 
    "profile.html"; }}>Go to Profile</a>  

Navigate to the new screen

Navigation from one screen to another screen is performed in different ways:
  1. <Button  
  2.           title="Go to URL"  
  3.           onPress={() => this.props.navigation.navigate('url')}  
  4.         />  

App.js

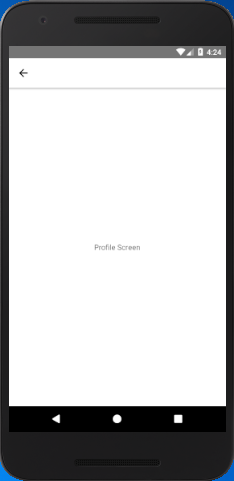
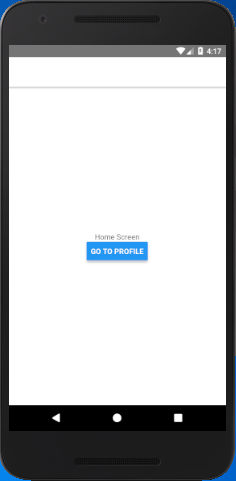
Add a Button component in 'HomeScreen' and perform an onPress{} action which calls the this.props.navigation.navigate('Profile') function. Clicking the Button component moves screen to 'ProfileScreen' layout.

  1. import React from 'react';  
  2. import { View, Text, Button } from 'react-native';  
  3. import { createStackNavigator, createAppContainer } from 'react-navigation';  
  4.   
  5. class HomeScreen extends React.Component {  
  6.     render() {  
  7.         return (  
  8.             <View style={{ flex: 1, alignItems: 'center', justifyContent: 'center' }}>  
  9.                 <Text>Home Screen</Text>  
  10.                 <Button  
  11.                     title="Go to Profile"  
  12.                     onPress={() => this.props.navigation.navigate('Profile')}  
  13.                 />  
  14.             </View>  
  15.         );  
  16.     }  
  17. }  
  18. class ProfileScreen extends React.Component {  
  19.     render() {  
  20.         return (  
  21.             <View style={{ flex: 1, alignItems: "center", justifyContent: "center" }}>  
  22.                 <Text>Profile Screen</Text>  
  23.             </View>  
  24.     );  
  25.     }  
  26. }  
  27.   
  28. const AppNavigator = createStackNavigator(  
  29.     {  
  30.         Home: HomeScreen,  
  31.         Profile: ProfileScreen  
  32.     },  
  33.     {  
  34.         initialRouteName: "Home"  
  35.     }  
  36. );  
  37.   
  38. const AppContainer = createAppContainer(AppNavigator);  
  39. export default class App extends React.Component {  
  40.     render() {  
  41.         return <AppContainer />;  
  42.     }  
  43. }  

Output:

React Native Moving Between Screens React Native Moving Between Screens
  • this.props.navigation: The navigation prop is passed the every screen component in stack navigation.
  • navigate('Profile'): Call the navigate function with the route name where we want to move.

Navigate to a route screen multiple times

Adding navigation from 'ProfileScreen' to 'Profile' URL doesn't make any change because we are already at Profile route.

  1. class ProfileScreen extends React.Component {  
  2.     render() {  
  3.         return (  
  4.             <View style={{ flex: 1, alignItems: "center", justifyContent: "center" }}>  
  5.                 <Text>Profile Screen</Text>  
  6.                    <Button  
  7.                      title="Go to Profile"  
  8.                      onPress={() => this.props.navigation.navigate('Profile')}  
  9.                    />  
  10.              </View>  
  11.     );  
  12.     }  
  13. }  

To call the profiles screen, mainly in the case of passing unique data (params) to each route. To do this, we change navigate to push. The navigate push expresses the intent to add another route disregarding the existing navigation history.

  1. <Button  
  2.         title="Go to Profile"  
  3.          onPress={() => this.props.navigation.push('Profile')}  
  4. />  
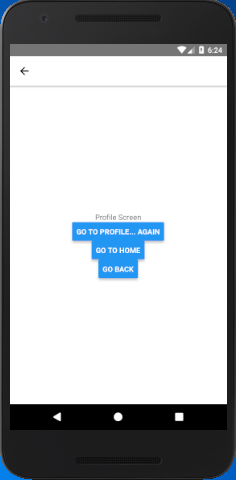
On pressing the button call push method each time and add a new route to the navigation stack.

Going back

The header of stack navigator automatically includes a back button when there is a possibility to go back from the current screen. The single screen stack navigation doesn't provide the back button as there is nothing where we can go back.
Sometimes, we programmatically implement the back behavior, for that we can call this.props.navigation.goBack(); function.

App.js

  1. import React from 'react';  
  2. import { View, Text, Button } from 'react-native';  
  3. import { createStackNavigator, createAppContainer } from 'react-navigation';  
  4.   
  5. class HomeScreen extends React.Component {  
  6.     render() {  
  7.         return (  
  8.             <View style={{ flex: 1, alignItems: 'center', justifyContent: 'center' }}>  
  9.                 <Text>Home Screen</Text>  
  10.                 <Button  
  11.                     title="Go to Profile"  
  12.                     onPress={() => this.props.navigation.push('Profile')}  
  13.                 />  
  14.             </View>  
  15.         );  
  16.     }  
  17. }  
  18. class ProfileScreen extends React.Component {  
  19.     render() {  
  20.         return (  
  21.             <View style={{ flex: 1, alignItems: "center", justifyContent: "center" }}>  
  22.                 <Text>Profile Screen</Text>  
  23.                 <Button  
  24.                     title="Go to Profile... again"  
  25.                     onPress={() => this.props.navigation.push('Profile')}  
  26.                 />  
  27.                 <Button  
  28.                     title="Go to Home"  
  29.                     onPress={() => this.props.navigation.navigate('Home')}  
  30.                  />  
  31.                 <Button  
  32.                     title="Go back"  
  33.                     onPress={() => this.props.navigation.goBack()}  
  34.                 />  
  35.             </View>  
  36.     );  
  37.     }  
  38. }  
  39.   
  40. const AppNavigator = createStackNavigator(  
  41.     {  
  42.         Home: HomeScreen,  
  43.         Profile: ProfileScreen  
  44.     },  
  45.     {  
  46.         initialRouteName: "Home"  
  47.     }  
  48. );  
  49.   
  50. const AppContainer = createAppContainer(AppNavigator);  
  51. export default class App extends React.Component {  
  52.     render() {  
  53.         return <AppContainer />;  
  54.     }  
  55. }  

Output:

React Native Moving Between Screens React Native Moving Between Screens

Comments

Popular Posts

What are the Alternatives of device UDID in iOS? - iOS7 / iOS 6 / iOS 5 – Get Device Unique Identifier UDID

Get Device Unique Identifier UDID Following code will help you to get the unique-device-identifier known as UDID. No matter what iOS user is using, you can get the UDID of the current iOS device by following code. - ( NSString *)UDID { NSString *uuidString = nil ; // get os version NSUInteger currentOSVersion = [[[[[UIDevice currentDevice ] systemVersion ] componentsSeparatedByString: @" . " ] objectAtIndex: 0 ] integerValue ]; if (currentOSVersion <= 5 ) { if ([[ NSUserDefaults standardUserDefaults ] valueForKey: @" udid " ]) { uuidString = [[ NSUserDefaults standardDefaults ] valueForKey: @" udid " ]; } else { CFUUIDRef uuidRef = CFUUIDCreate ( kCFAllocatorDefault ); uuidString = ( NSString *) CFBridgingRelease ( CFUUIDCreateString ( NULL ,uuidRef)); CFRelease (uuidRef); [[ NSUserDefaults standardUserDefaults ] setObject: uuidString ForKey: @" udid " ]; [[ NSUserDefaults standardUserDefaults ] synchro...

16 AWS Gotchas

16 AWS Gotchas In January I launched the MVP for my own startup,  Proximistyle , which helps you find what you’re looking for nearby. On advice from friends and industry contacts I chose AWS as my cloud provider. Having never had to set up my own cloud infrastructure before, the learning curve to get from no experience to a stable VPC system I was happy with was significantly steeper than expected, and had its fair share of surprises. #1 Take advantage of the free resources offered AWS offers a free tier for new accounts. If you have recently bought a domain and set up a company you qualify for the free tier for a year. Additionally, if you are a bootstrapped startup you can apply for  the Startup Builders package  and get $1000 in AWS credits. After doing the above, you’re now ready to get started with setting up the AWS infrastructure for your startup. #2 Set up billing budgets and alerting The very first thing you should do after setting up billing, is enabling a budge...

Ultimate Folder Structure For Your React Native Project

  Ultimate Folder Structure For Your React Native Project React native project structure React Native is a flexible framework, giving developers the freedom to choose their code structure. However, this can be a double-edged sword for beginners. Though it offers ease of coding, it can soon become challenging to manage as your project expands. Thus, a structured folder system can be beneficial in many ways like better organization, simplified module management, adhering to coding practices, and giving a professional touch to your project. This write-up discusses a version of a folder arrangement that I employ in my React Native projects. This structure is based on best practices and can be modified to suit the specific needs of your project. Before we get into the project structure let’s give credit to @sanjay who has the original idea of the structure but I modify his version of the code, to make it better. Base library axios  — For network calling. react-navigation ...