
React Native Passing Value between Screen

While creating an app containing multiple screens, then sometimes it is required to pass value between one screen to another. This can be achieved by using this.props.navigation.navigate() function.
This function is used to navigate between the different screens.

Example

In this example, we will input the value in the first screen and get it into the second screen.
The value (param) is passed as an object in the first screen to the navigation.navigate function as:

  1. this.props.navigation.navigate('RouteName', { /* params go here */ })   

The same value (param) is read in the second screen as:

  1. this.props.navigation.getParam(paramName, defaultValue)   
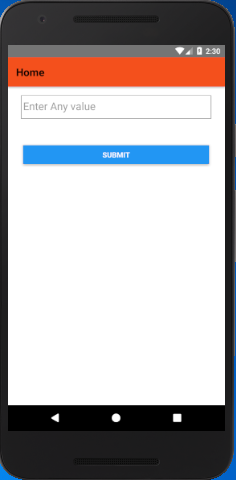
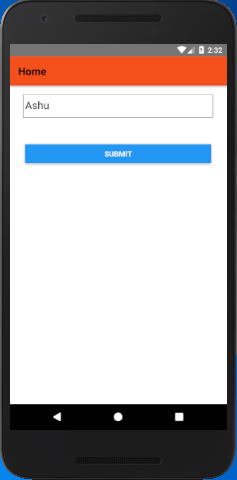
Create a HomeScreen.js file and add a TextInput component for input value and a Button to submit. The TextInput component has an onChangeText prop which takes a function which is to be called whenever the text changed.

HomeScreen.js

  1. import React from 'react';  
  2. //import react in our code.  
  3. import { StyleSheet, View, Button, TextInput } from 'react-native';  
  4.   
  5. export default class HomeScreen extends React.Component {  
  6.   
  7.     constructor(props) {  
  8.         //constructor to set default state  
  9.         super(props);  
  10.         this.state = {  
  11.             username: '',  
  12.         };  
  13.     }  
  14.     static navigationOptions = {  
  15.         title: 'Home',  
  16.         headerStyle: {  
  17.             backgroundColor: '#f4511e',  
  18.         },  
  19.         //headerTintColor: '#0ff',  
  20.         headerTitleStyle: {  
  21.             fontWeight: 'bold',  
  22.         },  
  23.     };  
  24.   
  25.     render() {  
  26.         const { navigate } = this.props.navigation;  
  27.         return (  
  28.             //View to hold our multiple components  
  29.             <View style={styles.container}>  
  30.             {/*Input to get the value from the user*/}  
  31.             <TextInput  
  32.         value={this.state.username}  
  33.         onChangeText={username => this.setState({ username })}  
  34.         placeholder={'Enter Any value'}  
  35.         style={styles.textInput}  
  36.         />  
  37.         <View style={styles.buttonStyle}>  
  38.             <Button  
  39.         title="Submit"  
  40.         // color="#00B0FF"  
  41.         onPress={() =>  
  42.         this.props.navigation.navigate('Profile', {  
  43.             userName: this.state.username,  
  44.             otherParam: '101',  
  45.         })  
  46.     }  
  47.         />  
  48.         </View>  
  49.         </View>  
  50.     );  
  51.     }  
  52. }  
  53. const styles = StyleSheet.create({  
  54.     container: {  
  55.         flex: 1,  
  56.         backgroundColor: '#fff',  
  57.         alignItems: 'center',  
  58.         padding: 16,  
  59.     },  
  60.     textInput: {  
  61.         height: 45,width: "95%",borderColor: "gray",borderWidth: 1,fontSize:20,  
  62.     },  
  63.     buttonStyle:{  
  64.         width: "93%",  
  65.         marginTop: 50,  
  66.         backgroundColor: "red",  
  67.     }  
  68. });  

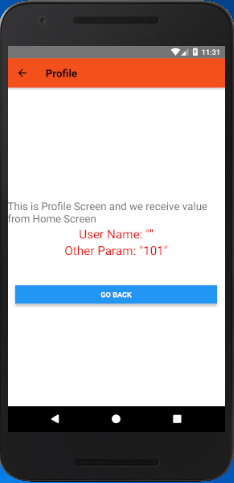
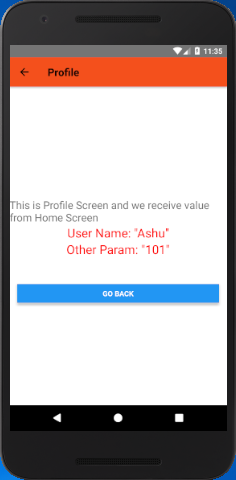
In the above code userName: this.state.username, store the value input into the TextInput component and otherParam: '101' directly assign a value. On clicking the Button userName and otherParam is passed to Profile screen.

ProfileScreen.js

In this screen, we receive the value of userName and otherParam using navigation.getParam('paramValue', default value) and stored into object user_name and other_param respectively. The value of JavaScript object is converted to string using JSON.stringify(object) function.

  1. import React from 'react';  
  2. import { StyleSheet, View, Text, Button } from 'react-native';  
  3.   
  4. export default class ProfileScreen extends React.Component {  
  5.     static navigationOptions = {  
  6.         title: 'Profile',  
  7.         headerStyle: {  
  8.             backgroundColor: '#f4511e',  
  9.         },  
  10.         //headerTintColor: '#0ff',  
  11.         headerTitleStyle: {  
  12.             fontWeight: 'bold',  
  13.         },  
  14.     };  
  15.     render() {  
  16.         {/*Using the navigation prop we can get the 
  17.               value passed from the previous screen*/}  
  18.         const { navigation } = this.props;  
  19.         const user_name = navigation.getParam('userName''NO-User');  
  20.         const other_param = navigation.getParam('otherParam''some default value');  
  21.         return (  
  22.             <View style={{ flex: 1, alignItems: "center", justifyContent: "center" }}>  
  23.                 <Text style={{ marginTop: 16,fontSize: 20,}}>  
  24.                     This is Profile Screen and we receive value from Home Screen  
  25.                 </Text>  
  26.                 <Text style={styles.textStyle}>User Name: {JSON.stringify(user_name)}</Text>  
  27.                 <Text style={styles.textStyle}>Other Param: {JSON.stringify(other_param)}</Text>  
  28.                 <View style={styles.buttonStyle}>  
  29.                 <Button  
  30.                     title="Go back"  
  31.                     onPress={() => this.props.navigation.goBack()}  
  32.                 />  
  33.                 </View>  
  34.             </View>  
  35.         );  
  36.     }  
  37. }  
  38. const styles = StyleSheet.create({  
  39.     textStyle: {  
  40.         fontSize: 23,  
  41.         textAlign: 'center',  
  42.         color: '#f00',  
  43.     },  
  44.   
  45.     buttonStyle:{  
  46.         width: "93%",  
  47.         marginTop: 50,  
  48.         backgroundColor: "red",  
  49.     }  
  50. });  

App.js

Create the App.js file as it is the entry point of the app and imports the HomeScreen and ProfileScreen. The HomeScreen set as the first screen using the initialRouteName.

  1. import React from 'react';  
  2. import {createStackNavigator,createAppContainer} from 'react-navigation';  
  3. import HomeScreen from './HomeScreen';  
  4. import ProfileScreen from './ProfileScreen';  
  5.   
  6. const AppNavigator = createStackNavigator(  
  7.     {  
  8.         Home: HomeScreen,  
  9.         Profile: ProfileScreen  
  10.     },  
  11.     {  
  12.         initialRouteName: "Home"  
  13.     }  
  14. );  
  15. export default createAppContainer(AppNavigator);  
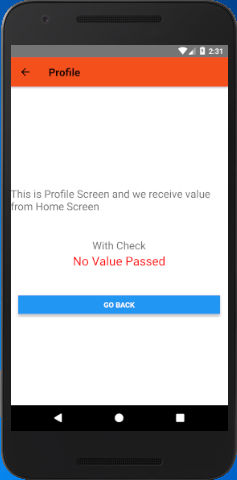
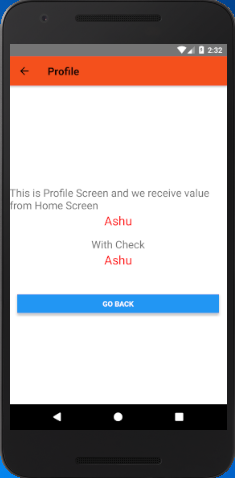
Output:

React Native Passing Value between Screen React Native Passing Value between Screen

We also send and receive the parameters into JSON such as:

HomeScreen.js

  1. onPress={() =>  
  2.     navigate('Profile', {  
  3.         JSON_ListView_Clicked_Item: this.state.username,  
  4.     })  
  5. }  

ProfileScreen.js

This screen read the value in two ways without checking.

  1. {this.props.navigation.state.params.JSON_ListView_Clicked_Item}  
Or checking the input value is null or not

  1. {this.props.navigation.state.params.JSON_ListView_Clicked_Item  
  2.    ? this.props.navigation.state.params.JSON_ListView_Clicked_Item  
  3.     : 'No Value Passed'}  

  1. <Text style={styles.textStyle}>  
  2.         {this.props.navigation.state.params.JSON_ListView_Clicked_Item}  
  3.     </Text>  
  4. <Text style={{ marginTop: 16,fontSize: 20, }}>With Check</Text>  
  5.     {/*If you want to check the value is passed or not, 
  6.             you can use conditional operator.*/}  
  7. <Text style={styles.textStyle}>  
  8.     {this.props.navigation.state.params.JSON_ListView_Clicked_Item  
  9.         ? this.props.navigation.state.params.JSON_ListView_Clicked_Item  
  10.         : 'No Value Passed'}  

Output:

React Native Passing Value between Screen React Native Passing Value between Screen

Comments

Popular Posts

How I Reduced the Size of My React Native App by 85%

How and Why You Should Do It I borrowed 25$ from my friend to start a Play Store Developer account to put up my first app. I had already created the app, created the assets and published it in the store. Nobody wants to download a todo list app that costs 25mb of bandwidth and another 25 MB of storage space. So today I am going to share with you how I reduced the size of Tet from 25 MB to around 3.5 MB. Size Matters Like any beginner, I wrote my app using Expo, the awesome React Native platform that makes creating native apps a breeze. There is no native setup, you write javascript and Expo builds the binaries for you. I love everything about Expo except the size of the binaries. Each binary weighs around 25 MB regardless of your app. So the first thing I did was to migrate my existing Expo app to React Native. Migrating to React Native react-native init  a new project with the same name Copy the  source  files over from Expo project Install all de...

How to recover data of your Android KeyStore?

These methods can save you by recovering Key Alias and Key Password and KeyStore Password. This dialog becomes trouble to you? You should always keep the keystore file safe as you will not be able to update your previously uploaded APKs on PlayStore. It always need same keystore file for every version releases. But it’s even worse when you have KeyStore file and you forget any credentials shown in above box. But Good thing is you can recover them with certain tricks [Yes, there are always ways]. So let’s get straight to those ways. 1. Check your log files → For  windows  users, Go to windows file explorer C://Users/your PC name/.AndroidStudio1.4 ( your android studio version )\system\log\idea.log.1 ( or any old log number ) Open your log file in Notepad++ or Any text editor, and search for: android.injected.signing and if you are lucky enough then you will start seeing these. Pandroid.injected.signing.store.file = This is  file path where t...

React Native - Text Input

In this chapter, we will show you how to work with  TextInput  elements in React Native. The Home component will import and render inputs. App.js import React from 'react' ; import Inputs from './inputs.js' const App = () => { return ( < Inputs /> ) } export default App Inputs We will define the initial state. After defining the initial state, we will create the  handleEmail  and the  handlePassword  functions. These functions are used for updating state. The  login()  function will just alert the current value of the state. We will also add some other properties to text inputs to disable auto capitalisation, remove the bottom border on Android devices and set a placeholder. inputs.js import React , { Component } from 'react' import { View , Text , TouchableOpacity , TextInput , StyleSheet } from 'react-native' class Inputs extends Component { state = { ...