
React Native Tab Navigation

React Native Tab Navigation is the most common navigation style in the mobile applications. The Tab Navigation is tabbed at the bottom of the screen or on the top below the header or sometimes as a header. It is used to switch between different route screens.
To create Tab-based navigation, import createBottomTabNavigator and createAppContainer in the root functions of the react-navigation library.

Bottom Tab Navigator Configuration

There are various configurable props of BottomTabNavigator. Some of them are:


PropDescription
initialRouteNameIt defines the initial tab route when the app first loads.
orderIt is an array of route screen, which sets the order of the tabs.
pathsIt provides the mapping of route screen to path config, which overrides the paths set in the routeConfigs.
lazySetting it as {true} makes the tab to rendered when the tab becomes active for the first time. If it is set to false, all tabs are rendered immediately. Its default value is true.
tabBarComponentIt overrides the component, which is used as the tab bar. It is optional.
tabBarOptionsIt is an object of the following properties: activeTintColor, activeBackgroundColor, inactiveTintColor , inactiveBackgroundColor, showLabel, showIcon, style, labelStyle, tabStyle, allowFontScaling.

Tab - based navigation Example

Create the two classes named as HomeScreen and ProfileScreen. Register these classes in createBottomTabNavigator function with Home and Profile tab respectively.

  1. import React from 'react';  
  2. import { StyleSheet, Text, View } from 'react-native';  
  3. import { createBottomTabNavigator, createAppContainer } from 'react-navigation';  
  4.   
  5. class HomeScreen extends React.Component {  
  6.     render() {  
  7.         return (  
  8.             <View style={styles.container}>  
  9.                 <Text>Home Screen</Text>  
  10.             </View>  
  11.         );  
  12.     }  
  13. }  
  14. class ProfileScreen extends React.Component {  
  15.     render() {  
  16.         return (  
  17.             <View style={styles.container}>  
  18.                 <Text>Profile Screen</Text>  
  19.             </View>  
  20.         );  
  21.     }  
  22. }  
  23.   
  24. const TabNavigator = createBottomTabNavigator({  
  25.     Home: HomeScreen,  
  26.     Profile: ProfileScreen,  
  27. });  
  28. const styles = StyleSheet.create({  
  29.     container: {  
  30.         flex: 1,  
  31.         justifyContent: 'center',  
  32.         alignItems: 'center'  
  33.     },  
  34. });  
  35.   
  36. export default createAppContainer(TabNavigator);  

Output:

React Native Tab Navigation React Native Tab Navigation

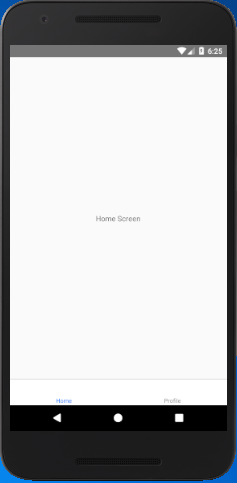
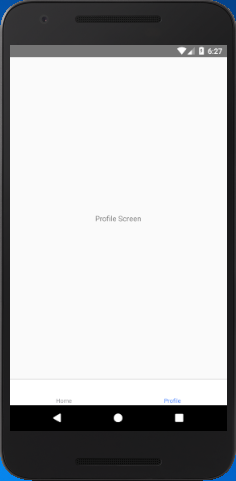
If we set the initialRouteName: "Profile" then, it loads the "ProfileScreen" as an initial route tab.

  1. const TabNavigator = createBottomTabNavigator({  
  2.         Home: HomeScreen,  
  3.         Profile: ProfileScreen,  
  4.     },  
  5.     {  
  6.         initialRouteName: "Profile"  
  7.     }  
  8. );  

Comments

Popular Posts

Reloading UITableView while Animating Scroll in iOS 11

Reloading UITableView while Animating Scroll Calling  reloadData  on  UITableView  may not be the most efficient way to update your cells, but sometimes it’s easier to ensure the data you are storing is in sync with what your  UITableView  is showing. In iOS 10  reloadData  could be called at any time and it would not affect the scrolling UI of  UITableView . However, in iOS 11 calling  reloadData  while your  UITableView  is animating scrolling causes the  UITableView  to stop its scroll animation and not complete. We noticed this is only true for scroll animations triggered via one of the  UITableView  methods (such as  scrollToRow(at:at:animated:) ) and not for scroll animations caused by user interaction. This can be an issue when server responses trigger a  reloadData  call since they can happen at any moment, possibly when scroll animation is occurring. Example of s...

What are the Alternatives of device UDID in iOS? - iOS7 / iOS 6 / iOS 5 – Get Device Unique Identifier UDID

Get Device Unique Identifier UDID Following code will help you to get the unique-device-identifier known as UDID. No matter what iOS user is using, you can get the UDID of the current iOS device by following code. - ( NSString *)UDID { NSString *uuidString = nil ; // get os version NSUInteger currentOSVersion = [[[[[UIDevice currentDevice ] systemVersion ] componentsSeparatedByString: @" . " ] objectAtIndex: 0 ] integerValue ]; if (currentOSVersion <= 5 ) { if ([[ NSUserDefaults standardUserDefaults ] valueForKey: @" udid " ]) { uuidString = [[ NSUserDefaults standardDefaults ] valueForKey: @" udid " ]; } else { CFUUIDRef uuidRef = CFUUIDCreate ( kCFAllocatorDefault ); uuidString = ( NSString *) CFBridgingRelease ( CFUUIDCreateString ( NULL ,uuidRef)); CFRelease (uuidRef); [[ NSUserDefaults standardUserDefaults ] setObject: uuidString ForKey: @" udid " ]; [[ NSUserDefaults standardUserDefaults ] synchro...

Xcode & Instruments: Measuring Launch time, CPU Usage, Memory Leaks, Energy Impact and Frame Rate

When you’re developing applications for modern mobile devices, it’s vital that you consider the performance footprint that it has on older devices and in less than ideal network conditions. Fortunately Apple provides several powerful tools that enable Engineers to measure, investigate and understand the different performance characteristics of an application running on an iOS device. Recently I spent some time with these tools working to better understand the performance characteristics of an eCommerce application and finding ways that we can optimise the experience for our users. We realised that applications that are increasingly performance intensive, consume excessive amounts of memory, drain battery life and feel uncomfortably slow are less likely to retain users. With the release of iOS 12.0 it’s easier than ever for users to find applications that are consuming the most of their device’s finite amount of resources. Users can now make informed decisions abou...