In this tutorial, we are going to build a chatbot application from scratch using Kompose ( Kommunicate Chatbot) and React Native.
We’ll do the integration in 2 phases:
- Create a Kompose chatbot and set up the answers.
- Add the created chatbot to your React Native.Let’s jump right into it.
Phase 1: Create a chatbot in Kompose and setup the answers
Step 1: Setup an account in Kommunicate
If you do not have an account in Kommunicate, you can create one here for free.
Next, log in to your Kommunicate dashboard and navigate to the Bot Integration section. Locate the Kompose section and click on Integrate Bot.

If you want to build a bot from scratch, select a blank template and go to the Set up your bot section. Select the name of your Bot, your bot’s Avatar, and your bot’s default language and click “Save and Proceed”.

You are now done creating your bot and all you have to worry about now is to “Enable bot to human transfer” when the bot encounters a query it does not understand. Enable this feature and click “Finish Bot Setup.”

From the next page, you can choose if this bot will handle all the incoming conversations. Click on “Let this bot handle all the conversations” and you are good to go.

Newly created bot here: Dashboard →Bot Integration → Manage Bots.
Step 2: Create welcome messages & answers for your chatbot
Go to the ‘Kompose – Bot Builder’ section and select the bot you created.
First, set the welcome message for your chatbot. The welcome message is the first message that the chatbot sends to the user who initiates a chat.
Click the “Welcome Message” section. In the “Enter Welcome message – Bot’s Message” box, provide the message your chatbot should be shown to the users when they open the chat and then save the welcome intent.
After creating the welcome message, the next step is to feed answers/intents. These answers/intents can be the common questions about your product and service.
The answers section is where you’ve to add all the user’s messages and the chatbot responses.
Go to the “Answer” section, click +Add, then give an ‘Intent name’
In the Configure user’s message section – you need to mention the phrases that you expect from the users that will trigger.

Configure bot’s reply section – you need to mention the responses (Text or as Rich messages) the chatbot will deliver to the users for the particular message. You can add any number of answers and follow-up responses for the chatbot. Here, I have used custom payload by selecting the “Custom” option in the “More” option.
Once you have configured the responses, you need to click on “Train Bot” which is at the button right and to the left of the preview screen. Once successfully trained, a toast “Anser training completed” will come at the top right corner.

Phase 2: Add the created chatbot to your React Native project:
Step 1: Setup the React Native development environment
https://reactnative.dev/docs/environment-setup
Step 2: Create a React Native app
Create a new React Native app (my-app) by using the command in your terminal or Command Prompt:
npx react-native init my-app
Step 3: Now, navigate to the my-app folder
cd my-app
Step 4: Install Kommunicate to your project
To add the Kommunicate module to you react native application, add it using npm:
npm install react-native-kommunicate-chat --save
Step 5: Add Kommunicate code to your project
Navigate to App.js in your project. By default, a new project contains demo code which are not required. You can remove those codes and write your own code to start a conversation in Kommunicate.
First, import Kommunicate using:
import RNKommunicateChat from 'react-native-kommunicate-chat';
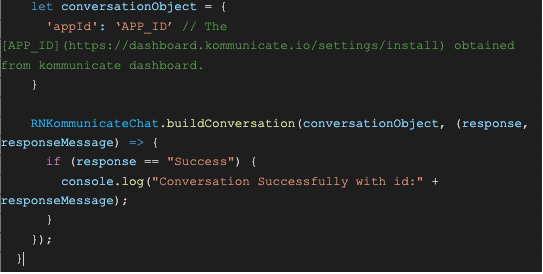
Then, create this a method to open conversation before returning any views:
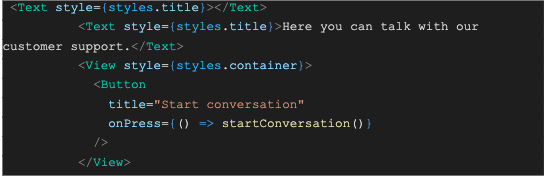
Next, we need to add a button, which when clicked would open a conversation. Add these React elements and return it.
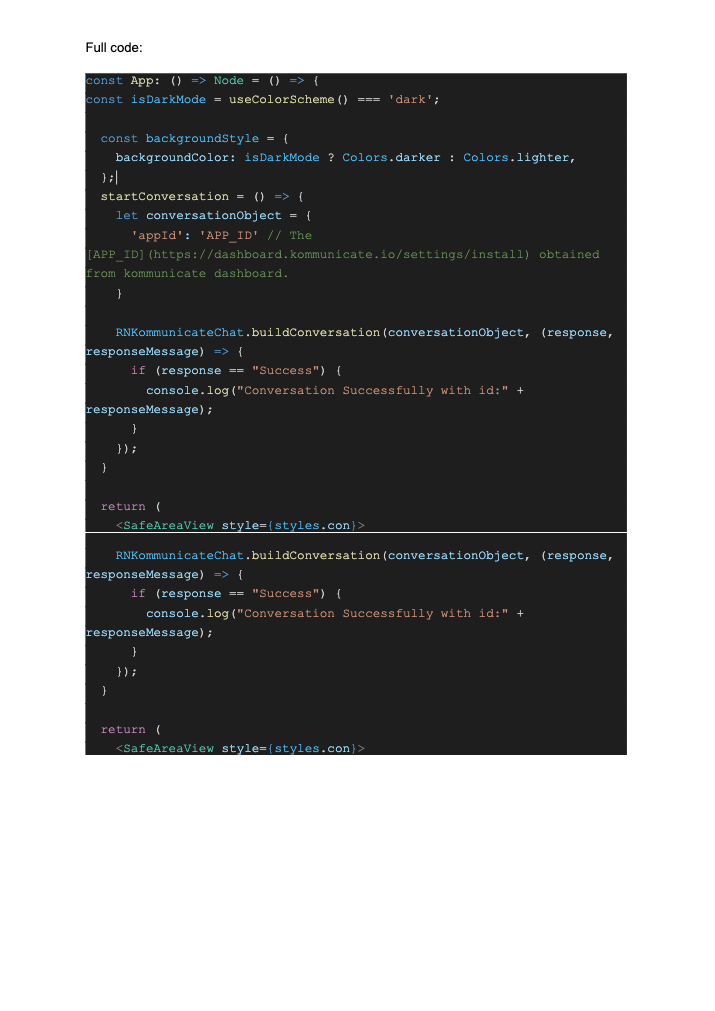
const App: () => Node = () => {
const isDarkMode = useColorScheme() === 'dark';
  const backgroundStyle = {
    backgroundColor: isDarkMode ? Colors.darker : Colors.lighter,
  };
  startConversation = () => {
    let conversationObject = {
      'appId': 'eb775c44211eb7719203f5664b27b59f' // The [APP_ID](https://dashboard.kommunicate.io/settings/install) obtained from kommunicate dashboard.
    }
    RNKommunicateChat.buildConversation(conversationObject, (response, responseMessage) => {
      if (response == "Success") {
        console.log("Conversation Successfully with id:" + responseMessage);
      }
    });
  }
  return (
    <SafeAreaView style={styles.con}>
      <StatusBar barStyle={isDarkMode ? 'light-content' : 'dark-content'} />
      <ScrollView
        contentInsetAdjustmentBehavior="automatic"
        style={backgroundStyle}>
        <Header />
        <View
          style={{
            backgroundColor: isDarkMode ? Colors.black : Colors.white,
          }}>
          <Text style={styles.title}></Text>
          <Text style={styles.title}>Here you can talk with our customer support.</Text>
          <View style={styles.container}>
            <Button
              title="Start conversation"
              onPress={() => startConversation()}
            />
          </View>
        </View>
      </ScrollView>
    </SafeAreaView>
  );
};
Here is my screenshot:

Comments
Post a Comment
Thank You.