Recently, I integrated push notifications in my react native app using react-native-firebase. I came across many challenges during the process of integration to successful implementation, so I thought to share steps with everyone here.
Create Application On Console
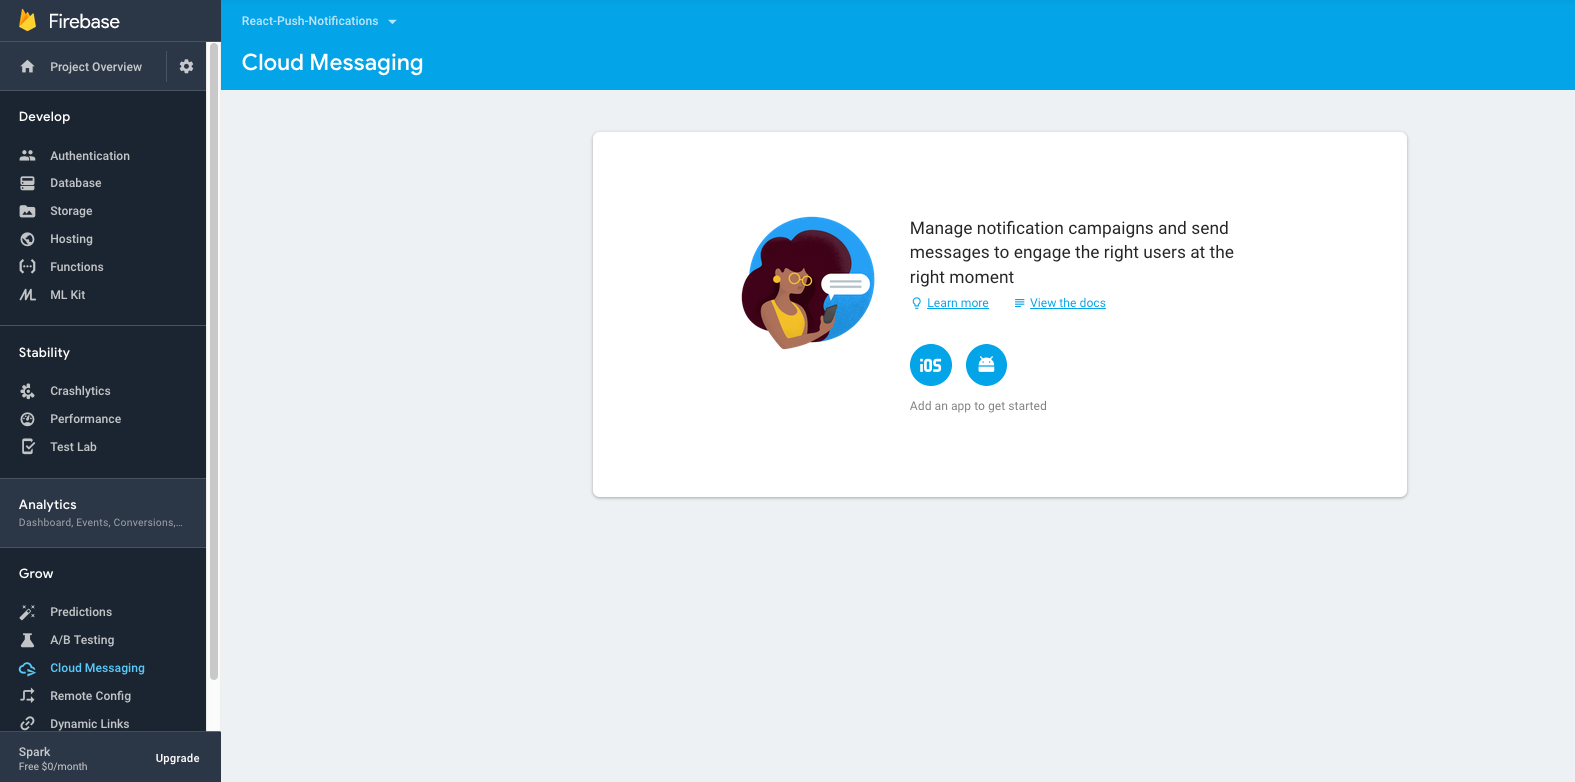
First create an application on Firebase console. Follow steps in Cloud Messaging Section, add iOS and Android apps as per your requirement.
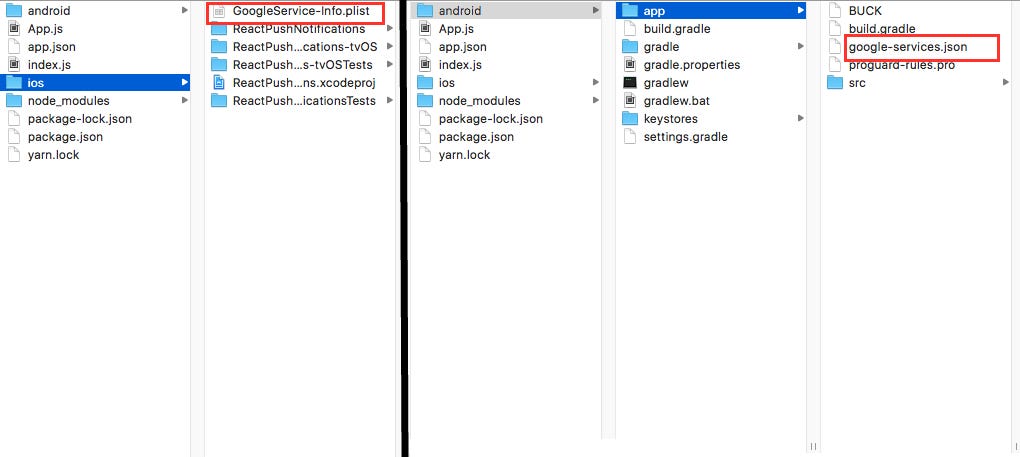
Make sure your google-services.json and GoogleService-Info.plist are placed in correct folders.
Android
Configure gradle files. Please use the latest firebase dependencies available while following this tutorial. You can find official FCM guide here. For your reference, my gradle files are as follows:
App module build gradle snippet
Root build gradle snippet
| dependencies { | |
| implementation fileTree(include: ['*.jar'], dir: 'libs') | |
| implementation 'com.android.support:appcompat-v7:27.1.1' | |
| implementation 'com.facebook.react:react-native:+' | |
| //Add these lines | |
| implementation "com.google.android.gms:play-services-base:15.0.0" | |
| implementation "com.google.firebase:firebase-core:15.0.2" | |
| implementation "com.google.firebase:firebase-messaging:15.0.2" | |
| } | |
| //Put this on bottom of file | |
| apply plugin: 'com.google.gms.google-services' |
App module build gradle snippet
| buildscript { | |
| repositories { | |
| google() | |
| jcenter() | |
| } | |
| dependencies { | |
| classpath 'com.android.tools.build:gradle:3.1.2' | |
| classpath 'com.google.gms:google-services:3.2.1' | |
| } | |
| } |
Root build gradle snippet
iOS
- In Firebase console, you have to include either APNs Authentication Keyor APNs Certificate in Project Settings > Cloud Messaging in order to receive push notifications. Creation of push certificate is out of scope in this tutorial, so here is a nice link for your reference :)
Note: You need two separate push certificates. One for Sandbox Environment (Development Certificate) and other for Production (Distribution Certificate). Both should be uploaded to Firebase Console.
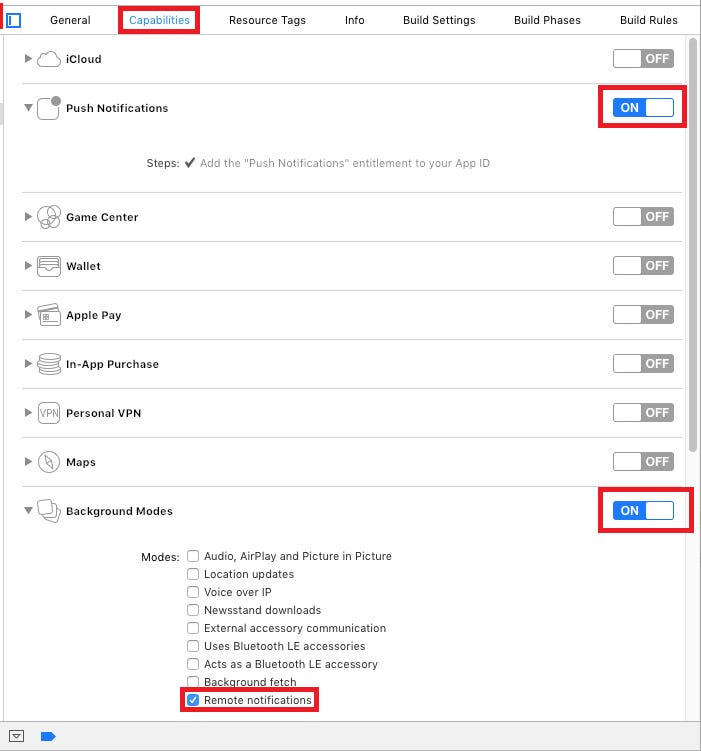
2. Turn on following two capabilities in Xcode. Make sure these are turned on in certificates as well created in step 1.
a) Push Notifications
b) Background Modes - Check only Remote Notifications
Make sure you open<YourProject>.xcworkspacefile using Xcode instead of<YourProject>.xcodeproj.
3. Open Podfile and edit its contents as follows:
Podfile contents snippet
| # Uncomment the next line to define a global platform for your project | |
| platform :ios, '9.0' | |
| target 'ReactPushNotifications' do | |
| # Uncomment the next line if you're using Swift or would like to use dynamic frameworks | |
| # use_frameworks! | |
| # Pods for ReactPushNotifications - Add these lines | |
| pod 'Firebase/Core' | |
| pod 'Firebase/Messaging' | |
| target 'ReactPushNotificationsTests' do | |
| inherit! :search_paths | |
| # Pods for testing | |
| end | |
| end |
Install Firebase Module
Run following command in root folder of your react project.
npm install --save react-native-firebase
You can link firebase node module with native applications using following command:
react-native link react-native-firebase
Here I will be linking firebase node module with native platforms manually without react-native link, since it avoids mess and incomplete bindings most of the times. Moreover, if you are face any issues after linking, you can confirm steps from below that everything is included correctly in native platforms.
Android Setup
- Edit MainApplication.java:
import io.invertase.firebase.RNFirebasePackage;
import io.invertase.firebase.messaging.RNFirebaseMessagingPackage;                       import io.invertase.firebase.notifications.RNFirebaseNotificationsPackage;
@Override
protected List<ReactPackage> getPackages() {
  return Arrays.<ReactPackage>asList(
 new MainReactPackage(),
 new RNFirebasePackage(),
 new RNFirebaseMessagingPackage(),
 new RNFirebaseNotificationsPackage()
 );
}
2. Add these lines in settings.gradle
include ':react-native-firebase' project(':react-native-firebase').projectDir = new File(rootProject.projectDir, '../node_modules/react-native-firebase/android')
3. In app build gradle, add dependency:
dependencies {
   compile(project(':react-native-firebase')) {
       transitive = false
   }
   // ... other dependencies listed
}
Sync gradle. You should be good to go for Android. At this point, we can quickly test notification on Android Device from Firebase Console.
Make sure your application is in background while testing, so that Firebase can automatically deliver to notification tray.
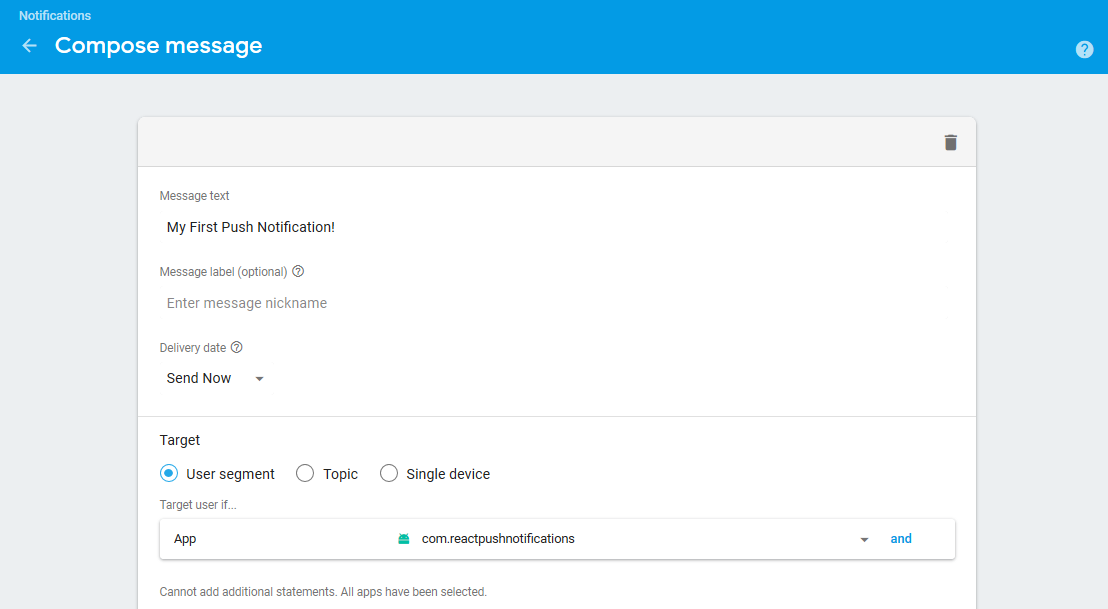
To test on console:
a) Go to Cloud Messaging section on left Pane.
b) Click on Send your first message.
c) Enter text, Select your app in User Segment and click Send Messagebutton. You should be able to receive notification.
iOS Setup
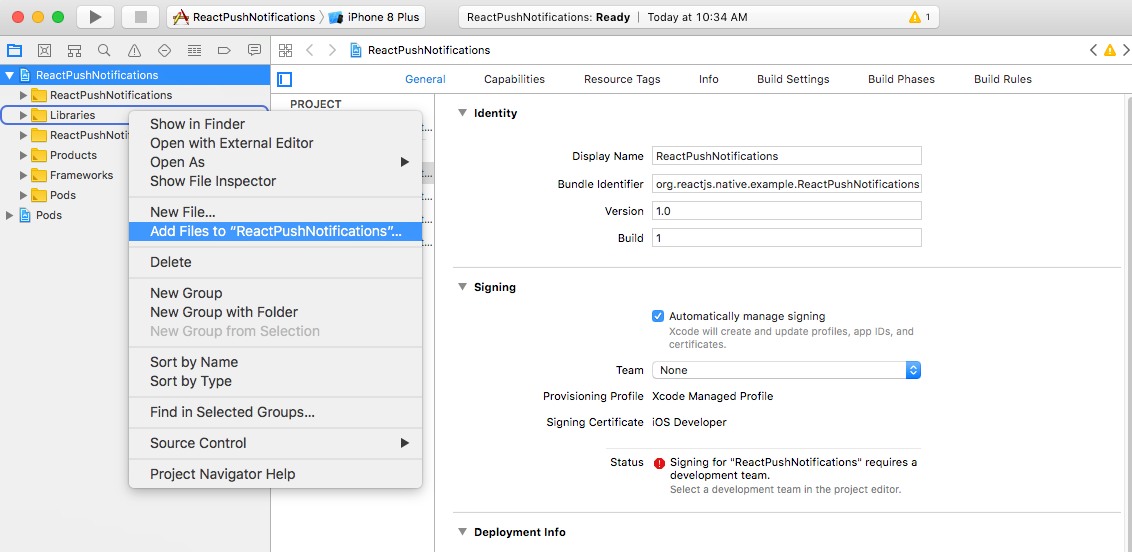
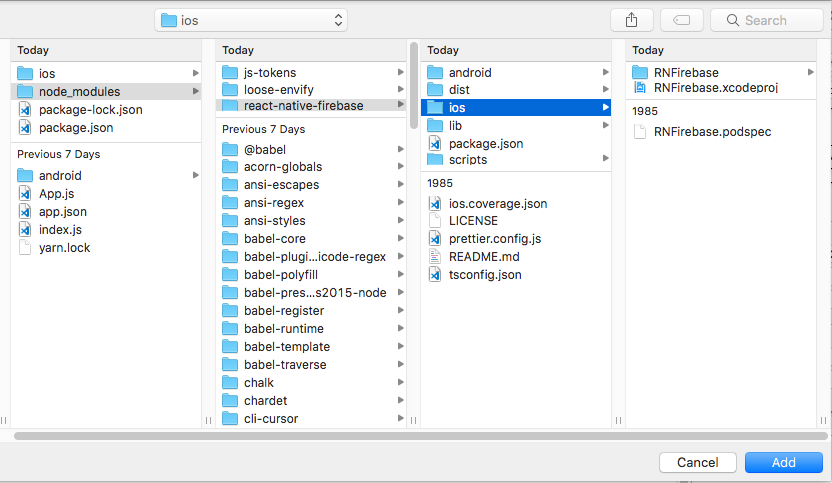
- In Project Navigator, right click Libraries > Add Files To <YourProject>. Navigate to <YourProject>/node_modules/react-native-firebase/ios/. Select RNFirebase.xcodeproj and click Add button.
- Go to Build Phases. Click on the “+” under “Link Binary With Libraries” to add a new library. Add UserNotifications.framework. This framework is required since iOS 10 for push notifications handling.
- Again click “+”, select libRNFirebase.a and add it. If you are unable to find it, clean and build project.
- Go to Build Settings, find Header Search Path, double click its value and press “+” button. Add following line there:
$(SRCROOT)/../node_modules/react-native-firebase/ios/RNFirebase
Use “Cmd +Shift + Enter + K” keys to clear cache and then build project. Now firebase dependencies should be recognised by Xcode.
4. In AppDelegate:
Receive Push Notifications
| #import <UIKit/UIKit.h> | ||||||||||||||||||||||||||||||||||||||||||||||||||||||||||||||||||||||||||||||||||||||||||||||||||||||
| #import <UserNotifications/UserNotifications.h> | ||||||||||||||||||||||||||||||||||||||||||||||||||||||||||||||||||||||||||||||||||||||||||||||||||||||
| @interface AppDelegate : UIResponder <UIApplicationDelegate, UNUserNotificationCenterDelegate> | ||||||||||||||||||||||||||||||||||||||||||||||||||||||||||||||||||||||||||||||||||||||||||||||||||||||
| @property (nonatomic, strong) UIWindow *window; | ||||||||||||||||||||||||||||||||||||||||||||||||||||||||||||||||||||||||||||||||||||||||||||||||||||||
@end
|
Receive Push Notifications
Now lets code the most awaited part… Receiving Notifications!
Handling Permissions
Before app can get any notifications, it is crucial to ask permission from user specially in iOS. If user didn’t allow your app to receive notifications, it can never get any unless user explicitly change it from Settings.
Open main component of your React Native app, from where basically routing starts i.e. App.js. Modify file as per the snippets below.
In componentDidMount, we check if user has granted permission to receive push notifications.
| import React, {Component} from 'react'; | |
| import { AsyncStorage } from 'react-native'; | |
| import firebase from 'react-native-firebase'; | |
| export default class App extends Component { | |
| async componentDidMount() { | |
| this.checkPermission(); | |
| } | |
| //1 | |
| async checkPermission() { | |
| const enabled = await firebase.messaging().hasPermission(); | |
| if (enabled) { | |
| this.getToken(); | |
| } else { | |
| this.requestPermission(); | |
| } | |
| } | |
| //3 | |
| async getToken() { | |
| let fcmToken = await AsyncStorage.getItem('fcmToken'); | |
| if (!fcmToken) { | |
| fcmToken = await firebase.messaging().getToken(); | |
| if (fcmToken) { | |
| // user has a device token | |
| await AsyncStorage.setItem('fcmToken', fcmToken); | |
| } | |
| } | |
| } | |
| //2 | |
| async requestPermission() { | |
| try { | |
| await firebase.messaging().requestPermission(); | |
| // User has authorised | |
| this.getToken(); | |
| } catch (error) { | |
| // User has rejected permissions | |
| console.log('permission rejected'); | |
| } | |
| } | |
| render() { | |
| return ( | |
| <View style={{flex: 1}}> | |
| <Text>Welcome to React Native!</Text> | |
| </View> | |
| ); | |
| } | |
| } |
In componentDidMount, we check if user has granted permission to receive push notifications.
- If permission hasn’t been granted to our app, request user in requestPermission method. If permission is successfully assigned, proceed towards token fetch, otherwise gracefully ignore the fact.
- If token was fetched earlier, it can be retrieved from AsyncStorage. If no token is found, request Firebase and save it in AsyncStorage.
Listening Notifications
We are now ready to listen push notification events. Before proceeding, you should know about different types of notifications supported by Firebase.
- Notification-only messages: These are display messages that are automatically handled by Firebase SDK. Notifications are thrown to device tray.
- Notification + optional data messages: These are also handled by Firebase SDK. Only difference here is when user taps on notification, your app receives payload associated with that notification.
- Data only messages: These types of notifications are handled exclusively by app. No notification is thrown on device tray unless app explicitly does so. In iOS, these types of notifications are also termed as ‘Silent Push Notifications’.
For more details, you can read from here.
Add these lines in App.js.
I hope comments would be enough to explain all scenarios. You should be now able to receive notifications on both platforms.
| import firebase from 'react-native-firebase'; | |
| export default class App extends Component { | |
| async componentDidMount() { | |
| this.checkPermission(); | |
| this.createNotificationListeners(); //add this line | |
| } | |
| ////////////////////// Add these methods ////////////////////// | |
| //Remove listeners allocated in createNotificationListeners() | |
| componentWillUnmount() { | |
| this.notificationListener(); | |
| this.notificationOpenedListener(); | |
| } | |
| async createNotificationListeners() { | |
| /* | |
| * Triggered when a particular notification has been received in foreground | |
| * */ | |
| this.notificationListener = firebase.notifications().onNotification((notification) => { | |
| const { title, body } = notification; | |
| this.showAlert(title, body); | |
| }); | |
| /* | |
| * If your app is in background, you can listen for when a notification is clicked / tapped / opened as follows: | |
| * */ | |
| this.notificationOpenedListener = firebase.notifications().onNotificationOpened((notificationOpen) => { | |
| const { title, body } = notificationOpen.notification; | |
| this.showAlert(title, body); | |
| }); | |
| /* | |
| * If your app is closed, you can check if it was opened by a notification being clicked / tapped / opened as follows: | |
| * */ | |
| const notificationOpen = await firebase.notifications().getInitialNotification(); | |
| if (notificationOpen) { | |
| const { title, body } = notificationOpen.notification; | |
| this.showAlert(title, body); | |
| } | |
| /* | |
| * Triggered for data only payload in foreground | |
| * */ | |
| this.messageListener = firebase.messaging().onMessage((message) => { | |
| //process data message | |
| console.log(JSON.stringify(message)); | |
| }); | |
| } | |
| showAlert(title, body) { | |
| Alert.alert( | |
| title, body, | |
| [ | |
| { text: 'OK', onPress: () => console.log('OK Pressed') }, | |
| ], | |
| { cancelable: false }, | |
| ); | |
| } | |
| } |
I hope comments would be enough to explain all scenarios. You should be now able to receive notifications on both platforms.
In iOS, you need to test on Device to receive notifications. iOS Simulator doesn’t support Push Notifications currently.
In Android, if you want to test on emulator, you need to install Google Play Services package.
React-native-firebase is a nice wrapper over Firebase for react native. However, there are few points you should know:
- In Android, if you tap on notification when app is killed, this library won’t be able to catch title and body of notification. Therefore these attributes will be undefined in showAlert function. As a solution, you should also send title and body in data payload of notification.
- To this date, Silent Push Notifications on iOS are not supported by this library. I have already opened an issue on their repository.
- To listen for data message notifications while the app is in background or killed in Android, you need to implement Headless JS functionality. For details, please refer to this link.
Hope this tutorial saves your time and make FCM integration easy in react native. If it helps you in anyway, don’t forget to clap! Thanks :)

Hey Man, Use this online converter;
ReplyDeleteFile to File Convertor
That converter has support several formats like those;
ReplyDeleteDjvu to Mobi
Mts to Mov
Divix to Mkv
Mpeg to Mp4
Mvk to Mp3
Thank you for sharing this awesome information with us.
ReplyDeleteAngularJS training in chennai | AngularJS training in anna nagar | AngularJS training in omr | AngularJS training in porur | AngularJS training in tambaram | AngularJS training in velachery
Great blog.
ReplyDeleteThe details that you shared regarding React Native Application is really very useful for one and all who is starting work on this tech.. This simple blog with the application development code will help everyone to understand about React Native. I was searching for react native app development company and got his blog.
Thanks for sharing such a great blog.
Thank you for sharing wonderful information about the react native push notification react native push notifications
ReplyDelete