When I created my first custom notification, I read many articles and videos and it was a bit tricky at first, so the intent of this tutorial is to centralise everything to make this process easier.
Let's start creating a Single View App or use an existing one. Put the name of your project and select your Team, is important to have a team in this case because will be necessary to create your app id, certificates, and APNs to send push, without that you will not be able to do this tutorial.
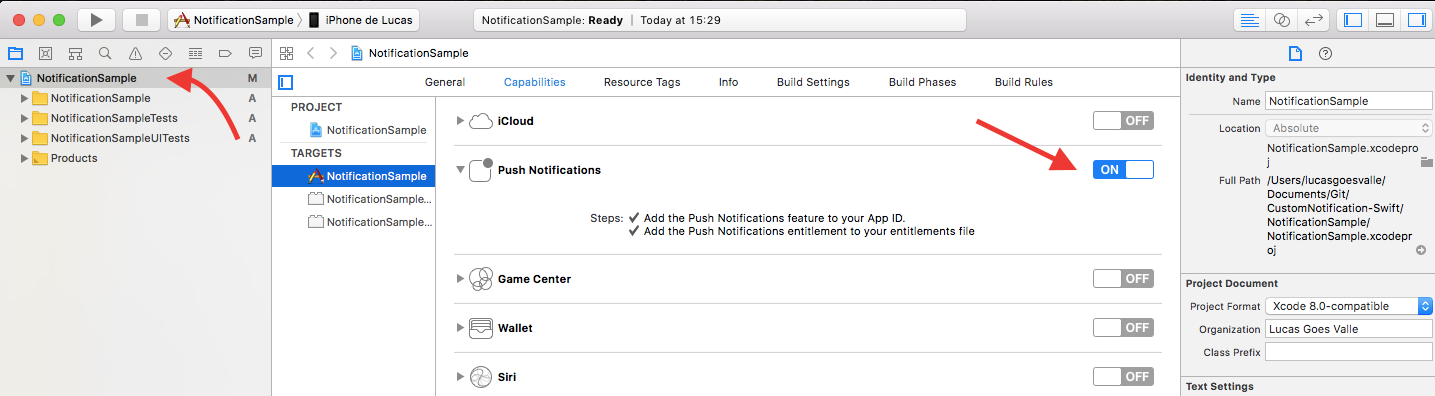
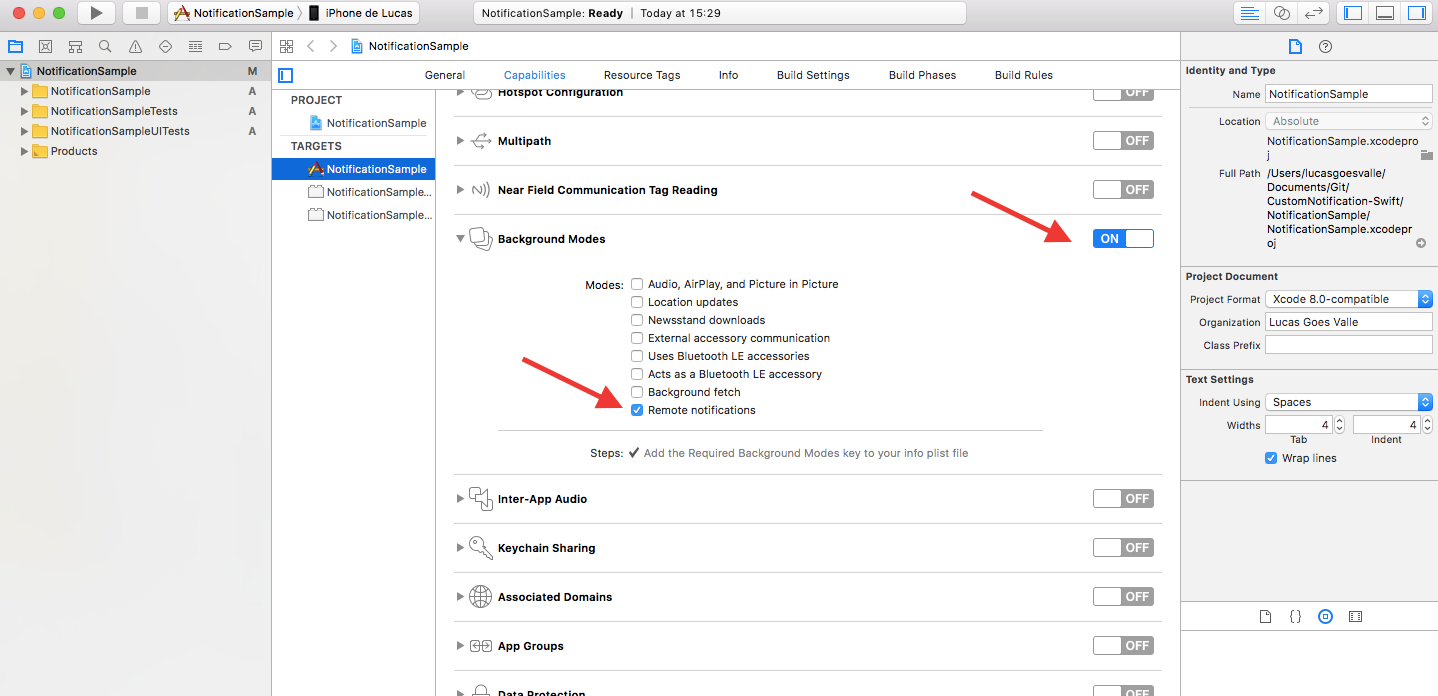
1. Setting your Capabilities in your xcodeproj
Go to your xcodeproj in xcode, select Capabilities, and turn ON Push notifications and Background Modes > Remote Notifications like the image below. Xcode will create for you your app id in the apple developer.


2. Generating APNs to send notifications.
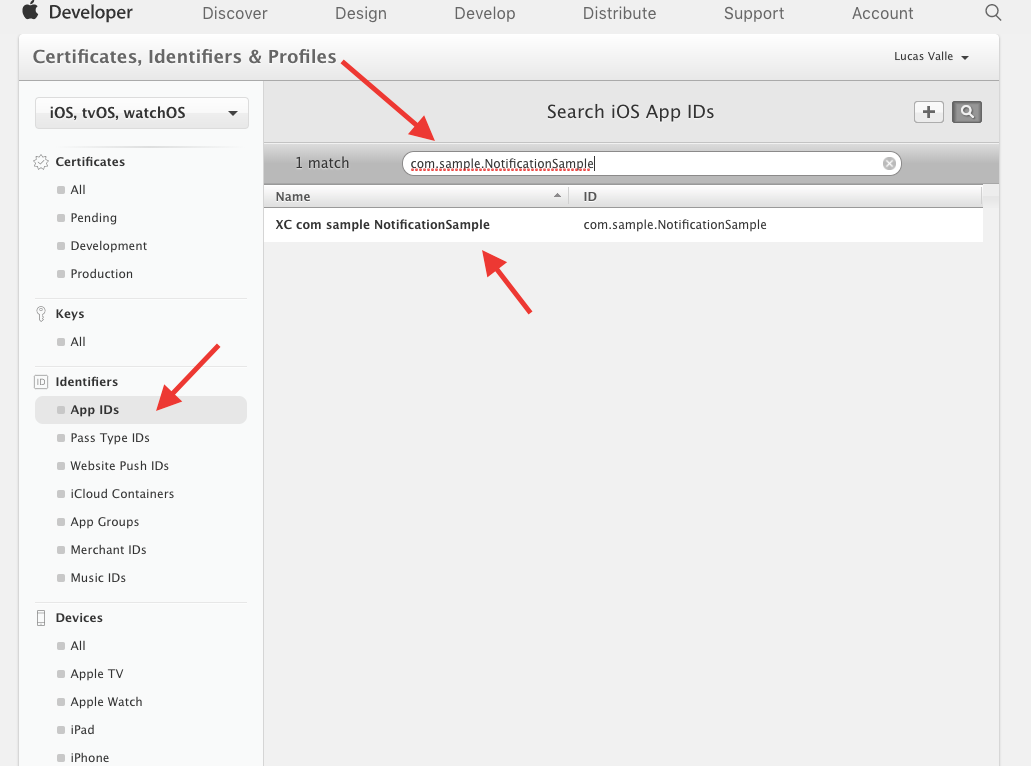
In the Apple Developer after logging in, go to:
Certificates, Identifiers & Profiles > Identifiers > App IDs > Select your app id app and click in edit to configure push notifications:
Certificates, Identifiers & Profiles > Identifiers > App IDs > Select your app id app and click in edit to configure push notifications:

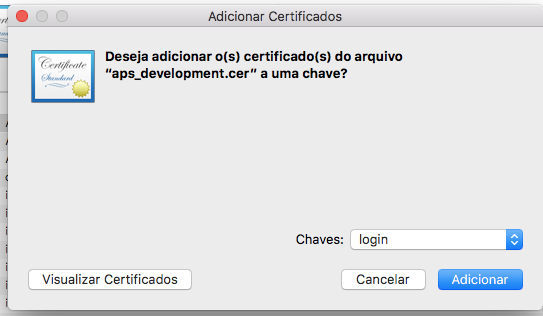
Open your app id and press Edit, and in the edit page go to Push Notification area and press Create Certificate…

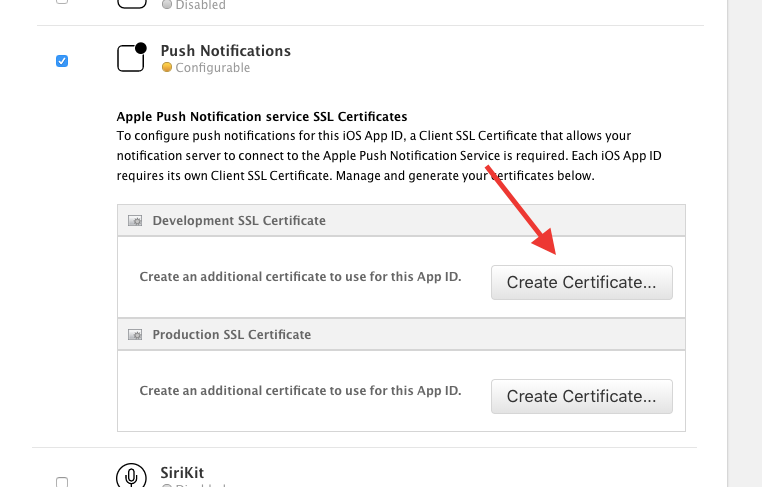
Follow the steps and download the certificate generated (aps_development.cer), open the certificate and add your keys.

3. Optional Step: Generating a .pem to send push notification by a web server.
There some tools to test the push notification, but if you need a .pem file I’ll explain below how to proceed, if not just move to step 4.
Open the keychain access, and export your p12 file:

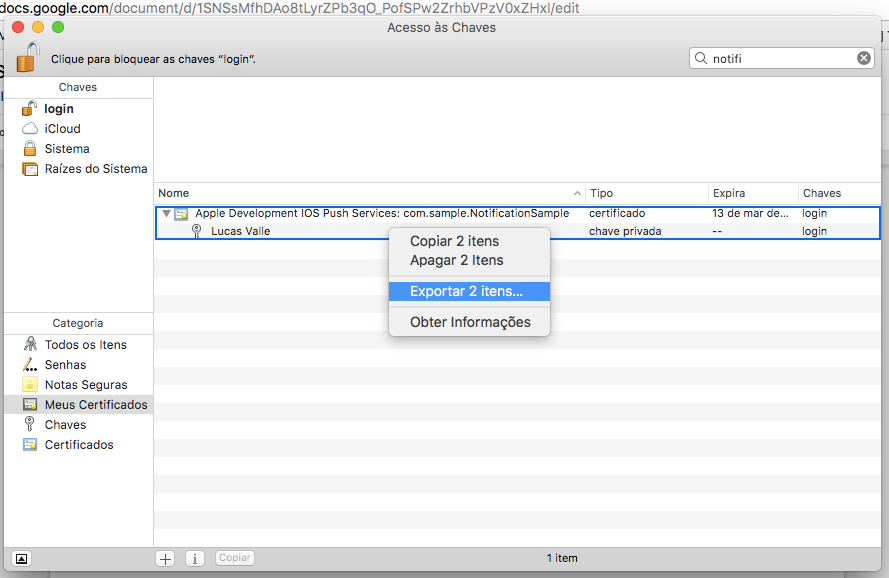
Create a password and save your file. Go to the terminal open the folder of your certificate, and run the command put the created password and you will have .pem file.
openssl pkcs12 -in cert.p12 -out pushcertdev.pem -nodes -clcerts
If you have some doubt about this part check this StackOverflow link with a very good step by step:
4. Request Authorisation to send push to the user.
In my project, the minimum iOS version will be 9.0, but the custom push notification will work just in the 10.0.
First import UserNotification
import UserNotifications
Call didRegisterForRemoteNotificationsWithDeviceToken and didFailToRegisterForRemoteNotificationsWithError to get the device token or some failure that may happen.
func application(_ application: UIApplication, didRegisterForRemoteNotificationsWithDeviceToken deviceToken: Data) {
  let deviceTokenString = deviceToken.reduce("", {$0 + String(format: "%02X", $1)})
  print("APNs device token: \(deviceTokenString)")
}

func application(_ application: UIApplication, didFailToRegisterForRemoteNotificationsWithError error: Error) {
  print("APNs registration failed: \(error)")
}
Request user permission for send push, creating a method to do this and call this method in the didFinishLaunchingWithOptions.
| func configureNotification() { | |
| if #available(iOS 10.0, *) { | |
| let center = UNUserNotificationCenter.current() | |
| center.requestAuthorization(options:[.badge, .alert, .sound]){ (granted, error) in } | |
| } | |
| UIApplication.shared.registerUserNotificationSettings(UIUserNotificationSettings(types: [.badge, .sound, .alert], categories: nil)) | |
| UIApplication.shared.registerForRemoteNotifications() | |
| } |
Your AppDelegate file will be like this:
| // | |
| // AppDelegate.swift | |
| // NotificationSample | |
| // | |
| // Created by Lucas Goes Valle on 13/03/18. | |
| // Copyright © 2018 Lucas Goes Valle. All rights reserved. | |
| // | |
| import UIKit | |
| import UserNotifications | |
| @UIApplicationMain | |
| class AppDelegate: UIResponder, UIApplicationDelegate, UNUserNotificationCenterDelegate { | |
| var window: UIWindow? | |
| func application(_ application: UIApplication, didFinishLaunchingWithOptions launchOptions: [UIApplicationLaunchOptionsKey: Any]?) -> Bool { | |
| self.configureNotification() | |
| return true | |
| } | |
| func applicationWillResignActive(_ application: UIApplication) { | |
| } | |
| func applicationDidEnterBackground(_ application: UIApplication) { | |
| } | |
| func applicationWillEnterForeground(_ application: UIApplication) { | |
| } | |
| func applicationDidBecomeActive(_ application: UIApplication) { | |
| } | |
| func applicationWillTerminate(_ application: UIApplication) { | |
| } | |
| func configureNotification() { | |
| if #available(iOS 10.0, *) { | |
| let center = UNUserNotificationCenter.current() | |
| center.requestAuthorization(options:[.badge, .alert, .sound]){ (granted, error) in } | |
| } | |
| UIApplication.shared.registerUserNotificationSettings(UIUserNotificationSettings(types: [.badge, .sound, .alert], categories: nil)) | |
| UIApplication.shared.registerForRemoteNotifications() | |
| } | |
| func application(_ application: UIApplication, didRegisterForRemoteNotificationsWithDeviceToken deviceToken: Data) { | |
| let deviceTokenString = deviceToken.reduce("", {$0 + String(format: "%02X", $1)}) | |
| print("APNs device token: \(deviceTokenString)") | |
| } | |
| func application(_ application: UIApplication, didFailToRegisterForRemoteNotificationsWithError error: Error) { | |
| print("APNs registration failed: \(error)") | |
| } | |
| } |
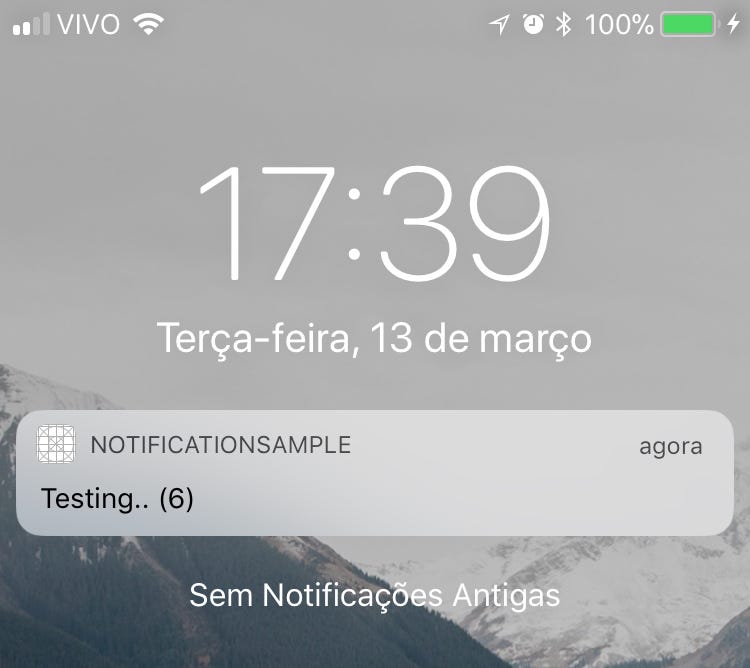
Nice!! The request authorisation it's done!
5. Send a normal push to test the last step.
Now run your app with the right certificated, can be in Automatically manage signing, the xcode will get the right certificate for you or you can put manual if not works.
After running, put your app in the background. We will use a tool to send push, its simple and fast to test, download and install NWPusher.
After running, put your app in the background. We will use a tool to send push, its simple and fast to test, download and install NWPusher.
After install open and select the right certificate to send push for your application, will be like this:

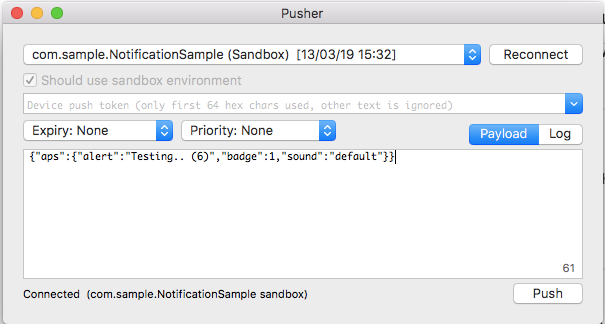
Now get the device token from your log console and put in the Device push token field and press Push. Your device(needs a real device) will receive the push if everything is working correctly. If not check your Capabilities, AppDelegate, APNs certificates and your signing certificate.

6. Handling notification interactions and show notification with open app
Create a NSObject class, in my case, the name of the class will be SampleNotificationDelegate, after create a class import UserNotifications and UserNotificationsUI , add the UNUserNotificationCenterDelegate protocol and call willPresent and didReceive methods, like this:
| // | |
| // SampleNotificationDelegate.swift | |
| // NotificationSample | |
| // | |
| // Created by Lucas Goes Valle on 14/03/18. | |
| // Copyright © 2018 Lucas Goes Valle. All rights reserved. | |
| // | |
| import Foundation | |
| import UserNotifications | |
| import UserNotificationsUI | |
| class SampleNotificationDelegate: NSObject , UNUserNotificationCenterDelegate { | |
| @available(iOS 10.0, *) | |
| func userNotificationCenter(_ center: UNUserNotificationCenter, | |
| willPresent notification: UNNotification, | |
| withCompletionHandler completionHandler: @escaping (UNNotificationPresentationOptions) -> Void) { | |
| completionHandler([.alert,.sound]) | |
| } | |
| @available(iOS 10.0, *) | |
| func userNotificationCenter(_ center: UNUserNotificationCenter, | |
| didReceive response: UNNotificationResponse, | |
| withCompletionHandler completionHandler: @escaping () -> Void) { | |
| switch response.actionIdentifier { | |
| case UNNotificationDismissActionIdentifier: | |
| print("Dismiss Action") | |
| case UNNotificationDefaultActionIdentifier: | |
| print("Open Action") | |
| case "Snooze": | |
| print("Snooze") | |
| case "Delete": | |
| print("Delete") | |
| default: | |
| print("default") | |
| } | |
| completionHandler() | |
| } | |
| } | |
After that, let go back to AppDelegate, and create a constant of the SampleNotificationDelegate:
let notificationDelegate = SampleNotificationDelegate()
And in configureNotification method we will set the delegate of UNUserNotificationCenter to our notificationDelegate, like this:
| func configureNotification() { | |
| if #available(iOS 10.0, *) { | |
| let center = UNUserNotificationCenter.current() | |
| center.requestAuthorization(options:[.badge, .alert, .sound]){ (granted, error) in } | |
| center.delegate = notificationDelegate | |
| } | |
| UIApplication.shared.registerUserNotificationSettings(UIUserNotificationSettings(types: [.badge, .sound, .alert], categories: nil)) | |
| UIApplication.shared.registerForRemoteNotifications() | |
| } |
After this changes build your app, and put a breakpoint in didReceive method, with your app open, send a new push from NWPusher, and the push will be shown in your screen even though your app is open, click in the push and your breakpoint will be called.
Nice work, if you get to this part with success in the next step we will start to customise our push.
7. Create a Custom Push Notification (Using Notification Service Extension and Notification Content Extension).
We will use the UNNotificationCategory to defines a type of notification that your executable can receive, as this is possible to customised a specific push notification.
In our configureNotification method, we will add the UNNotificationCategory and UNNotificationAction for our custom push. Just add the following code to your method too.
In our configureNotification method, we will add the UNNotificationCategory and UNNotificationAction for our custom push. Just add the following code to your method too.
| func configureNotification() { | |
| if #available(iOS 10.0, *) { | |
| let center = UNUserNotificationCenter.current() | |
| center.requestAuthorization(options:[.badge, .alert, .sound]){ (granted, error) in } | |
| center.delegate = notificationDelegate | |
| let openAction = UNNotificationAction(identifier: "OpenNotification", title: NSLocalizedString("Abrir", comment: ""), options: UNNotificationActionOptions.foreground) | |
| let deafultCategory = UNNotificationCategory(identifier: "CustomSamplePush", actions: [openAction], intentIdentifiers: [], options: []) | |
| center.setNotificationCategories(Set([deafultCategory])) | |
| } else { | |
| UIApplication.shared.registerUserNotificationSettings(UIUserNotificationSettings(types: [.badge, .sound, .alert], categories: nil)) | |
| } | |
| UIApplication.shared.registerForRemoteNotifications() | |
| } |
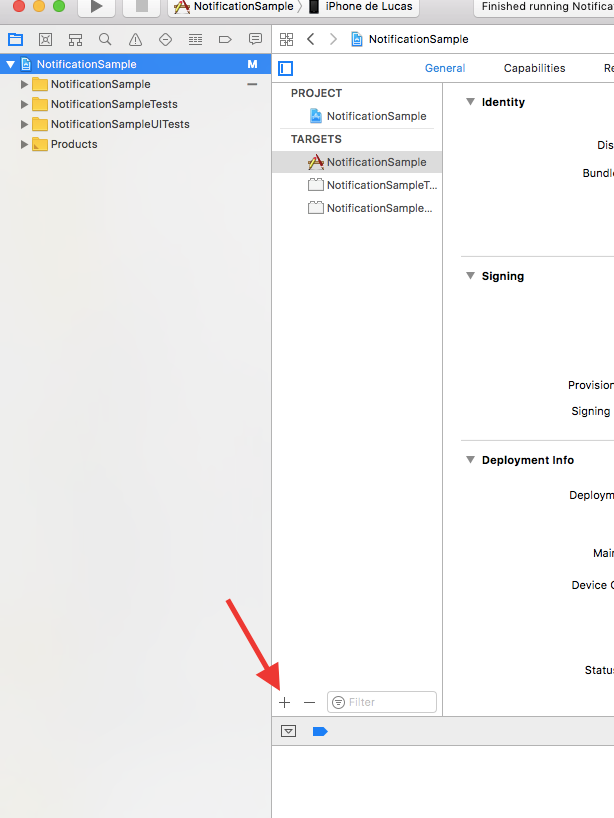
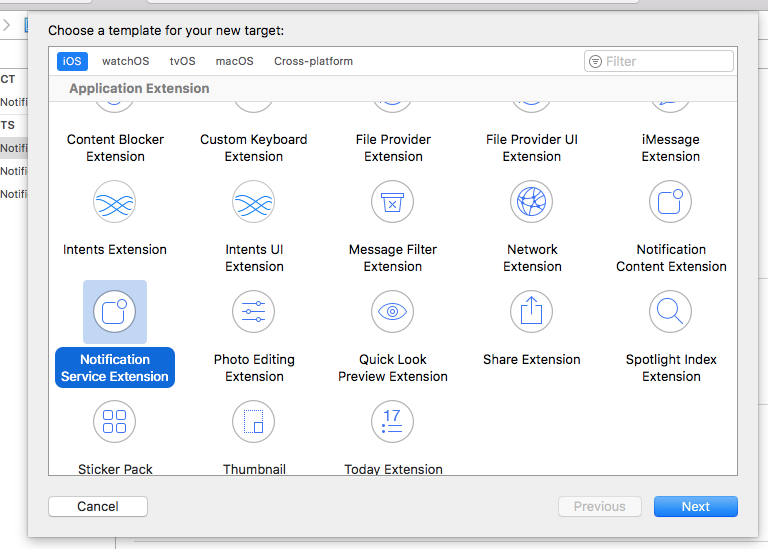
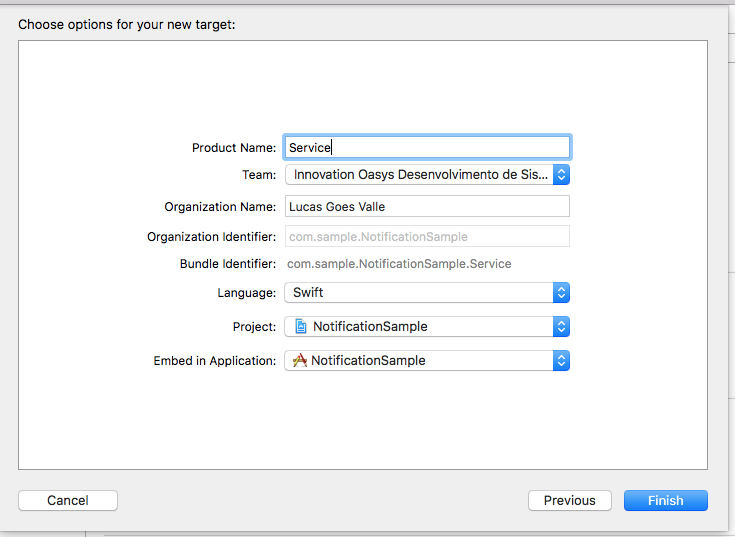
Now go to your xcodeproj in xcode > Add Target > Notification Service Extension >Next > Finish > Activate Scheme Content and repeat the same step to Notification Content Extension.


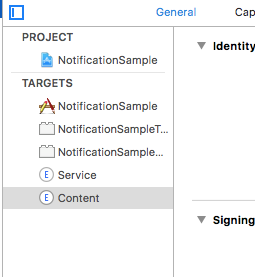
In the end will be like this:

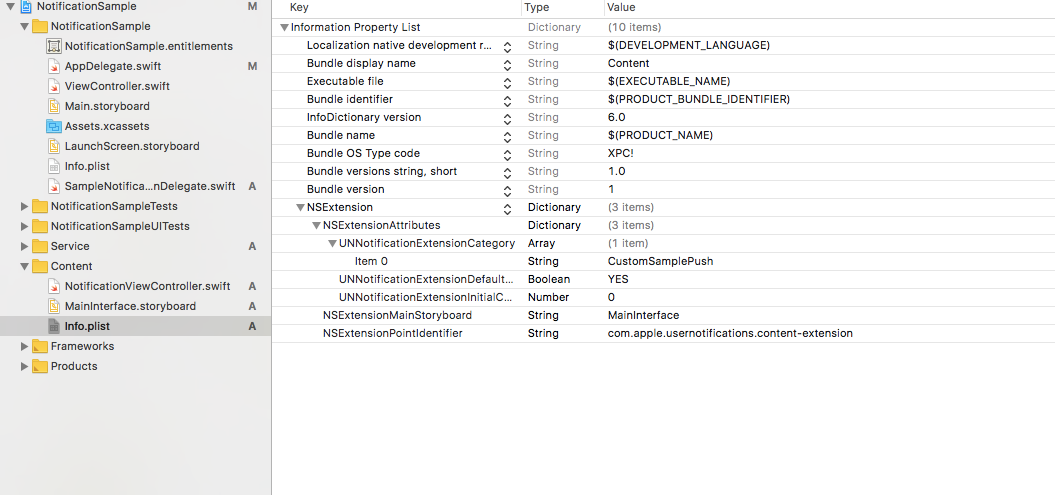
Go to your Content folder, the info.plist file will be like this:

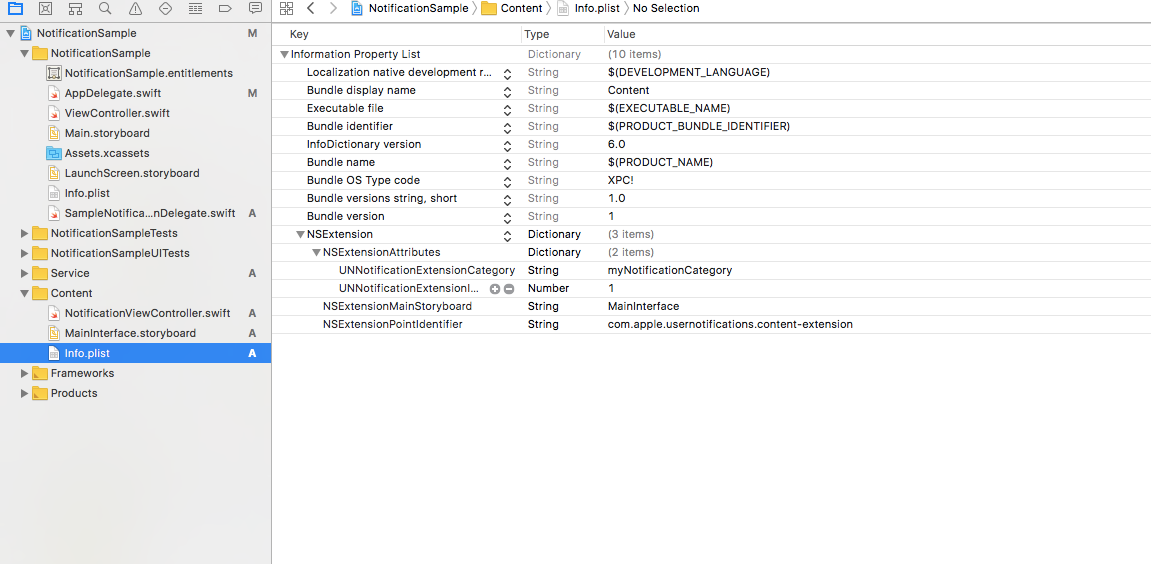
Now we need to change the UNNotificationExtensionCategory to Array and put our category to works.
Add UNNotificationExtensionDefaultContentHidden and set to true to show only our custom view controller in the notification interface.
Add UNNotificationExtensionInitialContentSizeRatio and set to 0 to be an initial size of our view controller in the notification interface.
Your info.plist, in the end, will be like this:

This configuration is to show a custom view controller when the user uses a 3D touch or press to see de details of the notification.
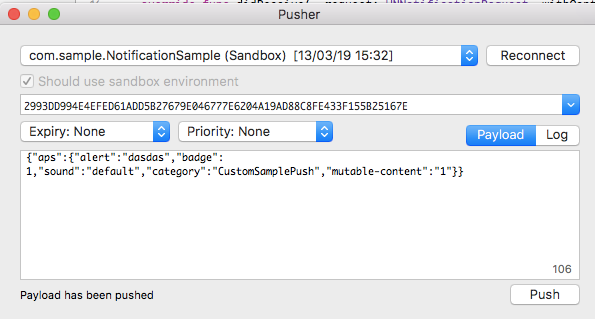
Go back to the NWPusher, but now the new body for the push need to have two new parameters, “category”:”CustomSamplePush” the same of your category in the project and “mutable-content”:”1".
Is important to check if the body it’s right, copy and paste the json from here.
| { | |
| "aps":{ | |
| "alert":"dasdas", | |
| "badge":1, | |
| "sound":"default", | |
| "category":"CustomSamplePush", | |
| "mutable-content":"1" | |
| } | |
| } |

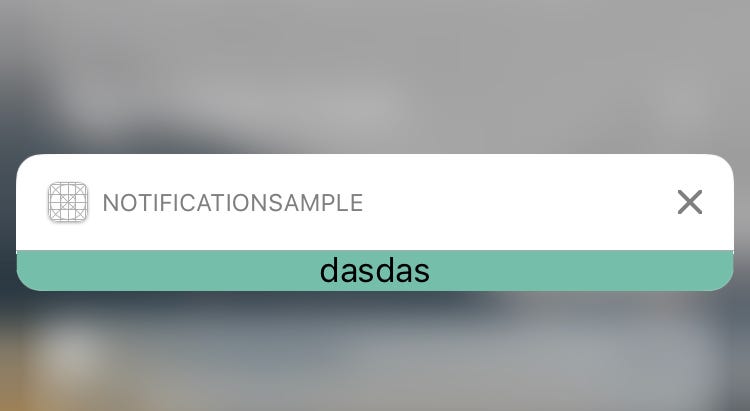
The result of the push will be this, the first is with the category and mutable-content, and the second is without these parameters, the normal notification, and the custom:

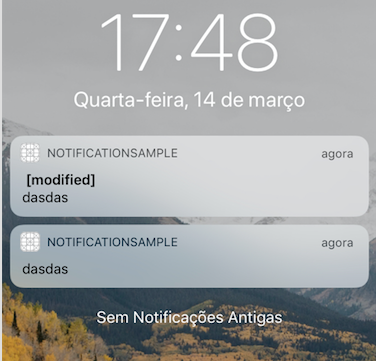
When you use the 3d touch in the push notification or swipe to left and press see you can see a custom notification view controller.

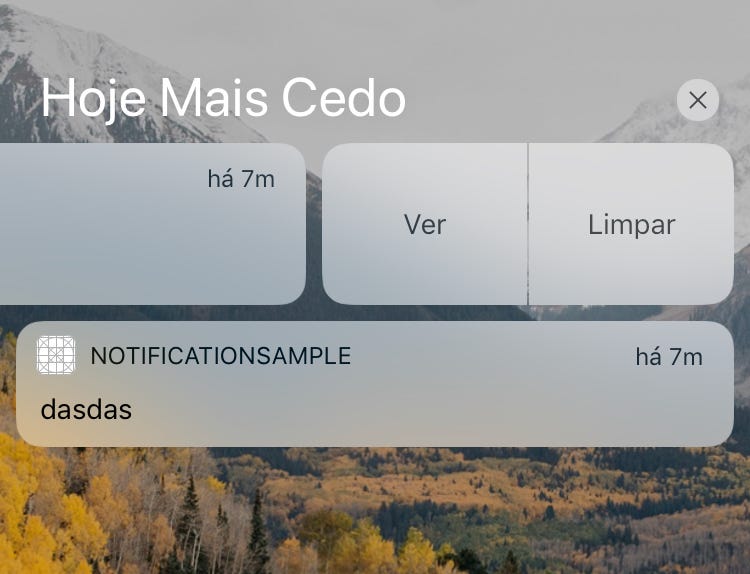

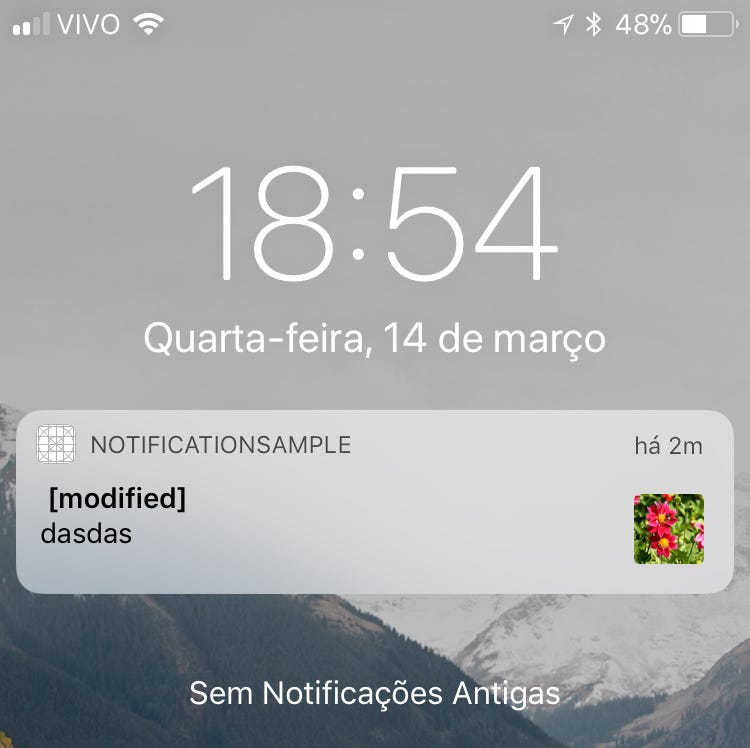
Nice!! Everything is configured and working if you get the same result. In the service extension you can change the notification, your title, content and put an image in the right side, and to change the details of the notification you need to go to the content extension, there is a storyboard to create a custom layout and create whatever you want.
If you can debug the content or service, build the project from the target of the content or the server.
Now to show a picture in the notification we will use a UNNotificationAttachment, but to be more realist, we will send the picture by the push and download before rendering the notification, for this is important use small images, because large images cannot be downloaded in time.
In your Notification Service Extension, go to NotificationService.swift and create an extension of UNNotificationAttachment, like this:
| @available(iOSApplicationExtension 10.0, *) | |
| extension UNNotificationAttachment { | |
| static func saveImageToDisk(fileIdentifier: String, data: NSData, options: [NSObject : AnyObject]?) -> UNNotificationAttachment? { | |
| let fileManager = FileManager.default | |
| let folderName = ProcessInfo.processInfo.globallyUniqueString | |
| let folderURL = NSURL(fileURLWithPath: NSTemporaryDirectory()).appendingPathComponent(folderName, isDirectory: true) | |
| do { | |
| try fileManager.createDirectory(at: folderURL!, withIntermediateDirectories: true, attributes: nil) | |
| let fileURL = folderURL?.appendingPathComponent(fileIdentifier) | |
| try data.write(to: fileURL!, options: []) | |
| let attachment = try UNNotificationAttachment(identifier: fileIdentifier, url: fileURL!, options: options) | |
| return attachment | |
| } catch let error { | |
| print("error \(error)") | |
| } | |
| return nil | |
| } | |
| } |
Now we need to get the image from the push, download and show in the push.
| var urlString:String? = nil | |
| if let urlImageString = request.content.userInfo["urlImageString"] as? String { | |
| urlString = urlImageString | |
| } | |
| if urlString != nil, let fileUrl = URL(string: urlString!) { | |
| print("fileUrl: \(fileUrl)") | |
| guard let imageData = NSData(contentsOf: fileUrl) else { | |
| contentHandler(bestAttemptContent) | |
| return | |
| } | |
| guard let attachment = UNNotificationAttachment.saveImageToDisk(fileIdentifier: "image.jpg", data: imageData, options: nil) else { | |
| print("error in UNNotificationAttachment.saveImageToDisk()") | |
| contentHandler(bestAttemptContent) | |
| return | |
| } | |
| bestAttemptContent.attachments = [ attachment ] | |
| } |
The complete NotificationService.swift file:
| // | |
| // NotificationService.swift | |
| // Service | |
| // | |
| // Created by Lucas Goes Valle on 14/03/18. | |
| // Copyright © 2018 Lucas Goes Valle. All rights reserved. | |
| // | |
| import UserNotifications | |
| class NotificationService: UNNotificationServiceExtension { | |
| var contentHandler: ((UNNotificationContent) -> Void)? | |
| var bestAttemptContent: UNMutableNotificationContent? | |
| override func didReceive(_ request: UNNotificationRequest, withContentHandler contentHandler: @escaping (UNNotificationContent) -> Void) { | |
| self.contentHandler = contentHandler | |
| bestAttemptContent = (request.content.mutableCopy() as? UNMutableNotificationContent) | |
| if let bestAttemptContent = bestAttemptContent { | |
| // Modify the notification content here... | |
| bestAttemptContent.title = "\(bestAttemptContent.title) [modified]" | |
| var urlString:String? = nil | |
| if let urlImageString = request.content.userInfo["urlImageString"] as? String { | |
| urlString = urlImageString | |
| } | |
| if urlString != nil, let fileUrl = URL(string: urlString!) { | |
| print("fileUrl: \(fileUrl)") | |
| guard let imageData = NSData(contentsOf: fileUrl) else { | |
| contentHandler(bestAttemptContent) | |
| return | |
| } | |
| guard let attachment = UNNotificationAttachment.saveImageToDisk(fileIdentifier: "image.jpg", data: imageData, options: nil) else { | |
| print("error in UNNotificationAttachment.saveImageToDisk()") | |
| contentHandler(bestAttemptContent) | |
| return | |
| } | |
| bestAttemptContent.attachments = [ attachment ] | |
| } | |
| contentHandler(bestAttemptContent) | |
| } | |
| } | |
| override func serviceExtensionTimeWillExpire() { | |
| // Called just before the extension will be terminated by the system. | |
| // Use this as an opportunity to deliver your "best attempt" at modified content, otherwise the original push payload will be used. | |
| if let contentHandler = contentHandler, let bestAttemptContent = bestAttemptContent { | |
| contentHandler(bestAttemptContent) | |
| } | |
| } | |
| } | |
| @available(iOSApplicationExtension 10.0, *) | |
| extension UNNotificationAttachment { | |
| static func saveImageToDisk(fileIdentifier: String, data: NSData, options: [NSObject : AnyObject]?) -> UNNotificationAttachment? { | |
| let fileManager = FileManager.default | |
| let folderName = ProcessInfo.processInfo.globallyUniqueString | |
| let folderURL = NSURL(fileURLWithPath: NSTemporaryDirectory()).appendingPathComponent(folderName, isDirectory: true) | |
| do { | |
| try fileManager.createDirectory(at: folderURL!, withIntermediateDirectories: true, attributes: nil) | |
| let fileURL = folderURL?.appendingPathComponent(fileIdentifier) | |
| try data.write(to: fileURL!, options: []) | |
| let attachment = try UNNotificationAttachment(identifier: fileIdentifier, url: fileURL!, options: options) | |
| return attachment | |
| } catch let error { | |
| print("error \(error)") | |
| } | |
| return nil | |
| } | |
| } |
Use this body in your push to receive an image, download, and show:
| { | |
| "aps":{ | |
| "alert":"dasdas", | |
| "badge":1, | |
| "sound":"default", | |
| "category":"CustomSamplePush", | |
| "mutable-content":"1" | |
| }, | |
| "urlImageString":"https://res.cloudinary.com/demo/image/upload/sample.jpg" | |
| } |

Important: note that the image URL is HTTPS if you need to show an HTTP image URL, go to plist.info of the Notification Service Extension and permit the domain or permit every domain.
| <key>NSAppTransportSecurity</key> | |
| <dict> | |
| <key>NSAllowsArbitraryLoads</key> | |
| <true/> | |
| </dict> |
or
| <key>NSAppTransportSecurity</key> | |
| <dict> | |
| <key>NSAllowsArbitraryLoads</key> | |
| <false/> | |
| <key>NSExceptionDomains</key> | |
| <dict> | |
| <key>domain.com</key> | |
| <dict> | |
| <key>NSIncludesSubdomains</key> | |
| <true/> | |
| <key>NSExceptionAllowsInsecureHTTPLoads</key> | |
| <true/> | |
| </dict> | |
| </dict> | |
| </dict> |
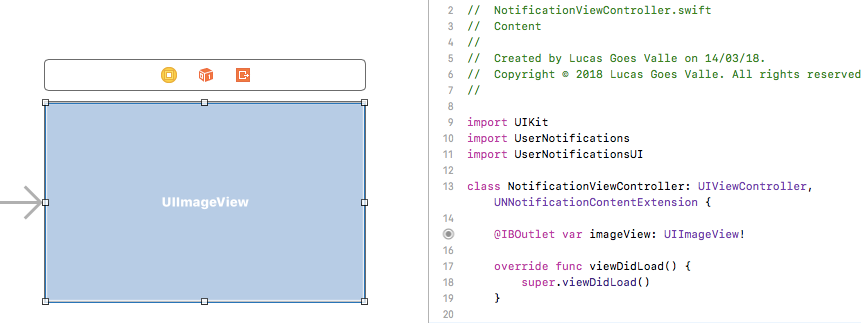
Nice! In this moment do you have your custom push notification with a image and now you can go to customise the detail of your push, for do this go to your Notification Content Extension, and open the MainInterface.storyboard to put an UIImageView and customise the content, in the storyboard there is ViewController and we can put the components of the iOS library.
If you check in the NotificationViewController there is a didReceive method from UNNotificationContentExtension protocol, and in this method, we can get the content of the push, like we did in the Notification Service.
So we will create a method to download an image and show the image in the details of push, you can use a Library to download this image, create your own method or whatever. I will create an extension of URLSession to download the image, will be like this:
| <key>NSAppTransportSecurity</key> | |
| <dict> | |
| <key>NSAllowsArbitraryLoads</key> | |
| <false/> | |
| <key>NSExceptionDomains</key> | |
| <dict> | |
| <key>domain.com</key> | |
| <dict> | |
| <key>NSIncludesSubdomains</key> | |
| <true/> | |
| <key>NSExceptionAllowsInsecureHTTPLoads</key> | |
| <true/> | |
| </dict> | |
| </dict> | |
| </dict> |
After that, we need to get the URL image from the push and download the image. Remember, if you need to download an image from HTTP add the same thing of Notification Service Extension in your plis.file.
Create a UIImageView in the storyboard and your outlet.
Create a UIImageView in the storyboard and your outlet.

Remember to add @available(iOSApplicationExtension 10.0, *) on didReceive.
After that in didReceive method, get the content from the push, download the image and set in the UIImageView, the final ViewController will be like this:
| extension URLSession { | |
| class func downloadImage(atURL url: URL, withCompletionHandler completionHandler: @escaping (Data?, NSError?) -> Void) { | |
| let dataTask = URLSession.shared.dataTask(with: url) { (data, urlResponse, error) in | |
| completionHandler(data, nil) | |
| } | |
| dataTask.resume() | |
| } | |
| } |
Then we can send another push and check the final result.


If you have succeeded so far, we have successfully completed the entire tutorial and you can now customise the custom push detail any way you want.
The Final Project will be available to checkout in git.
Thanks and Good Luck!!!
7. If you push is not arriving successfully, check these possibilities:
Some possibles problem that can occur when the push not arrive:
- Refresh the Push selected in the NWPusher tool.
- Check the body of the push, open the NWPusher and send the push with the default body to be sure that the problem is not your push body.
- Check your device token, delete and install again the app to get a new device token.
- Check the certificates, go your keychains and check the APNs device
- Create a Development provision profile, download and put manually in your project to make a build using the right certificated
Also a simple way is with INDIGITALL, it has been developed with the latest technology to guarantee maximum effectiveness and simplify the process of creating and sending Notifications with animated image, Segmented, Geolocated and many more functions, it is great. Here you can see the simple installation for your platform
ReplyDeletehttps://docs.indigitall.com/
Thank for solving the problem , But if any one want to add push notification on wordpress/wix/shiopify then gravitec is the best option, you should check Gravitec lifetime deal
ReplyDelete