The static property of a screen component is called navaigationOptions. It is either an object or a function. It returns an object containing several configuration options.
Props of the header bar
| Props | Description |
|---|
| title | It sets the title of active screen. |
| headerStyle | It adds style to header bar. |
| backgroundColor | It sets the background color of the header bar. |
| headerTintColor | It sets the color to header title. |
| headerTitleStyle | It adds style to the title of a screen. |
| fontWeight | It sets the font style of header title. |
- static navigationOptions = {
- title: 'HeaderTitle',
- headerStyle: {
- backgroundColor: '#f4511e',
- },
- headerTintColor: '#0ff',
- headerTitleStyle: {
- fontWeight: 'bold',
- },
- };
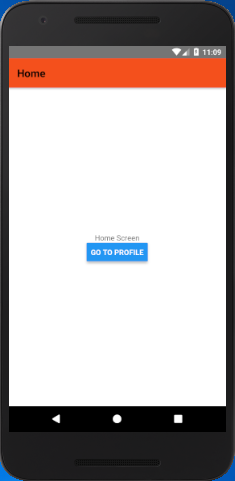
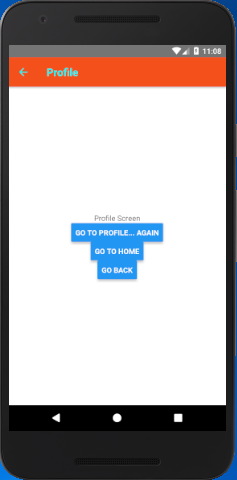
React Native Moving from One Screen to Other Example 1
In this example, we create two screen named as 'Home' and 'Profile'. The Home screen is set as first screen using "initialRouteName" property and Profile screen as second.
App.js
- import React from 'react';
- import { View, Text, Button } from 'react-native';
- import { createStackNavigator, createAppContainer } from 'react-navigation';
-
- class HomeScreen extends React.Component {
- static navigationOptions = {
- title: 'Home',
- headerStyle: {
- backgroundColor: '#f4511e',
- },
-
- headerTitleStyle: {
- fontWeight: 'bold',
- },
- };
-
- render() {
- return (
- <View style={{ flex: 1, alignItems: 'center', justifyContent: 'center' }}>
- <Text>Home Screen</Text>
- <Button
- title="Go to Profile"
- onPress={() => this.props.navigation.push('Profile')}
- />
- </View>
- );
- }
- }
- class ProfileScreen extends React.Component {
- static navigationOptions = {
- title: 'Profile',
- headerStyle: {
- backgroundColor: '#f4511e',
- },
- headerTintColor: '#0ff',
- headerTitleStyle: {
- fontWeight: 'bold',
- },
- };
- render() {
- return (
- <View style={{ flex: 1, alignItems: "center", justifyContent: "center" }}>
- <Text>Profile Screen</Text>
- <Button
- title="Go to Profile... again"
- onPress={() => this.props.navigation.push('Profile')}
- />
- <Button
- title="Go to Home"
- onPress={() => this.props.navigation.navigate('Home')}
- />
- <Button
- title="Go back"
- onPress={() => this.props.navigation.goBack()}
- />
- </View>
- );
- }
- }
-
- const AppNavigator = createStackNavigator(
- {
- Home: HomeScreen,
- Profile: ProfileScreen
- },
- {
- initialRouteName: "Home"
- }
- );
-
- const AppContainer = createAppContainer(AppNavigator);
- export default class App extends React.Component {
- render() {
- return <AppContainer />;
- }
- }
Output:
Using params in the title
To use the params (parameter) as a title, we need to make navigationOptions as a function which returns a configuration object. Use the this.props inside the navigationOptions. As it is the static property of component "this" does not refer to an instance of componen and therefore no props are available.
Making navigationOptions as a function which returns the object containing {navigation, navigationOptions, screenProps }. The navigation is the object which is passed to screen props as this.props.navigation. We can also get the params from navigation using navigation.getParam or navigation.state.params.
- class ProfileScreen extends React.Component {
- static navigationOptions = ({ navigation }) => {
- return {
- title: navigation.getParam('otherParam', 'A Param Header'),
- };
- };
- }
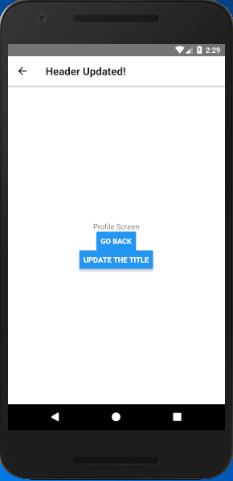
The navigationOtions configuration of the active screen which can also be updated from the current screen component itself.
-
- <Button
- title="Update the title"
- onPress={() => this.props.navigation.setParams({otherParam: 'Header Updated!'})}
- />
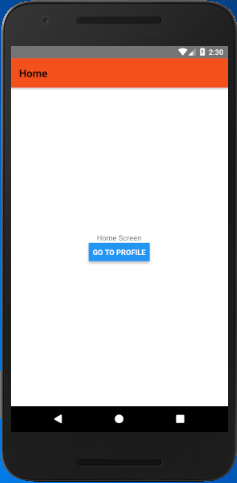
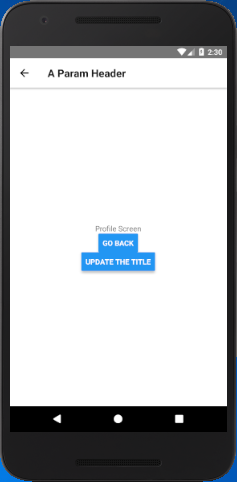
Complete code
In this example, we create two screen "Home" and "Profile". The Profile screen set its header title using params as: title: navigation.getParam('otherParam', 'A Param Header')
App.js
- import React from 'react';
- import { View, Text, Button } from 'react-native';
- import { createStackNavigator, createAppContainer } from 'react-navigation';
-
- class HomeScreen extends React.Component {
- static navigationOptions = {
- title: 'Home',
- headerStyle: {
- backgroundColor: '#f4511e',
- },
-
- headerTitleStyle: {
- fontWeight: 'bold',
- },
- };
-
- render() {
- return (
- <View style={{ flex: 1, alignItems: 'center', justifyContent: 'center' }}>
- <Text>Home Screen</Text>
- <Button
- title="Go to Profile"
- onPress={() => this.props.navigation.push('Profile')}
- />
- </View>
- );
- }
- }
- class ProfileScreen extends React.Component {
- static navigationOptions = ({ navigation }) => {
- return {
- title: navigation.getParam('otherParam', 'A Param Header'),
- };
- };
-
- render() {
- return (
- <View style={{ flex: 1, alignItems: "center", justifyContent: "center" }}>
- <Text>Profile Screen</Text>
- <Button
- title="Go back"
- onPress={() => this.props.navigation.goBack()}
- />
- <Button
- title="Update the title"
- onPress={() => this.props.navigation.setParams({otherParam: 'Header Updated!'})}
- />
- </View>
- );
- }
- }
-
- const AppNavigator = createStackNavigator(
- {
- Home: HomeScreen,
- Profile: ProfileScreen
- },
- {
- initialRouteName: "Home"
- }
- );
-
- const AppContainer = createAppContainer(AppNavigator);
- export default class App extends React.Component {
- render() {
- return <AppContainer />;
- }
- }
Comments
Post a Comment
Thank You.