React Native Navigation is a native navigation implementation, not a JavaScript based implementation. This means that the library will typically be more performant & have smoother interactions & screen transitions then some other solutions that are not native implementations.
Version 2 or React Native Navigation is a rewrite of the library.
In this tutorial, we’ll show how to build a real-world authentication flow, simulating authentication state using AsyncStorage that can be replaced with whatever authentication provider you choose.
The value we get out of using an authentication flow as a demo is that we’ll get to look at a fairly large surface of the React Native Navigation API, working with both stack & tab based navigation, & will also be seeing how to solve an actual problem when building out an application: structuring the navigation for user authentication considerations.
How the flow will work:


- When the application loads we’ll render an initial Initializing component while checking to see if there is a user available in storage.
- If there is a user in storage, we’ll render the Home route in a stack-based navigation.
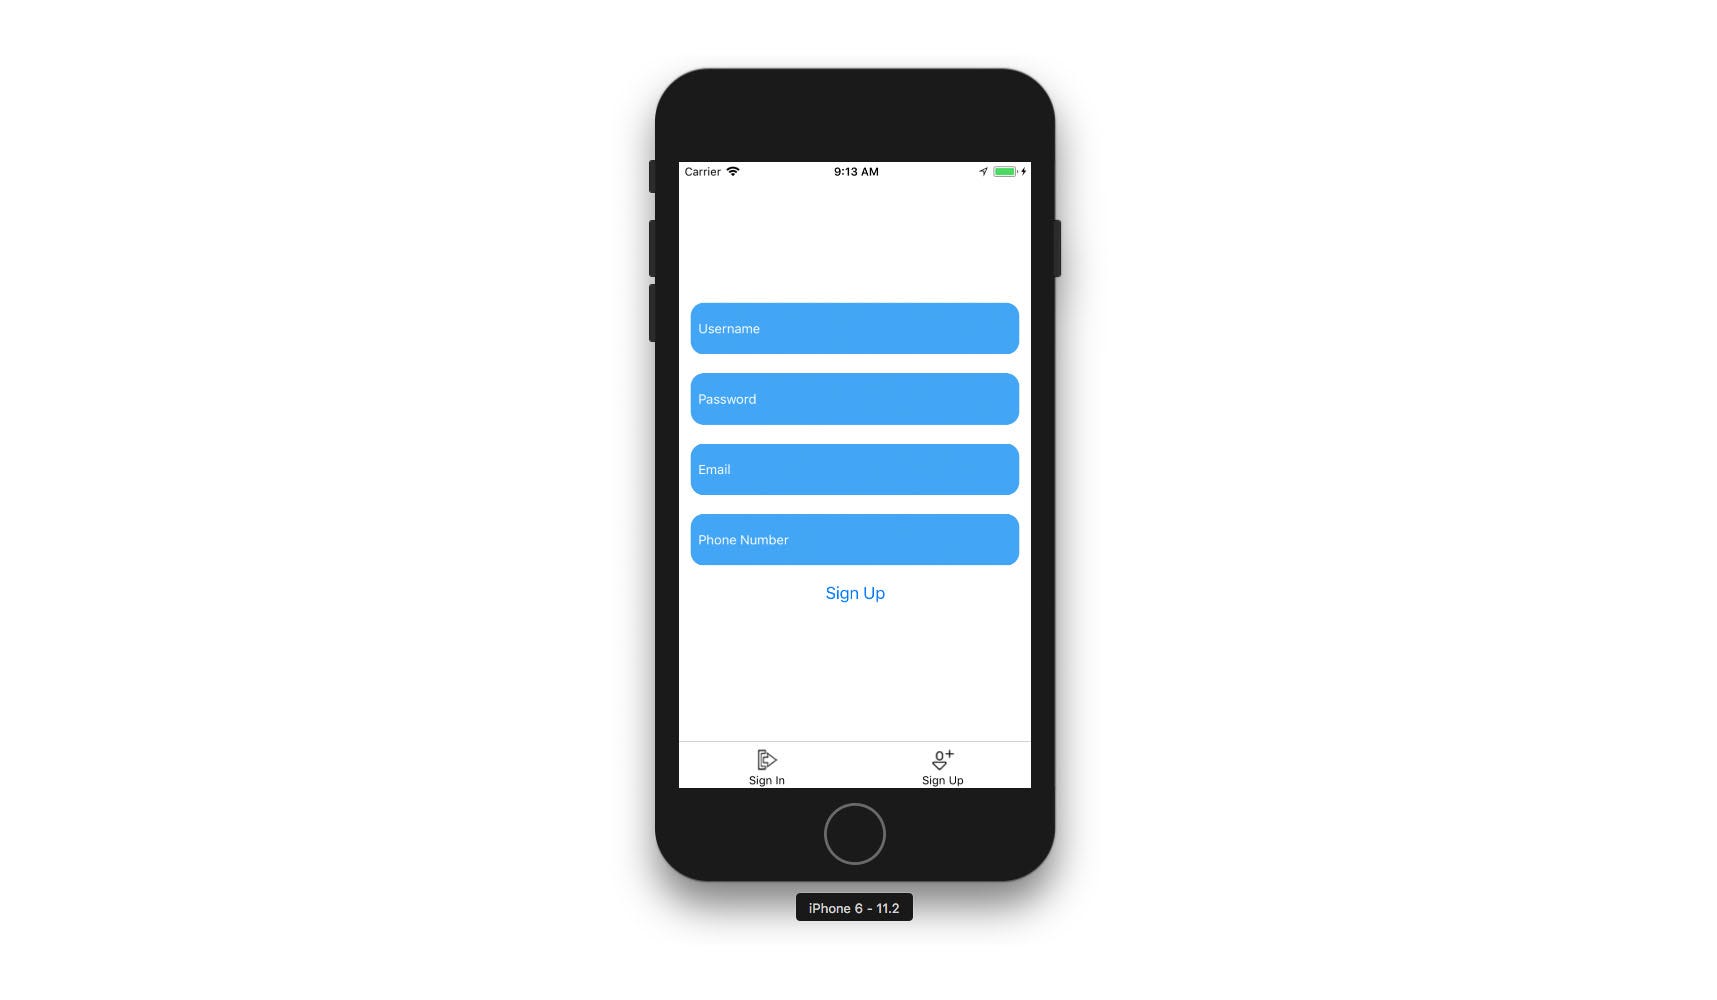
- If there is not a user in storage, we’ll render the auth components (SignIn & SignUp) in a tab-based navigation.


This is part 1 of a 2 part series.
Part 1 — Creating end-to-end navigation & authentication flow with dummy authorization for use with any Auth provider.
Getting Started
To get started, we first need to create a new React Native project using the React Native CLI:
react-native init RNNav2
Next, we’ll use npm or yarn to install React Native Navigation
npm install react-native-navigation@alpha# oryarn add react-native-navigation@alpha
We’ll now need to link the native dependencies & add some native code.
Creating the files
Next, we’ll create the files we’ll need for this app.
Let’s create a
src folder in our root directory to hold everything:mkdir src
Next, let’s create the following files in the
src directory:cd srctouch config.js Home.js Initializing.js SignIn.js SignUp.js screens.js navigation.js Screen2.js
config.js — this file will hold some basic configuration for our app, in our case it will be an AsyncStorage key for retrieving the user from storage.Home.js — this file will hold the component that renders if the user is logged in.Initializing.js — this file will hold the initialization logic and display a message to the user that the app is loading.Signin.js / SignUp.js — These will hold the forms for signing in & signing up. SignIn.js will also redirect a signed in user to the Home screen.screens.js — this file will hold the screen configuration for React Native Navigation.navigation.js — this file will hold our navigation functions. We’ll have two main functions: goToAuth() & goHome().Screen2.js — this will just hold another component for us to navigate to from our Home screen to demonstrate stack navigation.Registering the screens
With React Native Navigation, we need to register each of the screens that we will be using in our app.
To do so, we’ll use the
registerComponent method from React Native Navigation. We’ll place all of the screens we like to initialize into a single function, & call the function before creating the root of our navigation:// screens.js
import {Navigation} from 'react-native-navigation';
export function registerScreens() {
Navigation.registerComponent('Home', () => require('./Home').default);
Navigation.registerComponent('Initializing', (sc) => require('./Initializing').default);
Navigation.registerComponent('SignIn', () => require('./SignIn').default);
Navigation.registerComponent('SignUp', () => require('./SignUp').default);
Navigation.registerComponent('Screen2', () => require('./Screen2').default);
}
Here, we create & export a function that calls
Navigation.registerComponent() on any components we would like to have available to our Navigation.Registering the app
Next we’ll update
index.js to set up & initialize the application’s beginning navigation stack.// index.js
import {Navigation} from 'react-native-navigation';
import {registerScreens} from './src/screens';
registerScreens();
Navigation.events().registerAppLaunchedListener(() => {
Navigation.setRoot({
root: {
component: {
name: 'Initializing'
}
},
});
});
Here, we import the
registerScreens function & invoke it.
We also set the initial root stack of our app by calling
Navigation.setRoot, passing in the initial routes we would like our application to render. In our case, the root will be a single component, the Initializing screen.Creating our Navigation functions
Now, let’s create a couple of reusable functions that we can use to set root route stacks from within our app.
The root route is what defines the original route stack. We will want to have the option to reset the root stack to either the Authorization routes the actual App itself if the user is logged in.
// navigation.js
import { Navigation } from 'react-native-navigation'

export const goToAuth = () => Navigation.setRoot({
  root: {
    bottomTabs: {
      id: 'BottomTabsId',
      children: [
        {
          component: {
            name: 'SignIn',
            options: {
              bottomTab: {
                fontSize: 12,
                text: 'Sign In',
                icon: require('./signin.png')
              }
            }
          },
        },
        {
          component: {
            name: 'SignUp',
            options: {
              bottomTab: {
                text: 'Sign Up',
                fontSize: 12,
                icon: require('./signup.png')
              }
            }
          },
        },
      ],
    }
  }
});

export const goHome = () => Navigation.setRoot({
  root: {
    stack: {
      id: 'App',
      children: [
        {
          component: {
            name: 'Home',
          }
        }
    ],
    }
  }
})
The images we are requiring for our tabs are below, feel free to save them & use them:


In
navigation.js there are two functions:goToAuth — This function sets our root route stack to a bottomTabs route configuration. Each tab is a component, with a name and some options configured.goHome — This sets the route stack to a stack navigation, passing in a single component to the children array: the Home component.Storing the AsyncStorage key in a config file
We will be checking AsyncStorage to see if the user is signed in, and will be doing so in multiple files. We’ll store the AsyncStorage key in a separate file so we can reuse it easily.
// config.js
export const USER_KEY = 'USER_KEY'
Creating our screens
Now we have created all of the navigation configuration we will need, let’s create the screens & components we will be using.
Initializing.js.

// Initializing.js
import React from 'react'
import {
View,
Text,
StyleSheet,
AsyncStorage
} from 'react-native'
import { goToAuth, goHome } from './navigation'
import { USER_KEY } from './config'
export default class Initialising extends React.Component {
async componentDidMount() {
try {
const user = await AsyncStorage.getItem(USER_KEY)
console.log('user: ', user)
if (user) {
goHome()
} else {
goToAuth()
}
} catch (err) {
console.log('error: ', err)
goToAuth()
}
}
render() {
return (
<View style={styles.container}>
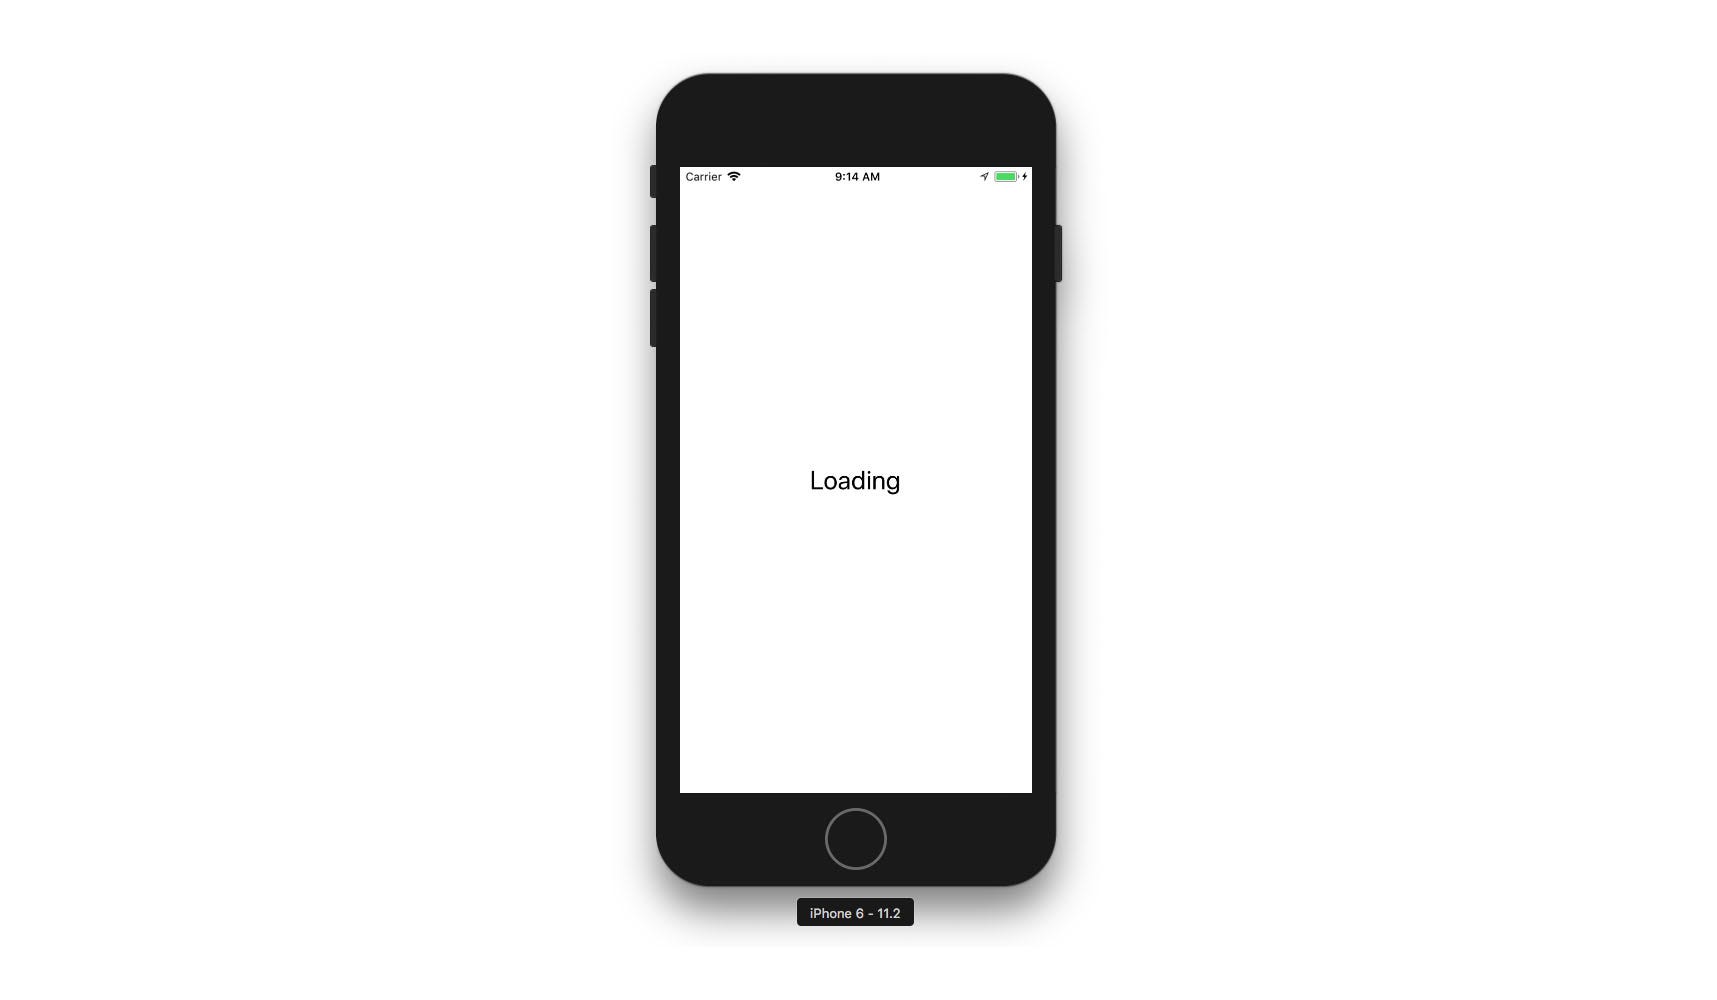
<Text style={styles.welcome}>Loading</Text>
</View>
)
}
}
const styles = StyleSheet.create({
welcome: {
fontSize: 28
},
container: {
flex: 1,
justifyContent: 'center',
alignItems: 'center'
}
})
Initializing.js — If you look at
componentDidMount, you will see most of what is going on here. We check AsyncStorage to see if we have a user saved in storage, if so we load the Home screen, if not we load the Auth routes (SignIn & SignUp).
While
componentDidMount is running the logic to see if a user is saved in storage, we show a Loading message. We then reset the route stack based on whether a user exists.Home.js


// Home.js
import React from 'react'
import {
  View,
  Text,
  Button,
  StyleSheet,
  AsyncStorage
} from 'react-native'
import { goToAuth } from './navigation'
import {Navigation} from 'react-native-navigation';

import { USER_KEY } from './config'

export default class Home extends React.Component {
  static get options() {
    return {
      topBar: {
        title: {
          text: 'Home'
        },
      }
    };
  }
  logout = async () => {
    try {
      await AsyncStorage.removeItem(USER_KEY)
      goToAuth()
    } catch (err) {
      console.log('error signing out...: ', err)
    }
  }
  render() {
    return (
      <View style={styles.container}>
        <Text>Hello from Home screen.</Text>
        <Button
          onPress={this.logout}
          title="Sign Out"
        />
        <Button
          onPress={() => {
            Navigation.push(this.props.componentId, {
              component: {
                name: 'Screen2',
              }
            });
          }}
          title="View next screen"
        />
      </View>
    )
  }
}

const styles = StyleSheet.create({
  container: {
    flex: 1,
    justifyContent: 'center',
    alignItems: 'center'
  }
})
Home.js — Here, we render a basic message to the user, and give them the option to either sign out or navigate to another route.
One difference & something I would note is how we are calling navigation methods. Instead of using props like in the old version (this.props.navigator.push), we’re importing theNavigationAPI and callingNavigation.push.
You’ll also notice a static
get options() class function. You can add this to your screen React component definition to add styling & properties to your navigator appearance. In ours, we’ve just given the topBar a title property.Screen2.js


import React from 'react'
import {
  View,
  Text,
  Button,
  StyleSheet,
} from 'react-native'
import {Navigation} from 'react-native-navigation';

export default class Screen2 extends React.Component {
  static get options() {
    return {
      topBar: {
        title: {
          text: 'Screen 2'
        },
      }
    };
  }
  render() {
    return (
      <View style={styles.container}>
        <Text>Screen 2</Text>
        <Button
          onPress={() => Navigation.pop(this.props.componentId)}
          title="Go Back"
        />
      </View>
    )
  }
}

const styles = StyleSheet.create({
  container: {
    flex: 1,
    justifyContent: 'center',
    alignItems: 'center'
  }
})
Screen.js — This is a really basic screen that we have only to demonstrate navigation in a stack navigator from our Home screen. One thing to note is how we call the Navigation.pop function to go back. This is again different from the old API that used props (
this.props.navigator.pop) vs in V2 we’re using the imported Navigation API from React Native Navigation (Navigation.pop).SignUp.js

// SignUp.js
import React from 'react'
import {
  View,
  Button,
  TextInput,
  StyleSheet
} from 'react-native'

export default class SignUp extends React.Component {
  state = {
    username: '', password: '', email: '', phone_number: ''
  }
  onChangeText = (key, val) => {
    this.setState({ [key]: val })
  }
  signUp = async () => {
    const { username, password, email, phone_number } = this.state
    try {
      // here place your signup logic
      console.log('user successfully signed up!: ', success)
    } catch (err) {
      console.log('error signing up: ', err)
    }
  }

  render() {
    return (
      <View style={styles.container}>
        <TextInput
          style={styles.input}
          placeholder='Username'
          autoCapitalize="none"
          placeholderTextColor='white'
          onChangeText={val => this.onChangeText('username', val)}
        />
        <TextInput
          style={styles.input}
          placeholder='Password'
          secureTextEntry={true}
          autoCapitalize="none"
          placeholderTextColor='white'
          onChangeText={val => this.onChangeText('password', val)}
        />
        <TextInput
          style={styles.input}
          placeholder='Email'
          autoCapitalize="none"
          placeholderTextColor='white'
          onChangeText={val => this.onChangeText('email', val)}
        />
        <TextInput
          style={styles.input}
          placeholder='Phone Number'
          autoCapitalize="none"
          placeholderTextColor='white'
          onChangeText={val => this.onChangeText('phone_number', val)}
        />
        <Button
          title='Sign Up'
          onPress={this.signUp}
        />
      </View>
    )
  }
}

const styles = StyleSheet.create({
  input: {
    width: 350,
    height: 55,
    backgroundColor: '#42A5F5',
    margin: 10,
    padding: 8,
    color: 'white',
    borderRadius: 14,
    fontSize: 18,
    fontWeight: '500',
  },
  container: {
    flex: 1,
    justifyContent: 'center',
    alignItems: 'center'
  }
})
SignUp.js — For now, SignUp.js is just a placeholder signup form. You can use this to implement whatever Authentication service you are using. In part 2, we will be updating this to be a real-world signup form using AWS Amplify & Amazon Cognito.
SignIn.js


// SignIn.js
import React from 'react'
import {
  View,
  Text,
  StyleSheet,
  TextInput,
  Button,
  AsyncStorage
} from 'react-native'

import { goHome } from './navigation'
import { USER_KEY } from './config'

export default class SignIn extends React.Component {
  state = {
    username: '', password: ''
  }
  onChangeText = (key, value) => {
    this.setState({ [key]: value })
  }
  signIn = async () => {
    const { username, password } = this.state
    try {
       // login with provider
       const user = await AsyncStorage.setItem(USER_KEY, username)
       console.log('user successfully signed in!', user)
       goHome()
    } catch (err) {
      console.log('error:', err)
    }
  }
  render() {
    return (
      <View style={styles.container}>
        <TextInput
          style={styles.input}
          placeholder='Username'
          autoCapitalize="none"
          autoCorrect={false}
          placeholderTextColor='white'
          onChangeText={val => this.onChangeText('username', val)}
        />
        <TextInput
          style={styles.input}
          placeholder='Password'
          autoCapitalize="none"
          secureTextEntry={true}
          placeholderTextColor='white'
          onChangeText={val => this.onChangeText('password', val)}
        />
        <Button
          title='Sign In'
          onPress={this.signIn}
        />
      </View>
    )
  }
}

const styles = StyleSheet.create({
  input: {
    width: 350,
    fontSize: 18,
    fontWeight: '500',
    height: 55,
    backgroundColor: '#42A5F5',
    margin: 10,
    color: 'white',
    padding: 8,
    borderRadius: 14
  },
  container: {
    flex: 1,
    justifyContent: 'center',
    alignItems: 'center'
  }
})
SignIn.js — This component holds a basic sign in form. In the
signIn class method we simulate a successful sign in by setting the username property in AsyncStorage & the navigating the user to the Home screen.
Now we should be able to run the app:
react-native run-ios
# or
react-native run-android
The final code for this project up to here is located here.
Comments
Post a Comment
Thank You.