React Native Navigation is used for managing the presentation, and transition between multiple screens. There are two types of navigation built in mobile applications. These are stack navigation and tabbed navigation patterns.
React Navigation Installation
React Navigation is generated from React Native community that provides the navigation solution written in JavaScript.
Create the React Native project and install the required packages and dependencies.
Install the react-navigation package in React Native project using any one of the below command.
- yarn add react-navigation
- # or with npm
- # npm install --save react-navigation
After successful execution of the above command, it adds the "react-navigation": "^3.3.0" (3.3.0 is version) in package.json file.
After that, install react-native-gesture-handler package.
- yarn add react-native-gesture-handler
- # or with npm
- # npm install --save react-native-gesture-handler
Now, link all the native dependencies together using command:
- react-native link react-native-gesture-handler
To complete the installation of 'react-native-gesture-handler' for Android, make the following modification in MainActivity.java.
projectDirectory/android/app/src/main/java/com/project/MainActivity.java
- import com.facebook.react.ReactActivityDelegate;
- import com.facebook.react.ReactRootView;
- import com.swmansion.gesturehandler.react.RNGestureHandlerEnabledRootView;
-
- . . .
-
- @Override
- protected ReactActivityDelegate createReactActivityDelegate() {
- return new ReactActivityDelegate(this, getMainComponentName()) {
- @Override
- protected ReactRootView createRootView() {
- return new RNGestureHandlerEnabledRootView(MainActivity.this);
- }
- };
- }
Creating a stack navigator
To create a stack navigation, we import createStackNavigator and createAppContainer functions of react-navigation library.
App.js
- import React from "react";
- import {Button, View, Text } from "react-native";
- import { createStackNavigator, createAppContainer } from "react-navigation";
-
- class HomeScreen extends React.Component {
- render() {
- return (
- <View style={{ flex: 1, alignItems: "center", justifyContent: "center" }}>
- <Text>Home Screen</Text>
- </View>
- );
- }
- }
-
- const AppNavigator = createStackNavigator({
- Home: {
- screen: HomeScreen
- }
- });
- export default createAppContainer(AppNavigator);
The createStackNavigator is a function which takes a route configuration object and options object. It returns the React component.
MainActivity.java
- package com.naviexe;
-
- import com.facebook.react.ReactActivity;
- import com.facebook.react.ReactActivityDelegate;
- import com.facebook.react.ReactRootView;
- import com.swmansion.gesturehandler.react.RNGestureHandlerEnabledRootView;
-
- public class MainActivity extends ReactActivity {
-
- @Override
- protected String getMainComponentName() {
- return "naviExe";
- }
- @Override
- protected ReactActivityDelegate createReactActivityDelegate() {
- return new ReactActivityDelegate(this, getMainComponentName()) {
- @Override
- protected ReactRootView createRootView() {
- return new RNGestureHandlerEnabledRootView(MainActivity.this);
- }
- };
- }
- }
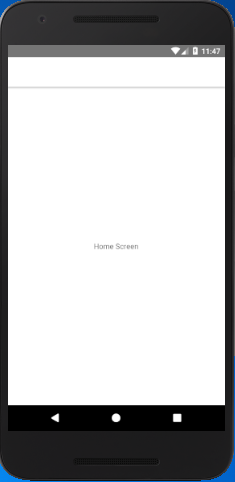
When we run the above code, we see an empty navigation bar containing the HomeScreen component.
Output:
Shorthand route configuration
When we have only a single screen as route that is Home screen component, we do not need to use the {screen: HomeScreen} , we can directly use the home component.
- const AppNavigator = createStackNavigator({
- Home: HomeScreen
- });
Adding title and styling navigation
- static navigationOptions = {
- title: 'Home',
- headerStyle: {
- backgroundColor: '#f4511e',
- },
- headerTintColor: '#0ff',
- headerTitleStyle: {
- fontWeight: 'bold',
- },
- };
- import React from 'react';
- import { View, Text } from 'react-native';
- import { createStackNavigator, createAppContainer } from 'react-navigation';
-
- class HomeScreen extends React.Component {
- static navigationOptions = {
- title: 'Home',
- headerStyle: {
- backgroundColor: '#f4511e',
- },
-
- headerTitleStyle: {
- fontWeight: 'bold',
- },
- };
- render() {
- return (
- <View style={{ flex: 1, alignItems: 'center', justifyContent: 'center' }}>
- <Text>Home Screen</Text>
- </View>
- );
- }
- }
- const AppNavigator = createStackNavigator({
- Home: HomeScreen
- });
-
- export default createAppContainer(AppNavigator);
Adding a second route screen
Create another class (ProfileScreen) in App.js file to add the second route screen to the stack navigator.
- class ProfileScreen extends React.Component {
- render() {
- return (
- <View style={{ flex: 1, alignItems: "center", justifyContent: "center" }}>
- <Text>Details Screen</Text>
- </View>
- );
- }
- }
-
- const AppNavigator = createStackNavigator(
- {
- Home: HomeScreen,
- Profile: ProfileScreen
- },
- {
- initialRouteName: "Home"
- }
- );
The initialRouteName options object specifies the initial route in the stack navigation.
Complete code:
App.js
- import React from 'react';
- import { View, Text } from 'react-native';
- import { createStackNavigator, createAppContainer } from 'react-navigation';
-
- class HomeScreen extends React.Component {
- render() {
- return (
- <View style={{ flex: 1, alignItems: 'center', justifyContent: 'center' }}>
- <Text>Home Screen</Text>
- </View>
- );
- }
- }
- class ProfileScreen extends React.Component {
- render() {
- return (
- <View style={{ flex: 1, alignItems: "center", justifyContent: "center" }}>
- <Text>Details Screen</Text>
- </View>
- );
- }
- }
-
- const AppNavigator = createStackNavigator(
- {
- Home: HomeScreen,
- Profile: ProfileScreen
- },
- {
- initialRouteName: "Home"
- }
- );
-
- export default createAppContainer(AppNavigator);
Output:
In the next section, we will learn how to go from Home route to Profile route (one screen to another).

Comments
Post a Comment
Thank You.