
React Native Picker

React Native Picker is component which is used to select an item from the multiple choices. This is the same as a Dropdown option. Picker is used when we need to provide an alternative to choose from multiple options.
It is used by importing the Picker component from the react-native library.

Props of Picker

PropDescription
onValueChange( itemValue, itemPosition)It is a callback prop and called when an item is selected. It takes two parameters (itemValue: the item (value) which is selected, itemPosition: the position (index) of a selected item).
selectedValueReturns the selected value.
styleIt is a picket style type.
testIDIt is used to locate this view in end-to-end tests.
enabledIt is a Boolean prop which makes picker disable when set to false. If it is set to false, the user cannot be able to make a selection.
modeOn Android, it specifies how to display the selections items when the users click on the picker. It has the "dialog" and "dropdown" properties. The dialog is default mode and shows as a modal dialog. The dropdown displays the picker as dropdown anchor view.
promptIt is used in Android with dialog mode as the title of the dialog.
itemStyleIt styles each item of the picker labels.

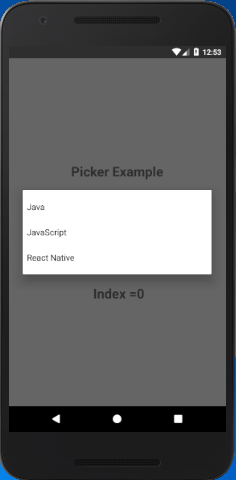
React Native Picker Example

In this example, we create three label items in Picker component. When the item is selected from Picker, it calls the onValueChange callback and set the selected item in the picker. The index of item is read from itemPosition. The item's position is displayed in a Text component.

App.js

  1. import React, { Component } from 'react'  
  2. import {StyleSheet,View, Text,Picker} from 'react-native'  
  3.   
  4. export default class SwitchExample extends Component {  
  5.     state = {  
  6.         choosenIndex: 0  
  7.     };  
  8.   
  9.     render() {  
  10.         return (  
  11.             <View style={styles.container}>  
  12.                 <Text style={styles.textStyle}>Picker Example</Text>  
  13.                 <Picker style={styles.pickerStyle}  
  14.                         selectedValue={this.state.language}  
  15.                         onValueChange={(itemValue, itemPosition) =>  
  16.                             this.setState({language: itemValue, choosenIndex: itemPosition})}  
  17.                     >  
  18.                     <Picker.Item label="Java" value="java" />  
  19.                     <Picker.Item label="JavaScript" value="js" />  
  20.                     <Picker.Item label="React Native" value="rn" />  
  21.                 </Picker>  
  22.                 <Text style={styles.textStyle}> {"Index ="+this.state.choosenIndex}</Text>  
  23.             </View>  
  24.         );  
  25.     }  
  26. }  
  27. const styles = StyleSheet.create ({  
  28.      container: {  
  29.          flex: 1,  
  30.          alignItems: 'center',  
  31.          justifyContent: 'center',  
  32.      },  
  33.     textStyle:{  
  34.         margin: 24,  
  35.         fontSize: 25,  
  36.         fontWeight: 'bold',  
  37.         textAlign: 'center',  
  38.     },  
  39.     pickerStyle:{  
  40.         height: 150,  
  41.         width: "80%",  
  42.         color: '#344953',  
  43.         justifyContent: 'center',  
  44.     }  
  45. })  

Output:

React Native Picker React Native Picker React Native Picker

Comments

Popular Posts

How I Reduced the Size of My React Native App by 85%

How and Why You Should Do It I borrowed 25$ from my friend to start a Play Store Developer account to put up my first app. I had already created the app, created the assets and published it in the store. Nobody wants to download a todo list app that costs 25mb of bandwidth and another 25 MB of storage space. So today I am going to share with you how I reduced the size of Tet from 25 MB to around 3.5 MB. Size Matters Like any beginner, I wrote my app using Expo, the awesome React Native platform that makes creating native apps a breeze. There is no native setup, you write javascript and Expo builds the binaries for you. I love everything about Expo except the size of the binaries. Each binary weighs around 25 MB regardless of your app. So the first thing I did was to migrate my existing Expo app to React Native. Migrating to React Native react-native init  a new project with the same name Copy the  source  files over from Expo project Install all de...

How to recover data of your Android KeyStore?

These methods can save you by recovering Key Alias and Key Password and KeyStore Password. This dialog becomes trouble to you? You should always keep the keystore file safe as you will not be able to update your previously uploaded APKs on PlayStore. It always need same keystore file for every version releases. But it’s even worse when you have KeyStore file and you forget any credentials shown in above box. But Good thing is you can recover them with certain tricks [Yes, there are always ways]. So let’s get straight to those ways. 1. Check your log files → For  windows  users, Go to windows file explorer C://Users/your PC name/.AndroidStudio1.4 ( your android studio version )\system\log\idea.log.1 ( or any old log number ) Open your log file in Notepad++ or Any text editor, and search for: android.injected.signing and if you are lucky enough then you will start seeing these. Pandroid.injected.signing.store.file = This is  file path where t...

React Native - Text Input

In this chapter, we will show you how to work with  TextInput  elements in React Native. The Home component will import and render inputs. App.js import React from 'react' ; import Inputs from './inputs.js' const App = () => { return ( < Inputs /> ) } export default App Inputs We will define the initial state. After defining the initial state, we will create the  handleEmail  and the  handlePassword  functions. These functions are used for updating state. The  login()  function will just alert the current value of the state. We will also add some other properties to text inputs to disable auto capitalisation, remove the bottom border on Android devices and set a placeholder. inputs.js import React , { Component } from 'react' import { View , Text , TouchableOpacity , TextInput , StyleSheet } from 'react-native' class Inputs extends Component { state = { ...