
React Native ProgressBarAndroid

The ProgressBarAndroid component of React Native is used to indicate the progress status of some activity or app loading something. ProgressBarAndroid component works only on Android platform. To use the progress bar in iOS platform, a ProgressViewIOS component is used.

Props of ProgressBarAndroid

PropsTypeRequiredDescription
animatingboolnoIt is used to show or hide the progress bar. Its default value is true to show, (false to hide).
colorcolornoIt sets the color of progress bar.
indeterminateindeterminateTypenoIt shows the intermediate progress status of progress bar. It can only be false if the styleAtte of progress bar is Horizontal.
progressnumbernoIt is a progress value between 0 and 1.
styleAttrenumnoIt sets the style of progress bar. There are various style of progress bar in React Native such as Horizontal, Normal (default), Small, Large, Inverse, SmallInverse, and LargeInverse.
testIDstringnoIt is used to locate this view in end-to-end tests.

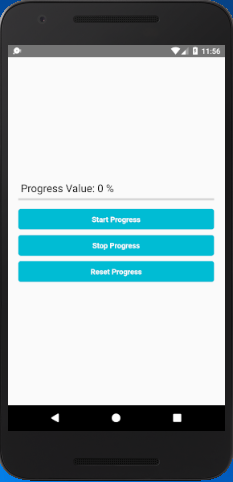
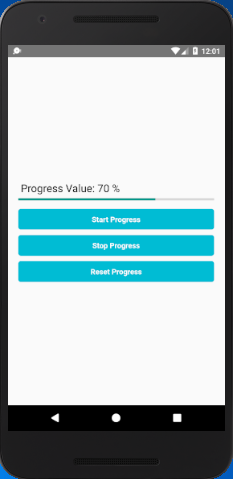
React Native ProgressBarAndroid Example

In this example, we will implement horizontal ProgressBarAndroid and perform action on TouchableOpacity component. The progress status will display in Text component up to 3 digits only.
  1. import React, { Component } from 'react';  
  2. import { Platform, StyleSheet, View, Text, TouchableOpacity, ProgressBarAndroid, ProgressViewIOS } from 'react-native';  
  3. export default class MyApp extends Component<{}>{  
  4.   constructor()  {  
  5.     super();  
  6.     this.state = {  
  7.       progressStatus: 0,  
  8.     }  
  9.   }  
  10.   
  11.   start_Progress = () => {  
  12.     this.value = setInterval( () => {  
  13.       if(this.state.progressStatus <= 1){  
  14.         this.setState({progressStatus: this.state.progressStatus+ .01})  
  15.       }  
  16.     }, 100 );  
  17.   }  
  18.   
  19.   stop_Progress = () =>{  
  20.    clearInterval(this.value);  
  21.   }  
  22.   
  23.   clear_Progress =()=>{  
  24.     this.setState({progressStatus : 0.0})  
  25.   }  
  26.   
  27.   render()  
  28.   {  
  29.     return(  
  30.       <View style = { styles.MainContainer }>  
  31.         <Text style = {{fontSize: 20, color: '#000'}}> Progress Value: { parseFloat((this.state.progressStatus * 100).toFixed(3))} %</Text>{  
  32.             ( Platform.OS === 'android' )  
  33.             ?  
  34.               ( <ProgressBarAndroid styleAttr = "Horizontal" progress = { this.state.progressStatus } indeterminate = { false } /> )  
  35.             :  
  36.               ( <ProgressViewIOS progress = { this.state.progressStatus } /> )  
  37.         }  
  38.         <TouchableOpacity activeOpacity = { 1 } style = { styles.button } onPress = { this.start_Progress }>  
  39.           <Text style = { styles.TextStyle }> Start Progress </Text>  
  40.         </TouchableOpacity>  
  41.         <TouchableOpacity activeOpacity = { 1 } style = { styles.button } onPress = { this.stop_Progress }>  
  42.           <Text style = { styles.TextStyle }> Stop Progress </Text>  
  43.         </TouchableOpacity>  
  44.         <TouchableOpacity activeOpacity = { 1 } style = { styles.button } onPress = { this.clear_Progress }>  
  45.           <Text style = { styles.TextStyle }> Reset Progress </Text>  
  46.         </TouchableOpacity>  
  47.       </View>  
  48.     );  
  49.   }  
  50. }  
  51.   
  52. const styles = StyleSheet.create(  
  53. {  
  54.   MainContainer:  
  55.   {  
  56.     flex: 1,  
  57.     justifyContent: 'center',  
  58.     paddingTop: ( Platform.OS === 'ios' ) ? 20 : 0,  
  59.     margin: 20  
  60.   },  
  61.   
  62.   button: {  
  63.   width: '100%',  
  64.   backgroundColor: '#00BCD4',  
  65.   borderRadius:5,  
  66.   padding: 10,  
  67.   marginTop: 10,  
  68.   
  69. },  
  70.   
  71. TextStyle:{  
  72.     color:'#fff',  
  73.     textAlign:'center',  
  74.     fontWeight: 'bold',  
  75. }  
  76. });  

Output:

React Native ProgressBarAndroid React Native ProgressBarAndroid

Comments

Popular Posts

How I Reduced the Size of My React Native App by 85%

How and Why You Should Do It I borrowed 25$ from my friend to start a Play Store Developer account to put up my first app. I had already created the app, created the assets and published it in the store. Nobody wants to download a todo list app that costs 25mb of bandwidth and another 25 MB of storage space. So today I am going to share with you how I reduced the size of Tet from 25 MB to around 3.5 MB. Size Matters Like any beginner, I wrote my app using Expo, the awesome React Native platform that makes creating native apps a breeze. There is no native setup, you write javascript and Expo builds the binaries for you. I love everything about Expo except the size of the binaries. Each binary weighs around 25 MB regardless of your app. So the first thing I did was to migrate my existing Expo app to React Native. Migrating to React Native react-native init  a new project with the same name Copy the  source  files over from Expo project Install all de...

How to recover data of your Android KeyStore?

These methods can save you by recovering Key Alias and Key Password and KeyStore Password. This dialog becomes trouble to you? You should always keep the keystore file safe as you will not be able to update your previously uploaded APKs on PlayStore. It always need same keystore file for every version releases. But it’s even worse when you have KeyStore file and you forget any credentials shown in above box. But Good thing is you can recover them with certain tricks [Yes, there are always ways]. So let’s get straight to those ways. 1. Check your log files → For  windows  users, Go to windows file explorer C://Users/your PC name/.AndroidStudio1.4 ( your android studio version )\system\log\idea.log.1 ( or any old log number ) Open your log file in Notepad++ or Any text editor, and search for: android.injected.signing and if you are lucky enough then you will start seeing these. Pandroid.injected.signing.store.file = This is  file path where t...

React Native - Text Input

In this chapter, we will show you how to work with  TextInput  elements in React Native. The Home component will import and render inputs. App.js import React from 'react' ; import Inputs from './inputs.js' const App = () => { return ( < Inputs /> ) } export default App Inputs We will define the initial state. After defining the initial state, we will create the  handleEmail  and the  handlePassword  functions. These functions are used for updating state. The  login()  function will just alert the current value of the state. We will also add some other properties to text inputs to disable auto capitalisation, remove the bottom border on Android devices and set a placeholder. inputs.js import React , { Component } from 'react' import { View , Text , TouchableOpacity , TextInput , StyleSheet } from 'react-native' class Inputs extends Component { state = { ...