The material style createMaterialTopTabNavigator is used to create tab navigator on the top of the screen. It provides functionality to create and display multiple screens routers. These screens are switches between each other by tapping route or swiping horizontally. The tab screen components are mounted when they are focused.
The createMaterialTopTabNavigator function of react-navigation library facilitates us to implement top tab navigator.
- createMaterialTopTabNavigator(RouteConfigs, TabNavigatorConfig);
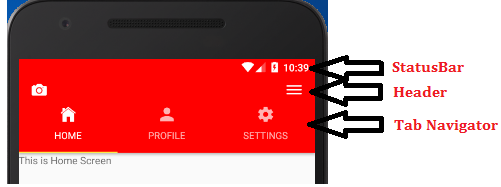
React Native Top Tab Navigator Example
Let's create a top tab navigator with custom status bar and header section. In this example, we will create three different screens for "Home", "Profile" and "Settings" router. Each router screens are created in separate files.
The directory structure of the application
Create a src directory in your route project. Inside the src directory create index.js file and two other directories lib and screens. In the screens directory, we place three screens file index.js (HomeScreen), profile.js (ProfileScreen), and settings.js (SettingsScreen). In the lib directory, we implement createMaterialTopTabNavigator to create top tab navigator.
topNavigation/index.js
Make the few changes in the topNavigation/index.js file (replace './App' with './src').
- import {AppRegistry} from 'react-native';
- import App from './src';
- import {name as appName} from './app.json';
-
- AppRegistry.registerComponent(appName, () => App);
Create the classes and import Icon from 'react-native-vector-icons/Ionicons' package. Implement tabBarIcon and add Icon tag in it.
src/screens/index.js
- import React, {Component} from 'react';
- import {View,Text} from 'react-native';
- import Icon from 'react-native-vector-icons/Ionicons';
- export default class HomeScreen extends Component{
- render() {
- return(
- <View>
- <Text>This is Home Screen</Text>
- </View>
- )
- }
- }
- HomeScreen.navigationOptions={
- tabBarIcon:({tintColor, focused})=>(
- <Icon
- name={focused ? 'ios-home' : 'md-home'}
- color={tintColor}
- size={25}
- />
- )
- }
src/screens/profile.js
- import React, {Component} from 'react';
- import {View,Text} from 'react-native';
- import Icon from 'react-native-vector-icons/Ionicons';
- export default class ProfileScreen extends Component{
- render(){
- return(
- <View>
- <Text>this is profile screen</Text>
- </View>
- )
- }
- }
- ProfileScreen.navigationOptions={
- tabBarIcon:({tintColor, focused})=>(
- <Icon
- name={focused ? 'ios-person' : 'md-person'}
- color={tintColor}
- size={25}
- />
- )
- }
src/screens/settings.js
- import React, {Component} from 'react';
- import {View,Text} from 'react-native';
- import Icon from 'react-native-vector-icons/Ionicons';
- export default class SettingScreen extends Component{
- render(){
- return(
- <View>
- <Text>this is setting screen</Text>
- </View>
- )
- }
- }
- SettingScreen.navigationOptions={
- tabBarIcon:({tintColor, focused})=>(
- <Icon
- name={focused ? 'ios-settings' : 'md-settings'}
- color={tintColor}
- size={25}
- />
- )
- }
src/lib/router.js
In router.js file, import createMaterialTopTabNavigator and createAppContainer functions of 'react-navigation' library. Also import all the routers classes in it and place them in such sequence as we want to display them on the top of tab navigator.
- activeTintColor: sets the mention color to the active router.
- showIcon: show {true} and hide {false} the icon of routers.
- showLabel: show {true} and hide {false} the title of routers. By default it is true.
- import React from 'react';
- import {createMaterialTopTabNavigator,createAppContainer} from 'react-navigation';
- import HomeScreen from "../screens/index";
- import ProfileScreen from "../screens/profile";
- import SettingScreen from "../screens/settings";
-
- const AppNavigator = createMaterialTopTabNavigator(
- {
- Home: HomeScreen,
- Profile: ProfileScreen,
- Settings: SettingScreen,
- },
- {
- tabBarOptions: {
- activeTintColor: 'white',
- showIcon: true,
- showLabel:false,
- style: {
- backgroundColor:'red'
- }
- },
- }
- )
- export default createAppContainer(AppNavigator);
src/index.js
Import AppNavigator from './lib/router' and assign the AppNavigator in a const AppIndex in this file. Customize the status bar using StatusBar tag and add header on the top of tab navigator.
- import React, {Component} from 'react';
- import {StyleSheet, Text, View,StatusBar} from 'react-native';
- import {createAppContainer} from 'react-navigation';
- import Icon from 'react-native-vector-icons/Ionicons';
-
- import AppNavigator from './lib/router';
- const AppIndex = createAppContainer(AppNavigator)
-
- export default class App extends Component{
- render(){
- return(
- <View style={{flex:1}} >
- <StatusBar
- backgroundColor='red'
- barStyle='light-content'
- />
- <View style={styles.header}>
- <Icon name='ios-camera' size={28} color='white'/>
- <Icon name='ios-menu' size={28} color='white'/>
- </View>
- <AppIndex/>
- </View>
- )
- }
- }
- const styles = StyleSheet.create({
- wrapper: {
- flex: 1,
- },
- header:{
- flexDirection: 'row',
- alignItems: 'center',
- justifyContent: 'space-between',
- backgroundColor: 'red',
- paddingHorizontal: 18,
- paddingTop: 5,
- }
- });
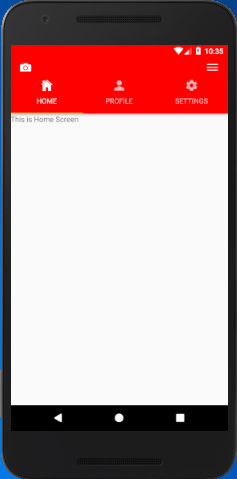
Output:
Comments
Post a Comment
Thank You.