It involves things that I needed to do to get this experiment to work, mainly:
- Figuring out how to split react native bundle per screen with Metro
- Tracking the code path that loads and executes the javascript bundle inside JavascriptCore and replicating it
- Hooking it up inside a react native app to lazily load the javascript bundle for a screen before navigating to it
Code Splitting using Metro
Metro doesn’t have an out of the box way to split your bundle based on dynamic imports help but for the purposes of this experiment I stuck with Metro.
The next option was to write two minimal screens and try to split the unified javascript bundle manually. So I created two variations of my index.js:

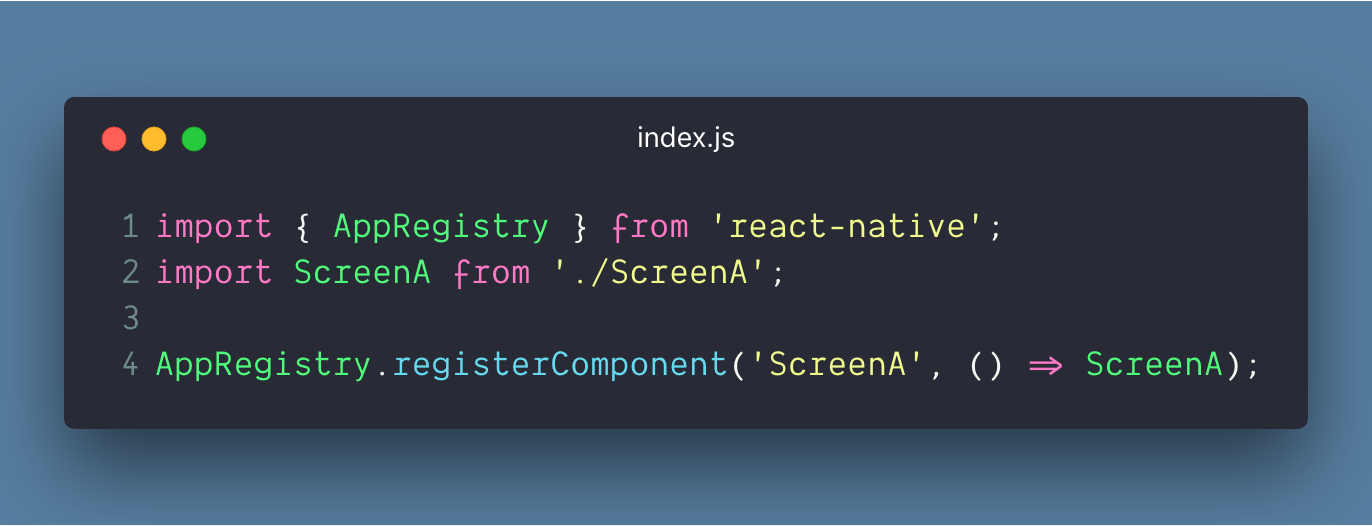

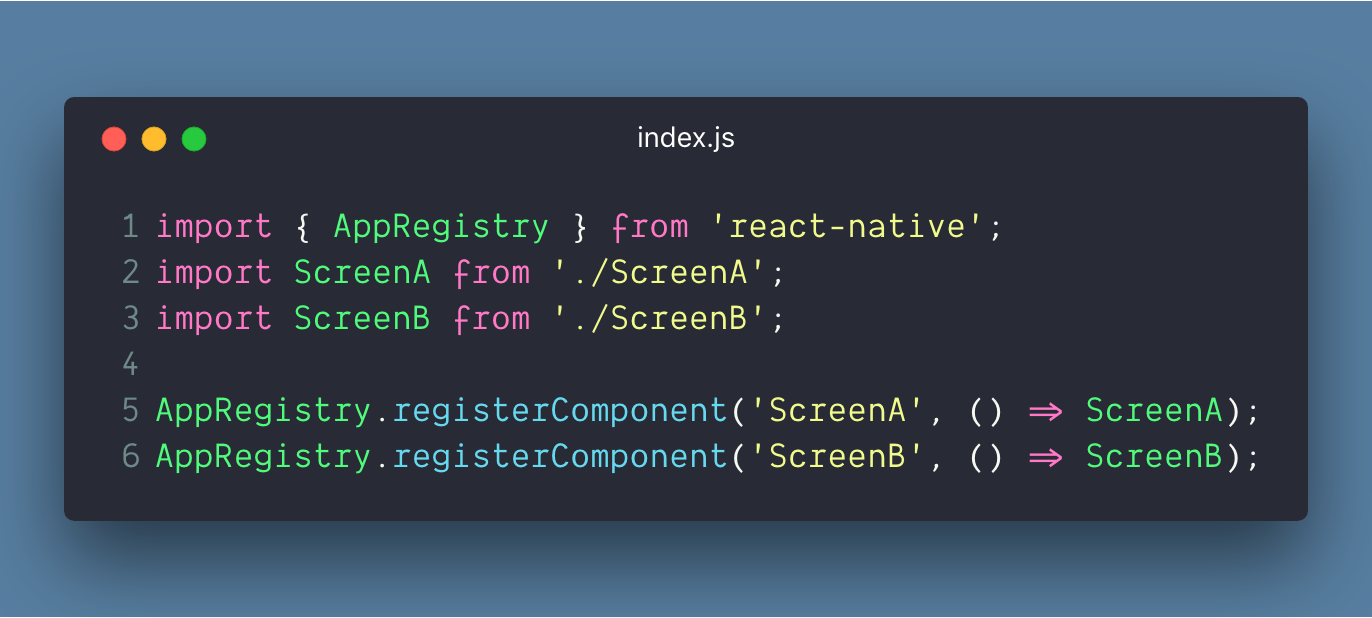
I used these two variations to generate two different javascript bundles using the following react-native CLI command:
react-native bundle \
        --platform ios \
        --entry-file index.js \
        --bundle-output ./ios/main.jsbundle
Next, I diff’ed them in a file diff tool.
The first diff looked like this:


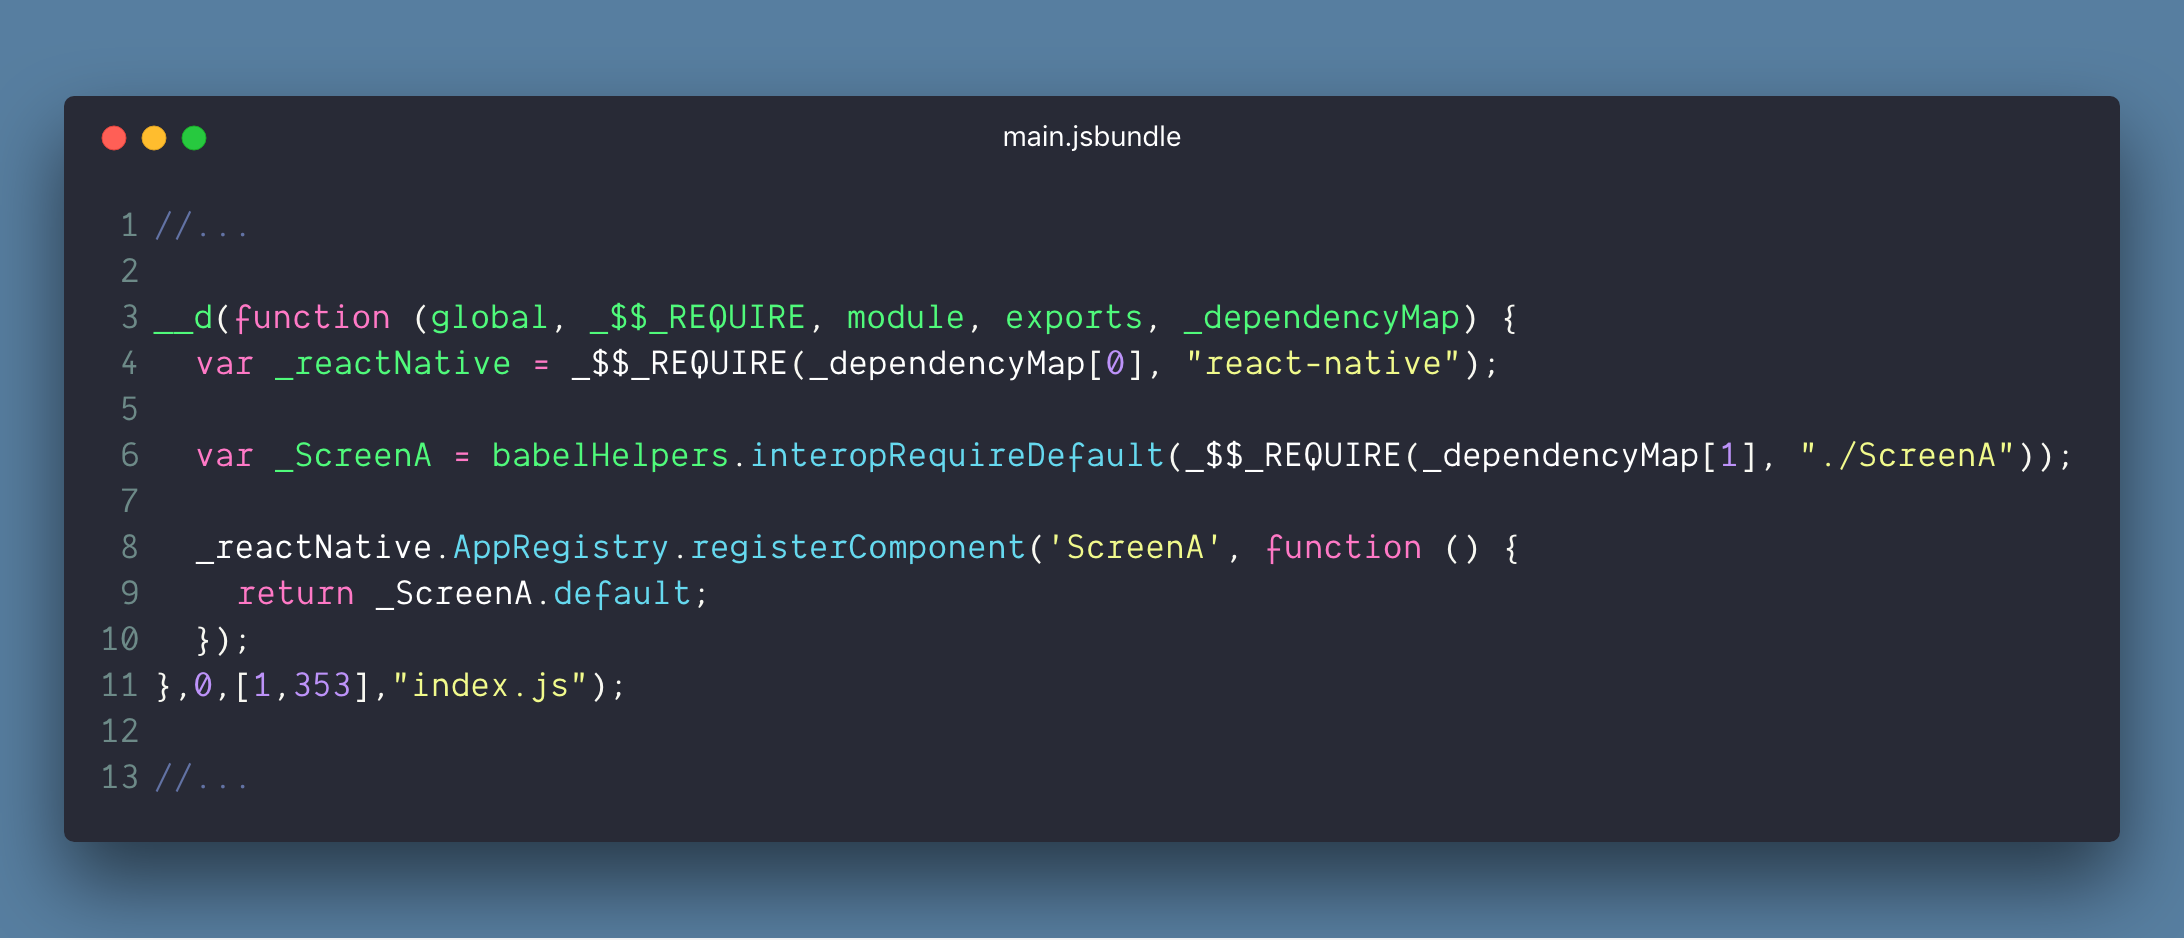
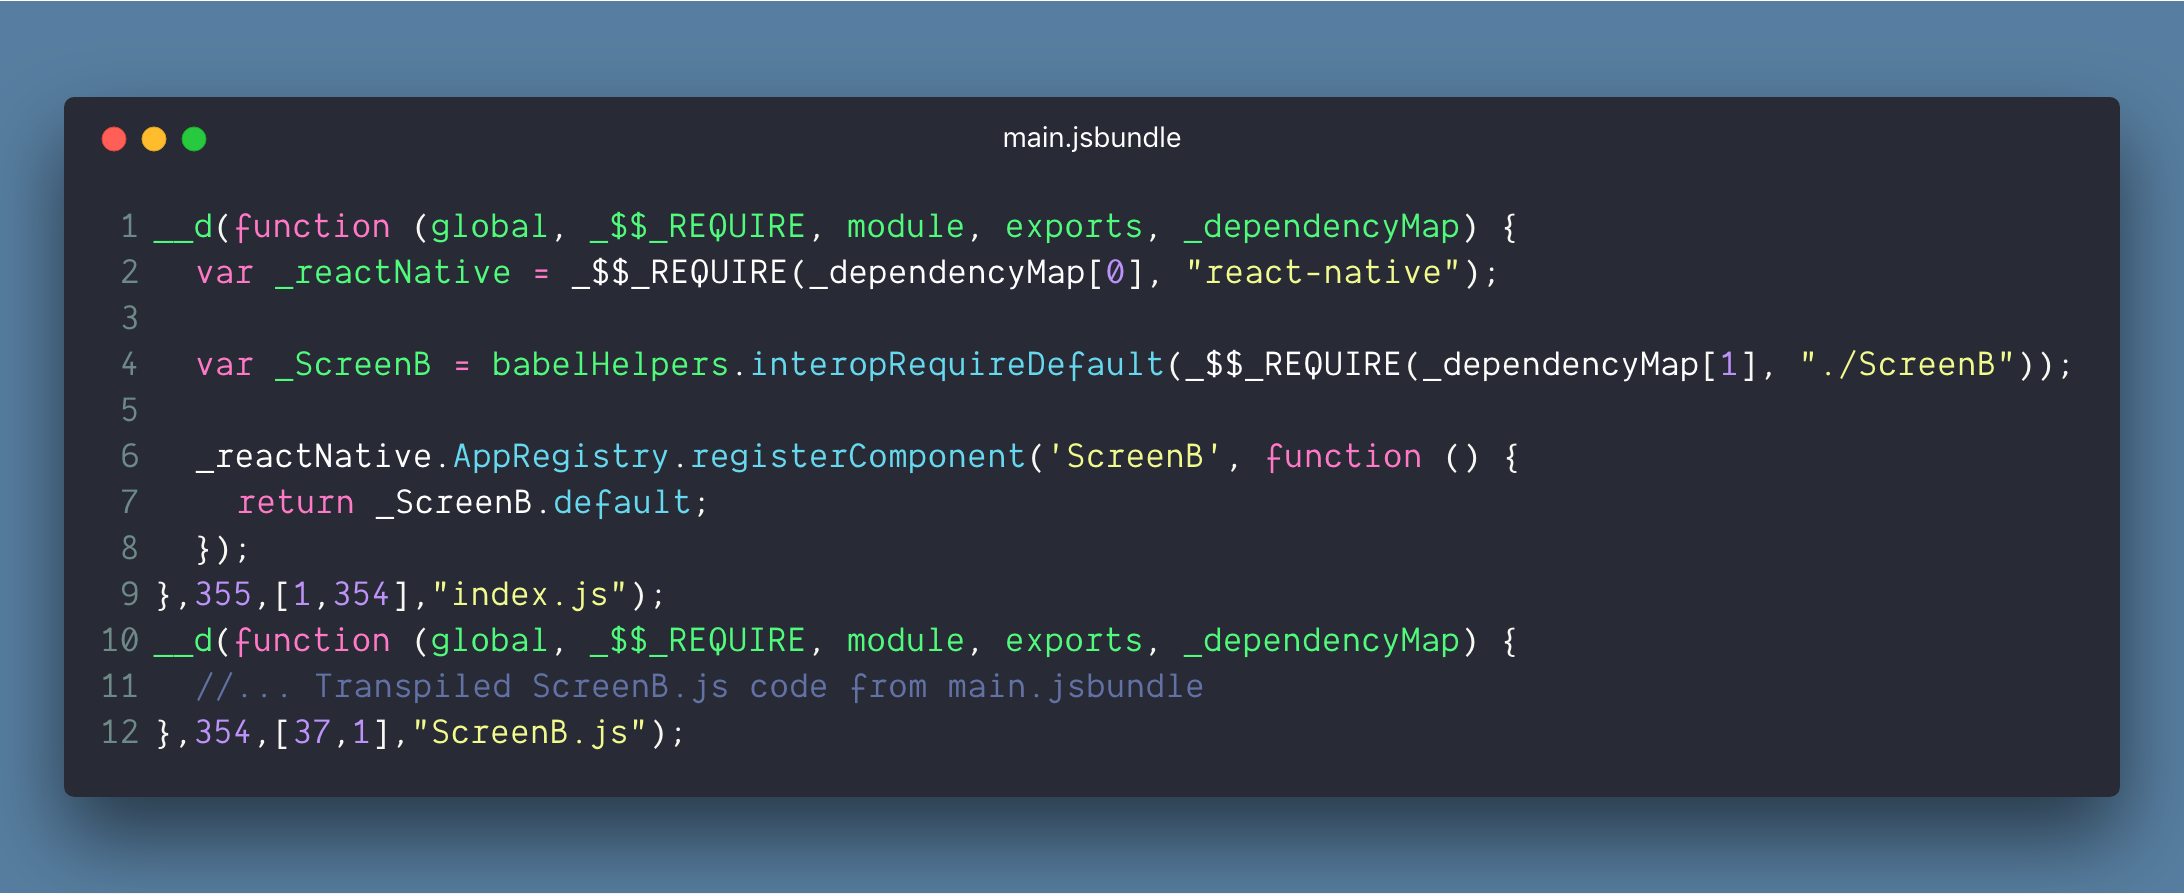
This is how the transpiled portion of the index.js file looks like. It has 3 distinct parts:
- First part of the diff refers to the extra ScreenB import. Note that _dependencyMap is the array of module ID’s received by this function. So:
_dependencyMap[0] = react-native_dependencyMap[1] = ScreenA
_dependencyMap[2] = ScreenB - Second part refers to the AppRegistry call to register ScreenB with react native
- Third part refers to Metro providing the ScreenB module ID, 354, to the function so that it can consume it
Each of __d(…) functions refers to a file/module used within your react native app. The second argument of this, 0(zero) in this case, refers to the ID given to our index.js file by Metro.
The second part of the diff looks like this:

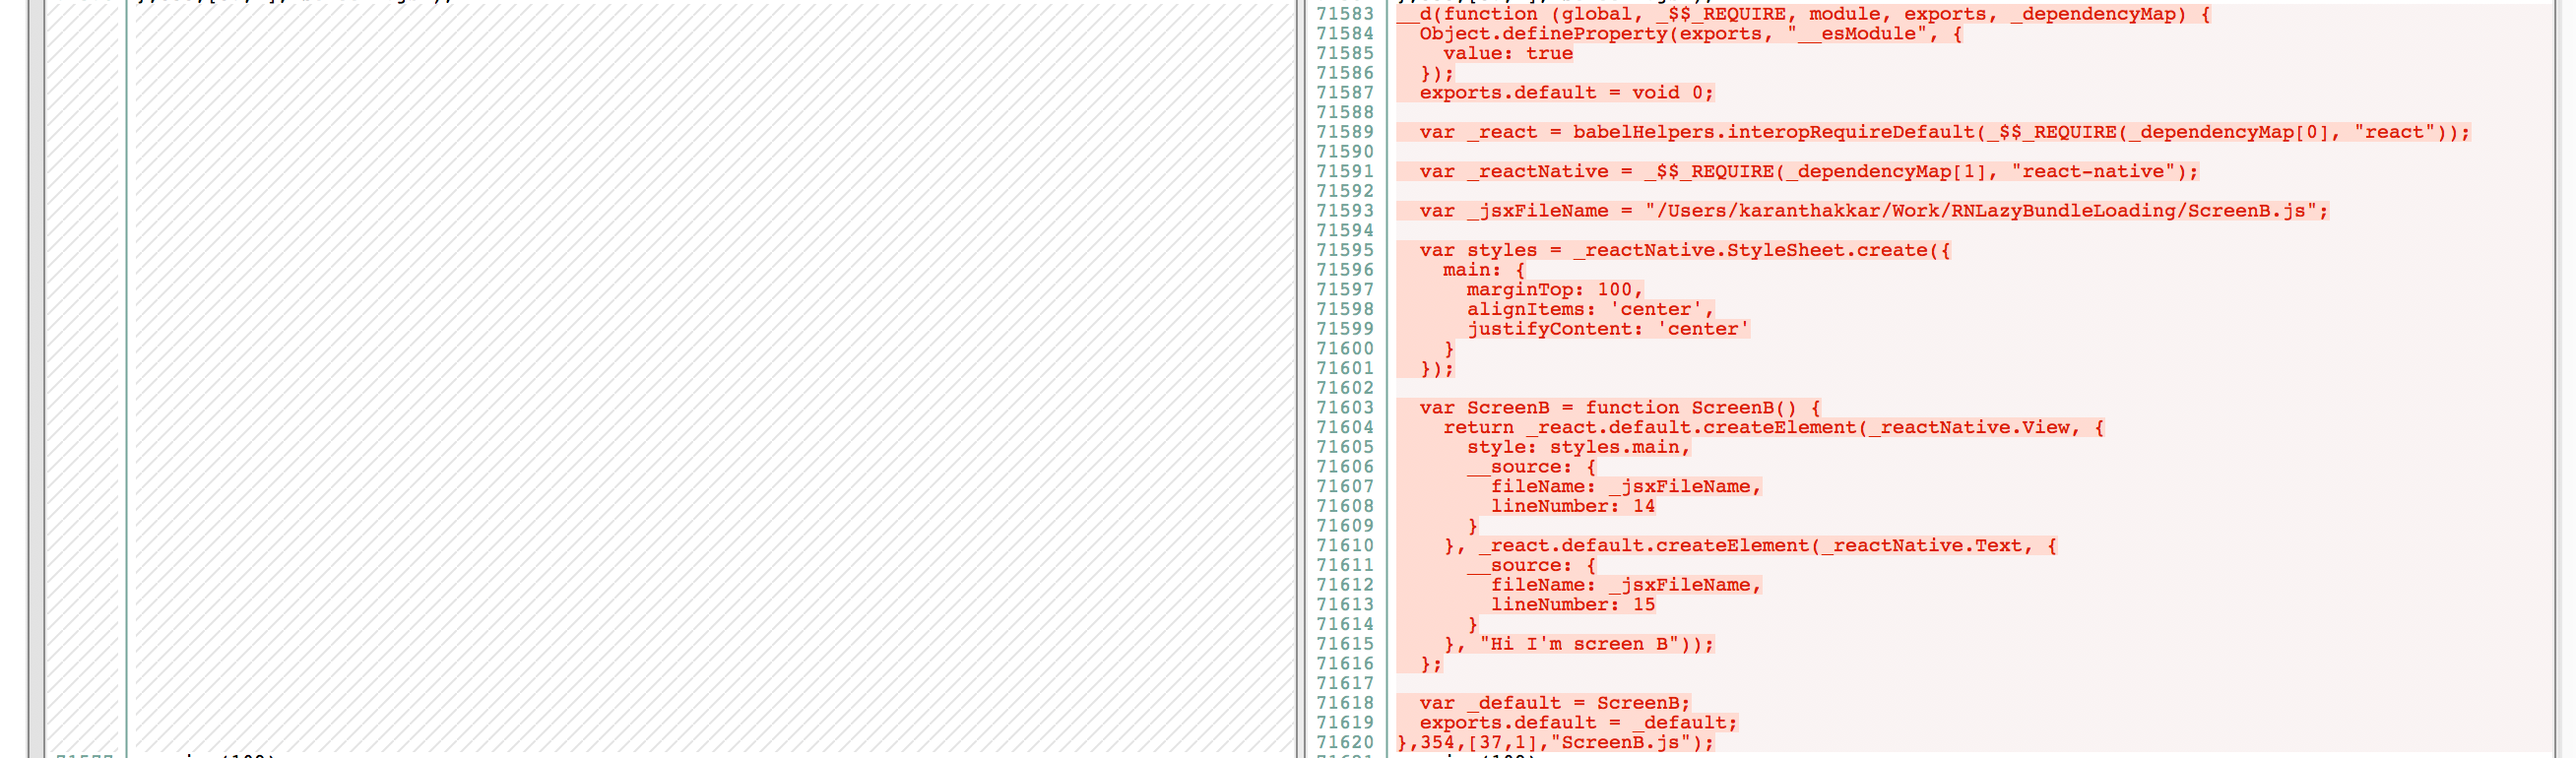
This shows the transpiled ScreenB.js module included in the final bundle with a module ID of 354.
So to create our separate bundle for ScreenB we have to do two things:
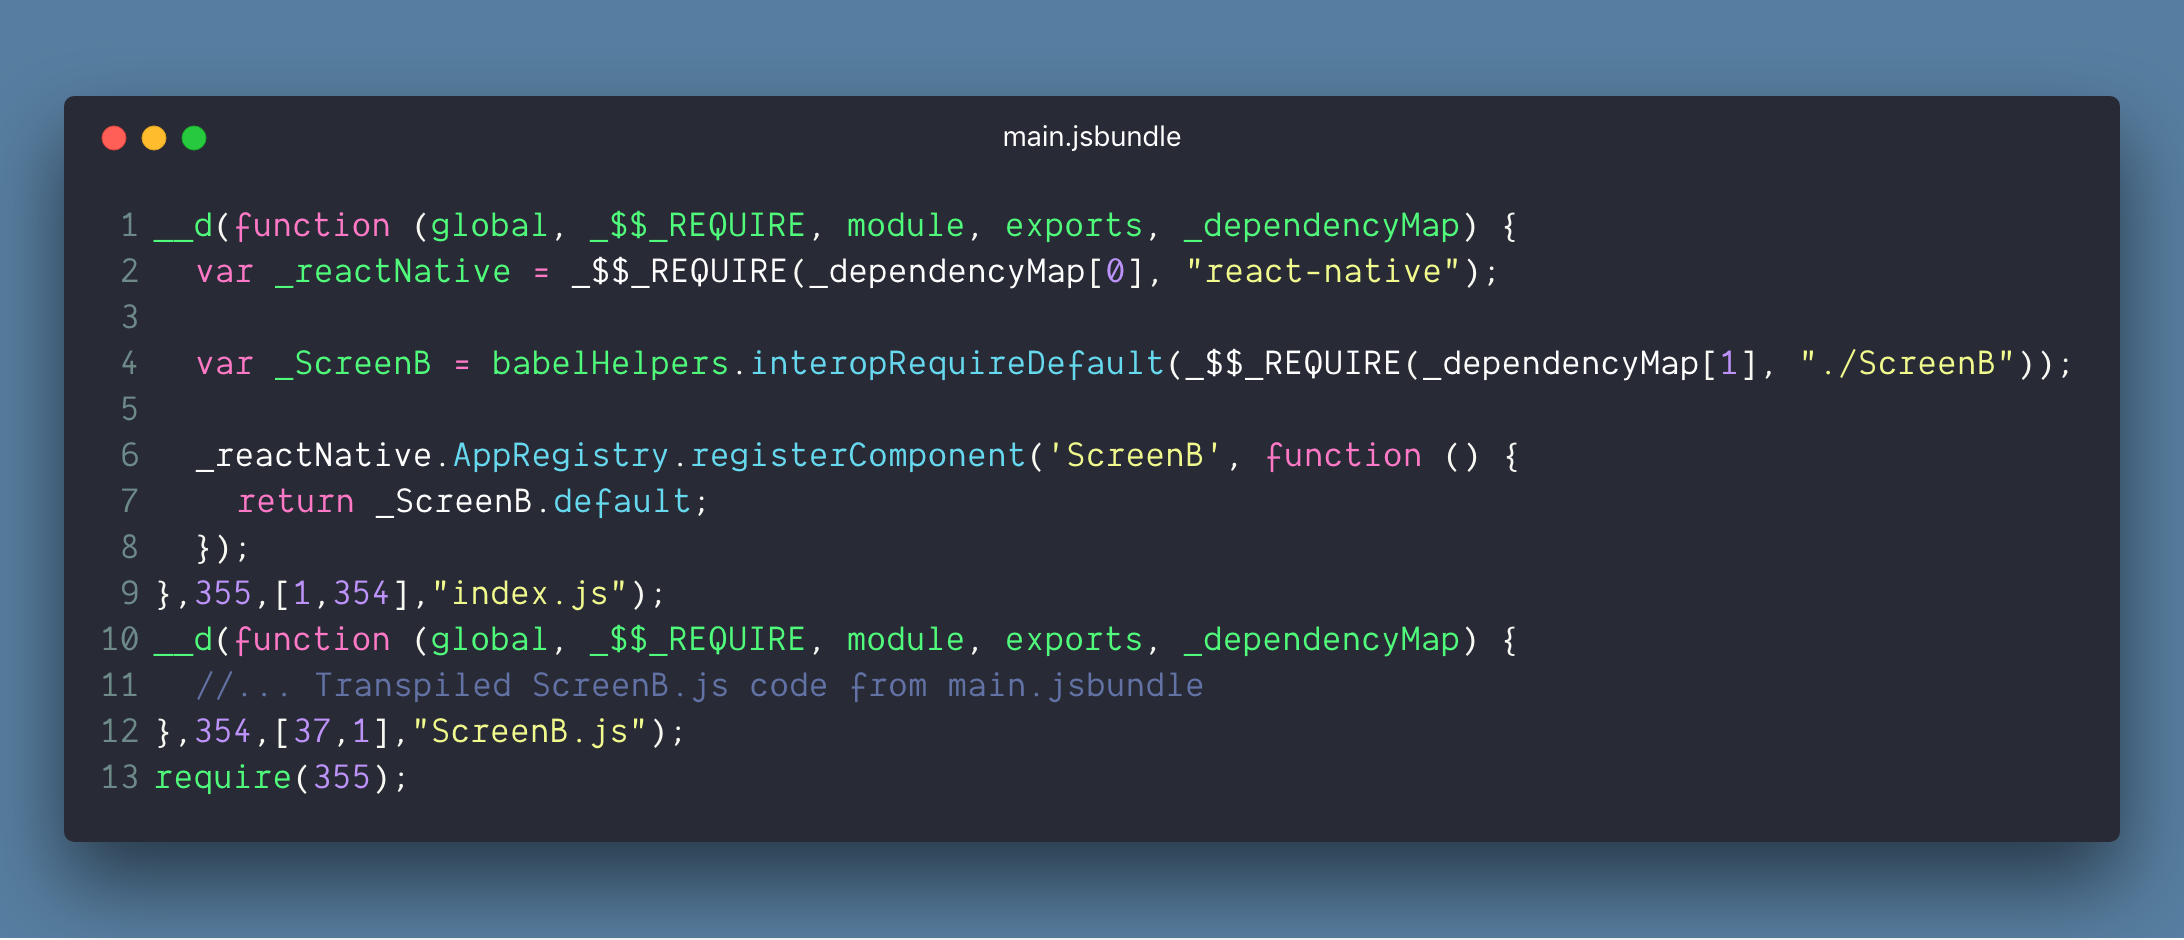
1. Update main.jsbundle
- Removed ScreenB import and registration
- Removed the module ID for ScreenB, 354, from the dependency map passed to __d(…) in main.jsbundle
- Removed the transpiled ScreenB.js module as shown in the second part of the diff

2. Move code to new file — ScreenB.jsbundle
- I created a new __d(…) function call which is how a module is registered. I needed to give it a unique ID. I chose 355, as 354 was the last module ID used in main.jsbundle
- ScreenB is the second element in the dependencyMap array now, instead of third, so I changed the require to use _dependencyMap[1] instead of _dependencyMap[2]

Now we have an “almost” complete ScreenB.jsbundle. It registers the two modules with Metro, but now we want it to “consume” it as well. This can be done by checking the relevant code in main.jsbundle to understand what’s happening:

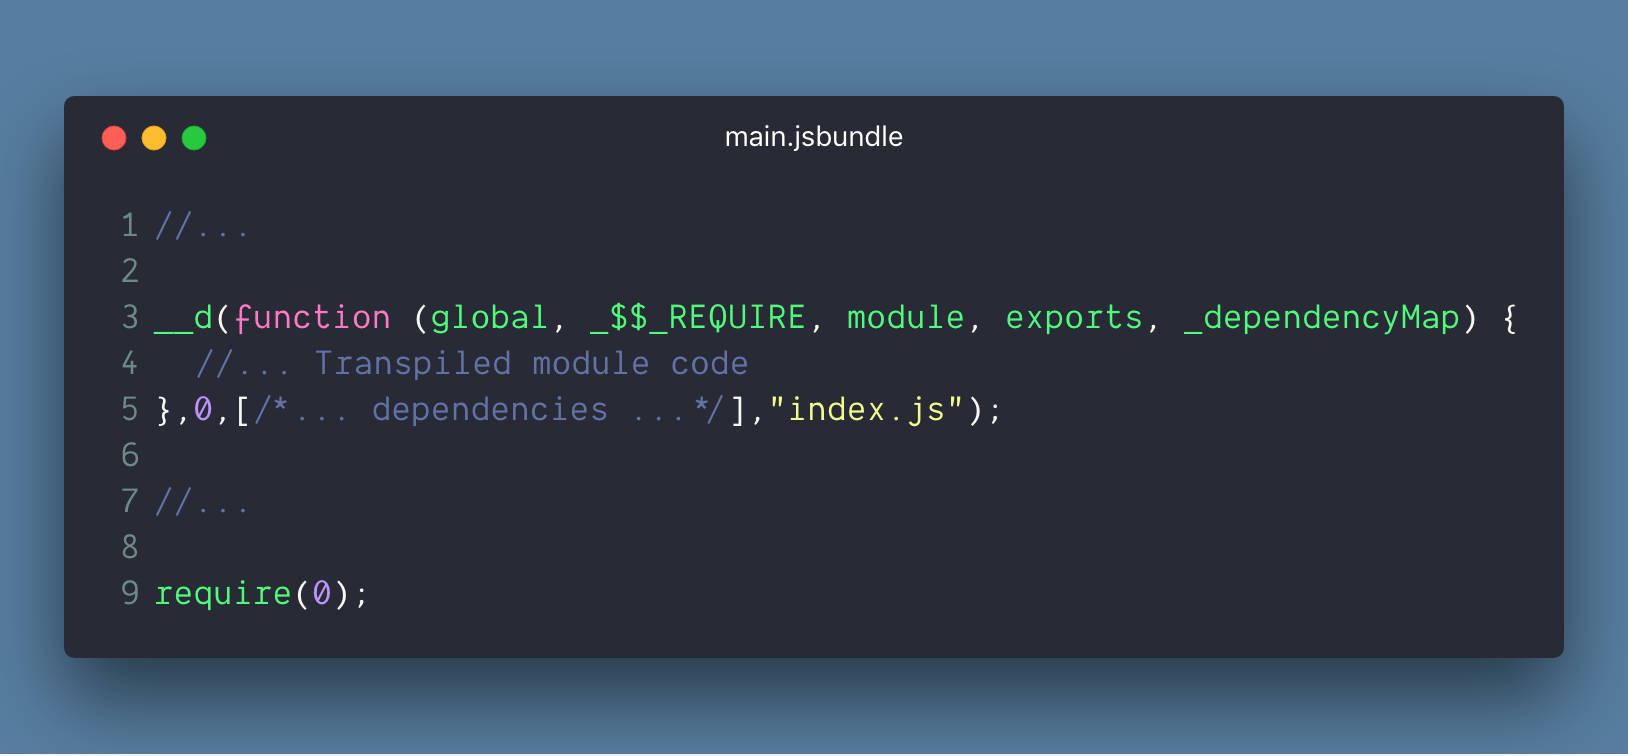
In main.jsbundle, the actual starting point is the require(0) at the end of the file. This triggers the application start by executing the code for module ID 0(zero), which is our react native application entry file, index.js.
Since we moved ScreenB registration to a separate module, we need to trigger its execution so that it gets registered with react native and is available when we try to load ScreenB from the native side. We do this by adding a require(355) at the end of ScreenB.jsbundle.

Now, our code splitting task is complete 🌟
Lazily load and execute a partial bundle inside react native
Every react native app starts with the creation of an RCTBridge instance. In this, react native loads the javascript, either from the local packager or a pre-built bundle, and executes this inside JavascriptCore.

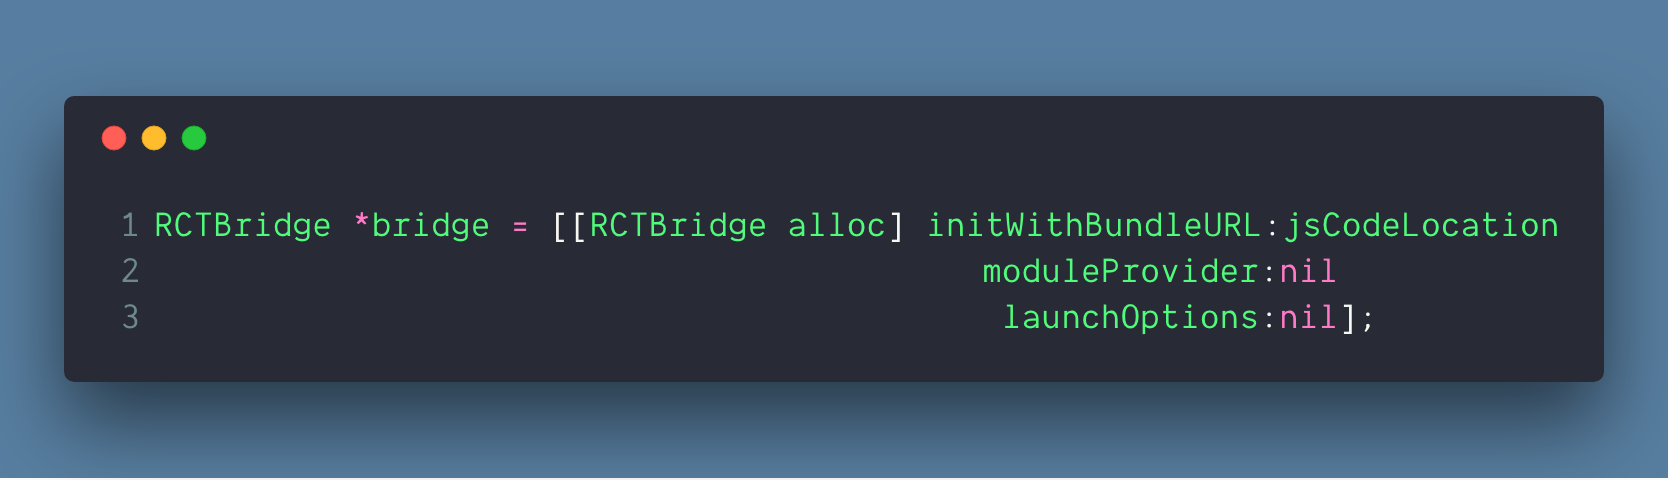
Here’s the chain of events that happens when we call initWithBundleURL:
- An instance of class RCTBridge is created and _bundleURL is set to the one we provide it — [Code]
- The setUp method of this object is called which initialises RCTCxxBridge (aka batched bridge)— [Code]
- The start method of the batched bridge is called — [Code]
- This is where the actual bundle loading and execution takes place — [Code]
So to get out custom loading setup working, we need to have two things in place:
1. Setup the bridge to load a custom bundle
Here we need to set the _bundleURL to point to the partial bundle file we have: ScreenB.jsbundle. So we create a custom method inside RCTBridge.m and expose it in RCTBridge.h. This is the only method we need to call from our userland code. Everything is else will be hidden inside the react native code.

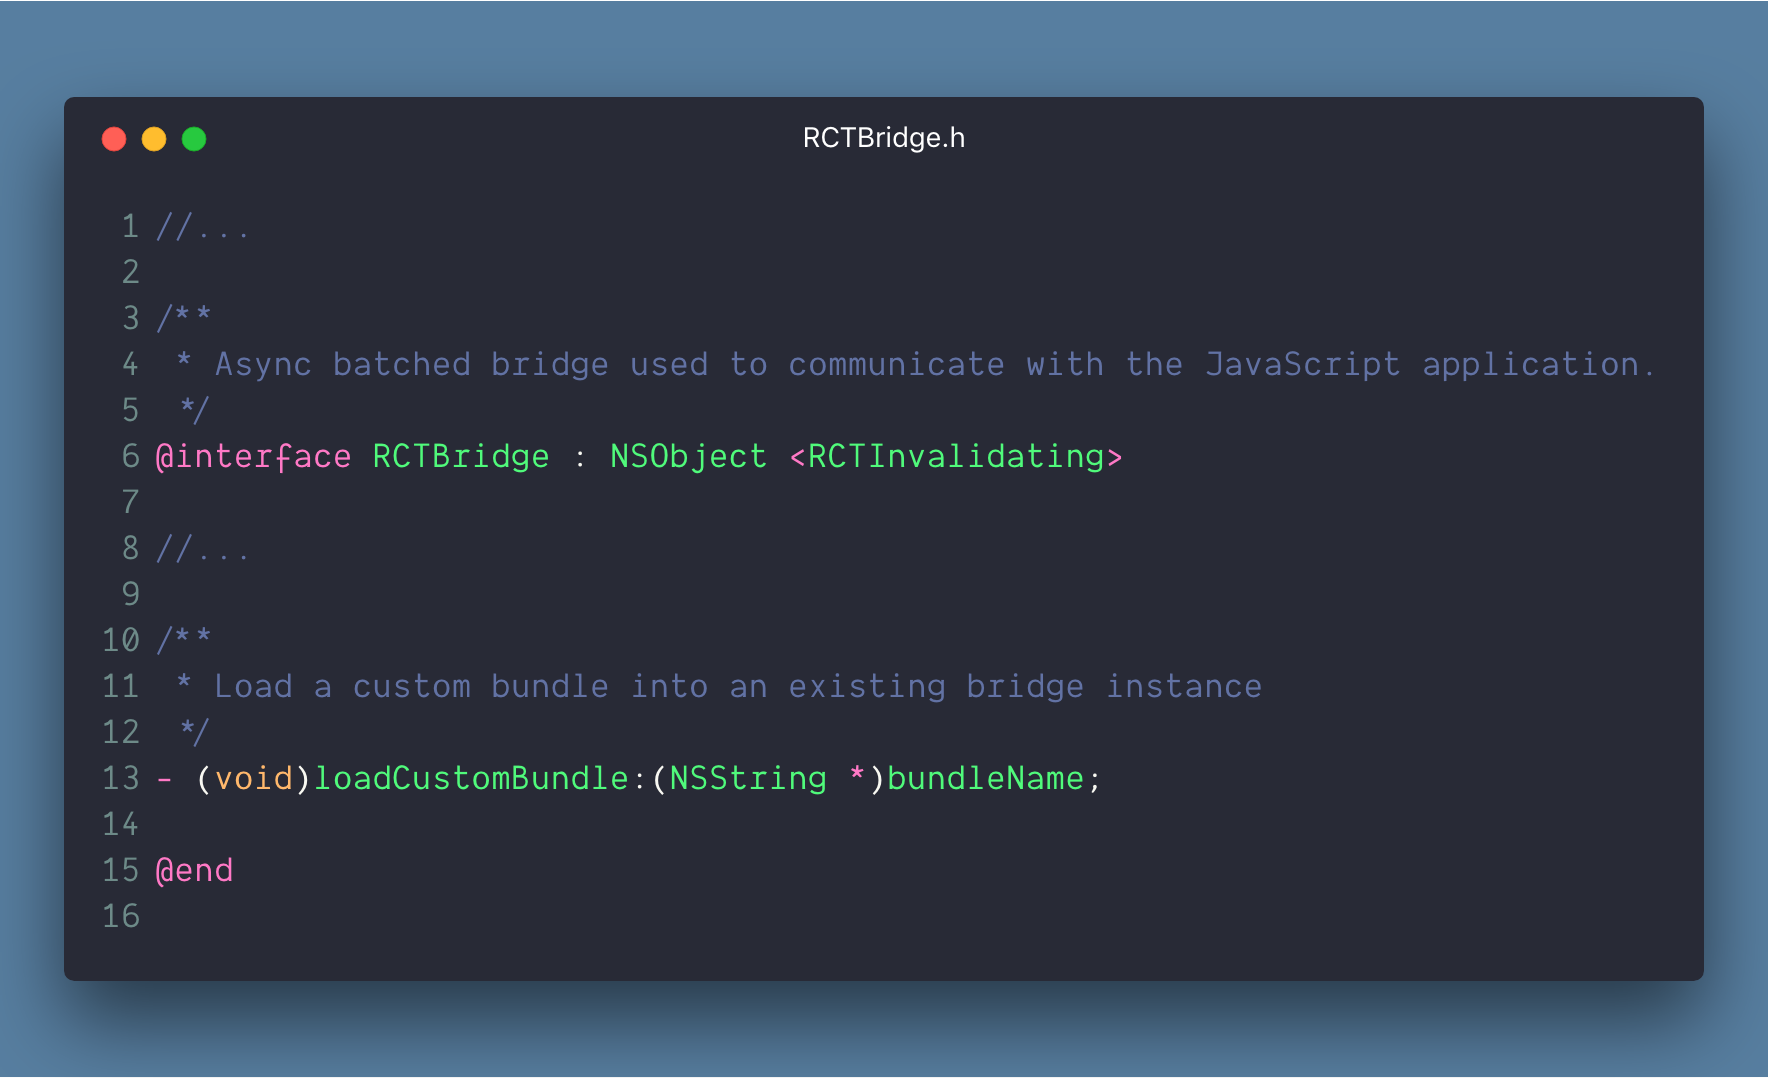


Don’t worry about the lazyStart method that is being invoke inside loadCustomBundle. It is still unimplemented and will be done in the next step 🙂
2. Load and execute the new bundle
Here we replicate the logic for the loading and executing javascript from the start method in RCTCxxBridge.mm and copy it to a new method so that we can call it from the loadCustomBundle method. The start method initialises a lot of things and towards the end it will do three things:
- Initialise the bridge object which makes the native to JS communication possible — [Code]
- Load the javascript bundle based on the bundle URL — [Code]
- Since both the above steps are async, it needs to wait for them to complete. This is done by using dispatch_group_notify which is called only when both the async calls complete. After that, it executes the loaded javascript bundle using the bridge object created in step 1 — [Code]
Based on this, our new method, lazyStart, will look like this:

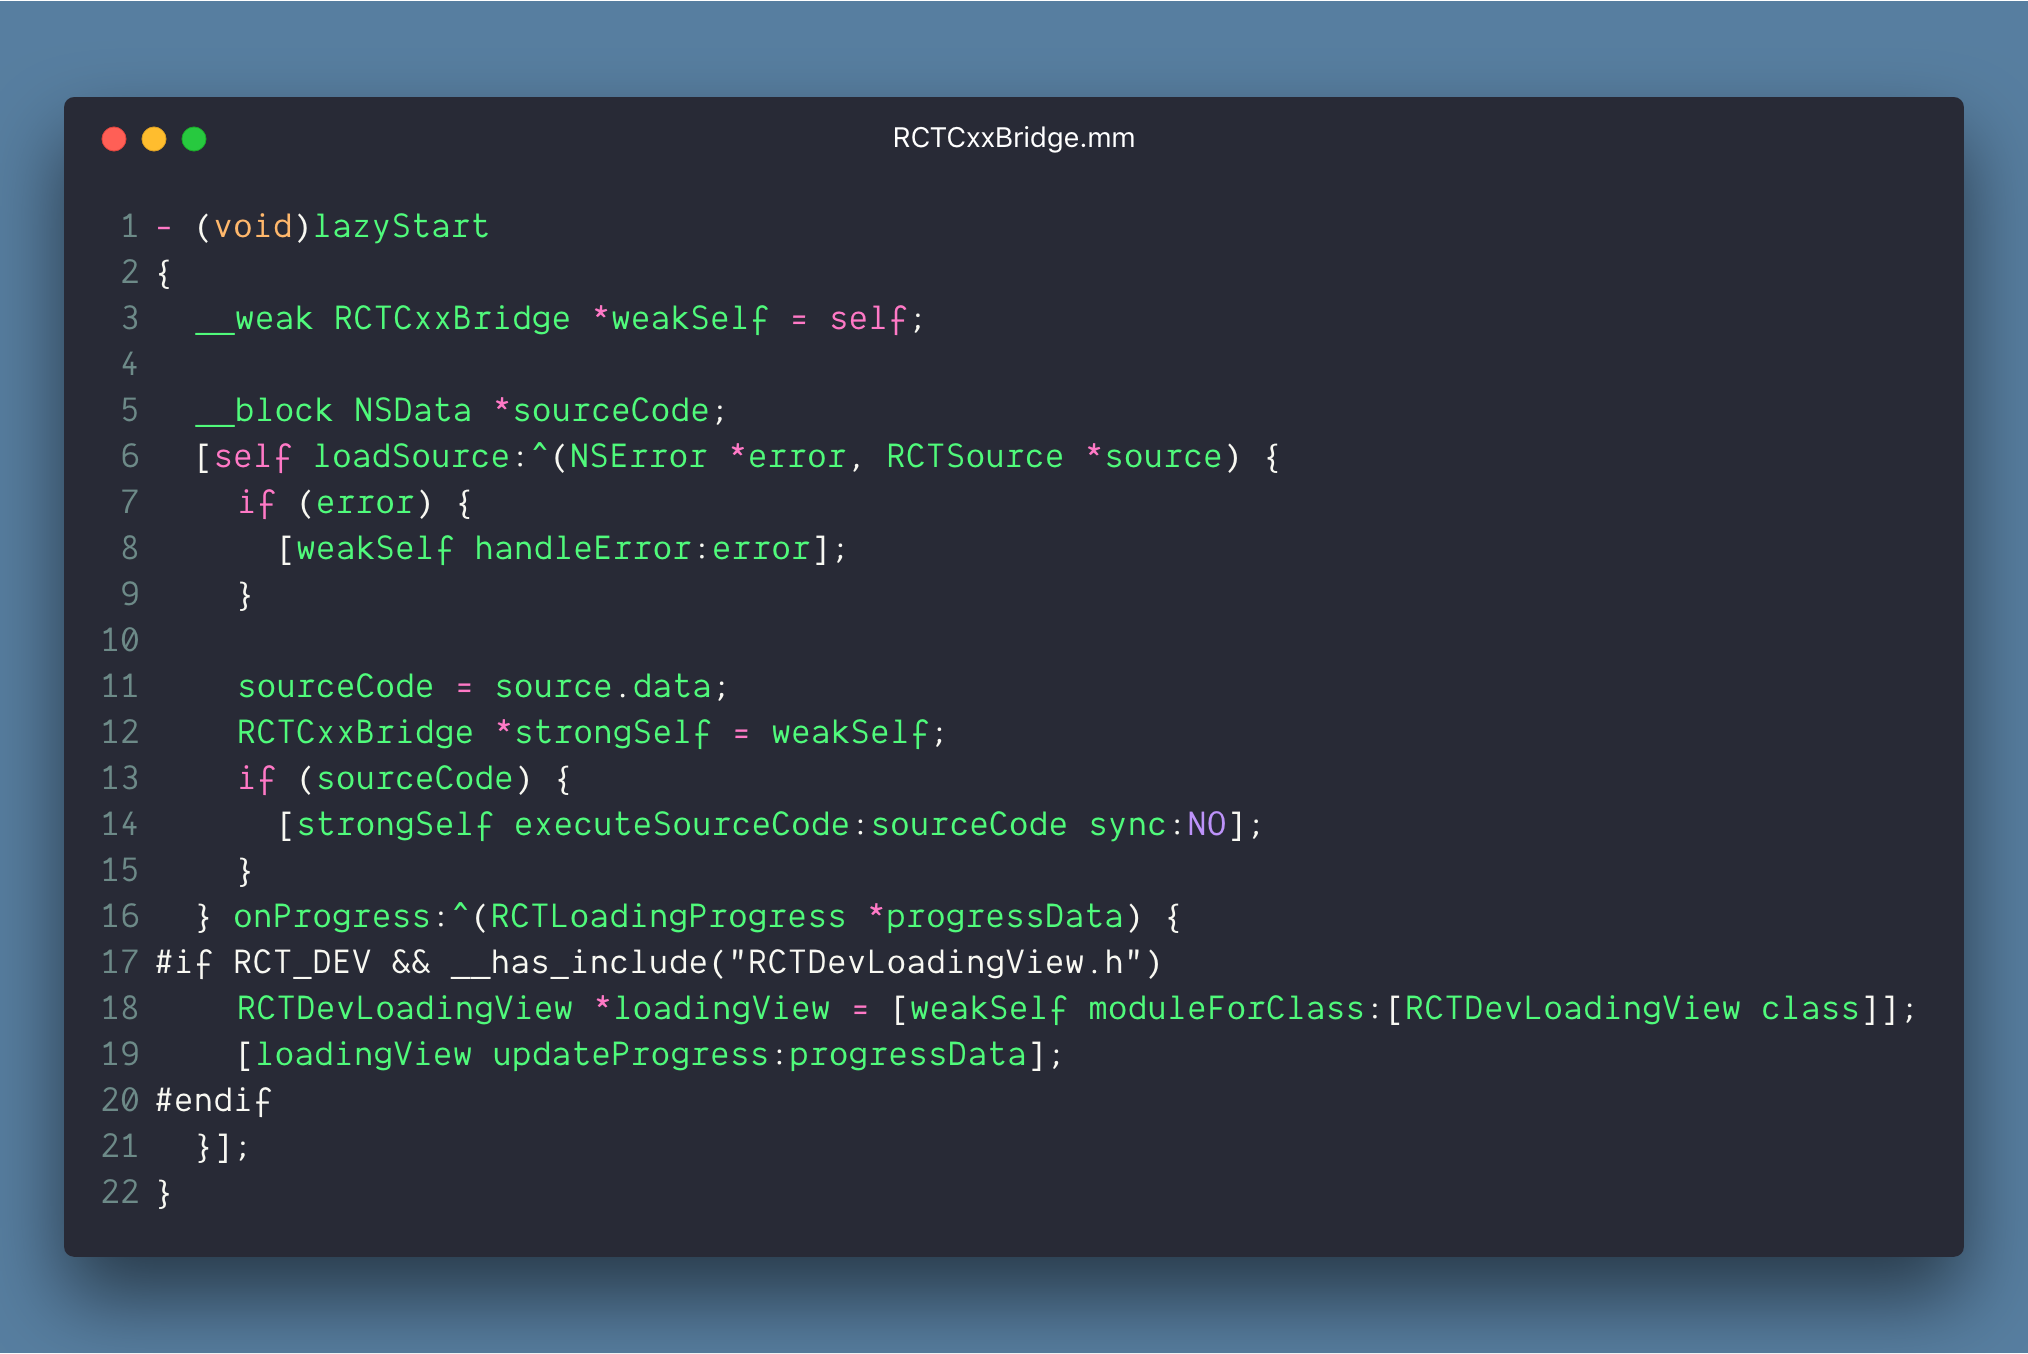
In this, we don’t need to initialise the bridge object since that is already done when the first bundle was loaded. So we just need to do two things here:
- Load the new javascript bundle via loadSource. This will internally use the bundleURL that we set in loadCustomBundle method in the previous step.
- Once it is loaded, in its callback block, we execute the javascript bundle. Since we don’t have have two async calls, we don’t need to use dispatch_group_notify.
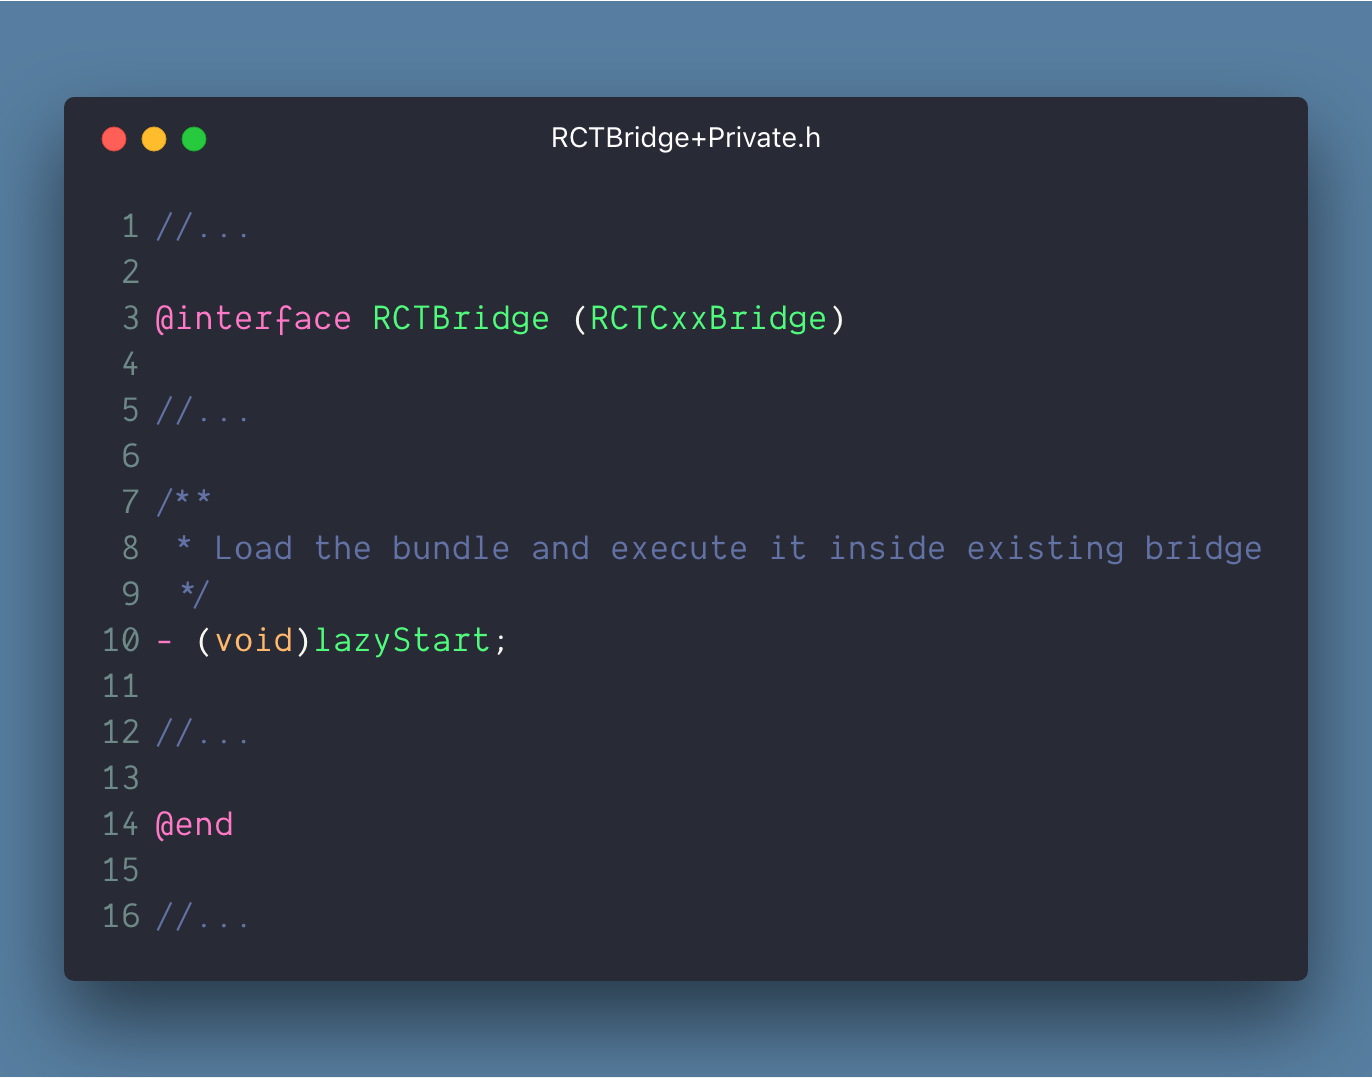
Next, we need to expose this method inside RCTCxxBridge.mm so that we can invoke it from the loadCustomBundle method in RCTBridge.m. We can do this by adding it to the interface in RCTBridge+Private.h.

Hooking up lazy loading code with user land code
Now that we have a partial bundle and the code to load it ready, we need two things to wrap it all up.
1. Add ScreenB.jsbundle to bundle resources in XCode
The default react native project generated by the react-native-cli comes with main.jsbundle added to bundle resources. These are resources that XCode bundles with your app. Since ScreenB.jsbundle is a non-standard file that we created, we need to add it to this configuration.


2. Use the react native bridge instance to trigger lazy load
By default, the react native project created by react-native-cli internally creates an RCTBridge instance when we call initWithBundleURL on the the RCTRootView:


In our case, the loadCustomBundle method is available on the RCTBridge. So we need an instance of that class. To do that, we need to break down the above implementation into two parts like so:

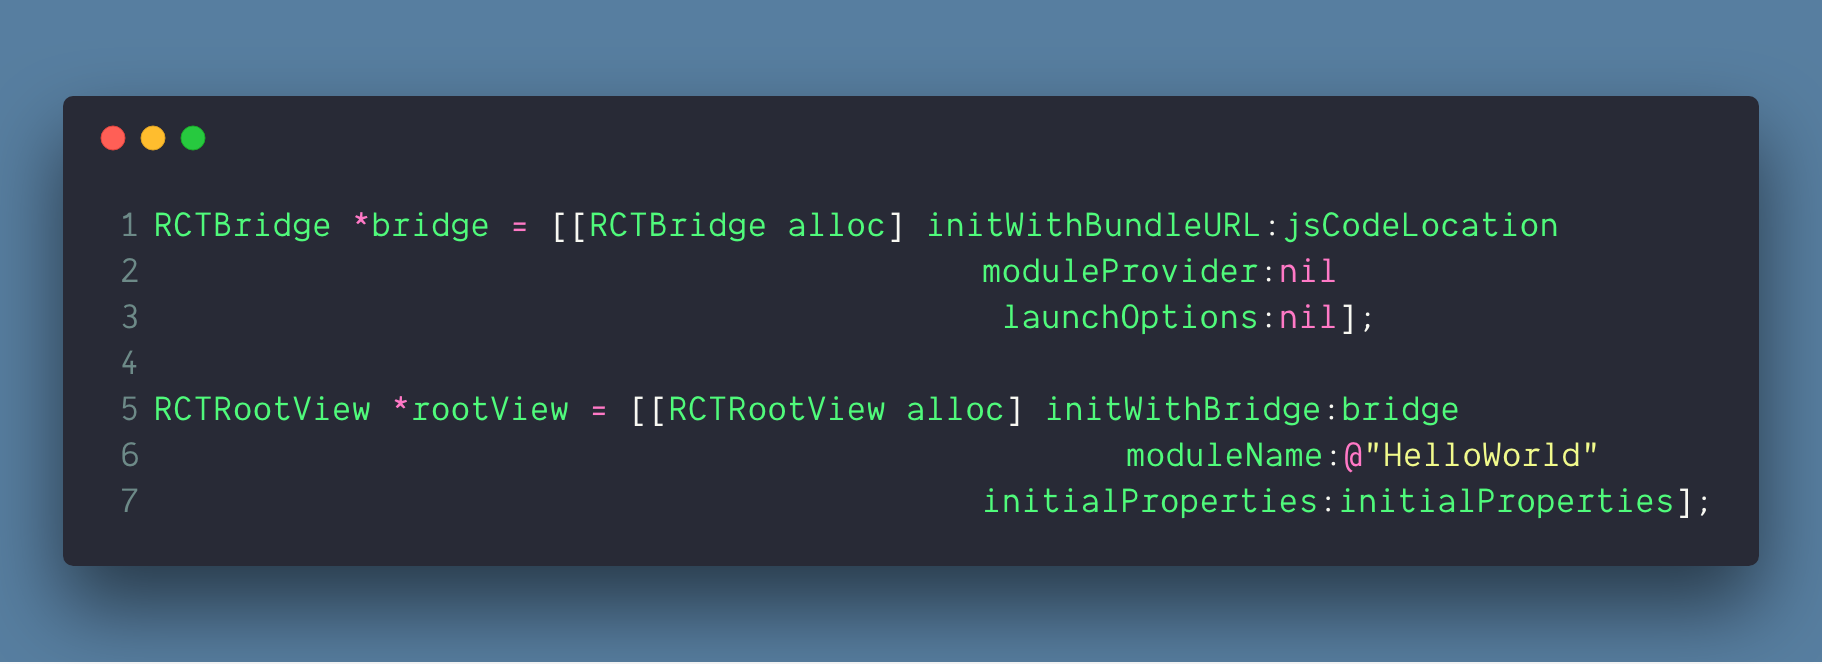
This way we have the bridge instance and now you can use it to load your custom bundle wherever you want:


You can save the bridge to a static class property and use it as a singleton wherever you want. Or you can use any dependency injection technique of your choice.
A more elaborate and complete example of the concepts covered in this blog is available on Github.
If you're trying to lose fat then you need to get on this totally brand new tailor-made keto meal plan diet.
ReplyDeleteTo design this keto diet, licensed nutritionists, fitness couches, and chefs united to produce keto meal plans that are effective, suitable, economically-efficient, and enjoyable.
Since their launch in early 2019, hundreds of people have already completely transformed their body and well-being with the benefits a great keto meal plan diet can offer.
Speaking of benefits: clicking this link, you'll discover eight scientifically-certified ones offered by the keto meal plan diet.