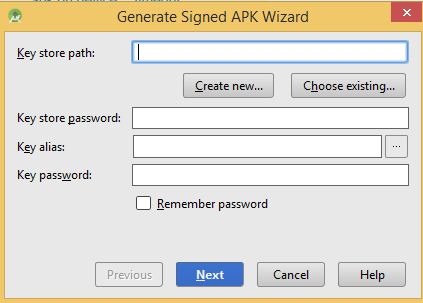
These methods can save you by recovering Key Alias and Key Password and KeyStore Password.

You should always keep the keystore file safe as you will not be able to update your previously uploaded APKs on PlayStore. It always need same keystore file for every version releases.
But it’s even worse when you have KeyStore file and you forget any credentials shown in above box.
But Good thing is you can recover them with certain tricks [Yes, there are always ways]. So let’s get straight to those ways.
1. Check your log files
→ For windows users,
Go to windows file explorer C://Users/your PC name/.AndroidStudio1.4 (your android studio version)\system\log\idea.log.1 (or any old log number)
Open your log file in Notepad++ or Any text editor, and search for:
android.injected.signing
and if you are lucky enough then you will start seeing these.
- Pandroid.injected.signing.store.file = This is file path where the keystore file was stored
2. Pandroid.injected.signing.store.password = This is Key store password
3. Pandroid.injected.signing.key.alias = This is Key alias name
4. Pandroid.injected.signing.key.password = This is Key password
→ For MAC users,
Launch the Console utility and scrolled down to ~/Library/Logs -> AndroidStudioBeta(Version of your studio) ->idea.log.1 (or any old log number)
Search for android.injected.signing and you can get them.
 Pandroid.injected.signing.store.file=/Users/myuserid/AndroidStudioProjects/keystore/keystore.jks
-Pandroid.injected.signing.store.password=mystorepassword,
-Pandroid.injected.signing.key.alias=myandroidkey,
-Pandroid.injected.signing.key.password=mykeypassword,
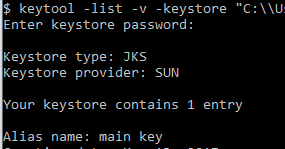
2. In case you remember KeyStore password but not the Alias name
→ Launch command prompt(i.e CMD)
→ keytool -list -keystore [will show all available options]
→ Launch command prompt(i.e CMD)
→ keytool -list -keystore [will show all available options]


→ Directly run
 keytool -list -v -keystore <full path to keystore file>
path example --> "C:\\users\admin\docs\main.keystore"
It will ask for KeyStore password and then shows name of alias,

3. Do hack
→ Use BruteForce method to recover keystore password.
see this Google thread: https://code.google.com/archive/p/android-keystore-password-recover/wikis/HowTo.wiki
and also this github link : http://maxcamillo.github.io/android-keystore-password-recover/
see this Google thread: https://code.google.com/archive/p/android-keystore-password-recover/wikis/HowTo.wiki
and also this github link : http://maxcamillo.github.io/android-keystore-password-recover/
Tips:
→ Any time you upload any app to PlayStore, save your keystore file and credentials at any safe place
→ The remember password checkbox shown in image top of the page, will not gonna save it for life time, if you upgrade your studio, there are chances you will loose them.
→ At least, save your KeyStore Password, as in certain tricks it’s the most vital.
→ The remember password checkbox shown in image top of the page, will not gonna save it for life time, if you upgrade your studio, there are chances you will loose them.
→ At least, save your KeyStore Password, as in certain tricks it’s the most vital.
Comments
Post a Comment
Thank You.