Building an app with React-Native, Bluetooth Low Energy and Redux-Saga
Part 2 — Retrieving and displaying data from a BLE Peripheral
Connect to the device
To get heart rate information, we first need to connect to our heart rate monitor. Let’s start by adding a filter to our bluetoothPeripheralsFound method in the reducer. To do this, check that devices being found are all CorSense HRV monitors. This can be done by extending our if statement:
const isCorsenseMonitor = action.payload.name.toLowerCase().includes("corsense")if (!isDuplicate && isCorsenseMonitor) {
Next, we’ll add a method to our Bluetooth singleton that manages connecting to a device. The method is pretty simple, an you can just copy/paste:
connectToPeripheral = async (identifier: string) => {
  return await this.bleManager.connectToDevice(identifier)
}
In the reducer we’ll add an action constant so that we can initiate the Bluetooth connection.
export const sagaActionConstants = {
  ...
  INITIATE_CONNECTION: bluetoothReducer.actions.initiateConnection.type
};
Next we’ll add a listener to our saga
export function* bluetoothSaga() {
  ...
  yield takeEvery(sagaActionConstants.INITIATE_CONNECTION, connectToPeripheral)
}
Finally, we add our method in the Bluetooth saga file that listens for a Bluetooth connection attempt:
function* connectToPeripheral(action: {
  type: typeof sagaActionConstants.INITIATE_CONNECTION,
  payload: string
}) {
  const peripheralId = action.payload;
  yield call(bluetoothLeManager.connectToPeripheral, peripheralId);
  yield put({
    type: sagaActionConstants.CONNECTION_SUCCESS,
    payload: peripheralId,
  });
}
The method above uses yield to wait for the connection promise to complete before returning. The call to put updates the redux state with the id of the newly connected peripheral after peripheral connection is successful.
Subscribing to characteristic updates
When working with Bluetooth, it’s tempting to think we connect to the device and, magically, data beams to our phone. Unfortunately, this isn’t the case. There is a bit of setup we have to do before getting any information from the peripheral. We need to subscribe to a service and get data from its characteristics. A service in Bluetooth Low Energy is a collection of characteristics that send you some kind of related information. Characteristics are the attributes of a service that can send you information. We need to subscribe to characteristics on services to get any data back.
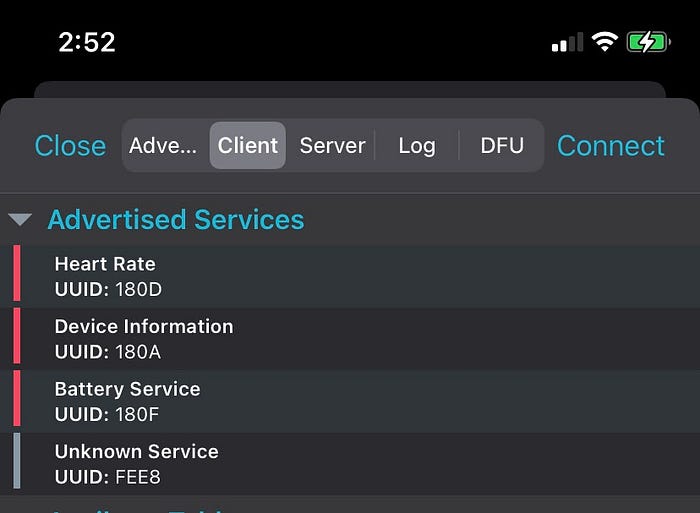
The first step to subscribing to a characteristic is figuring out what its UUID is. At this point I recommend downloading the NRF connect app on your respective App Store. After that connect your device NRF Connect. You should see a list like this:

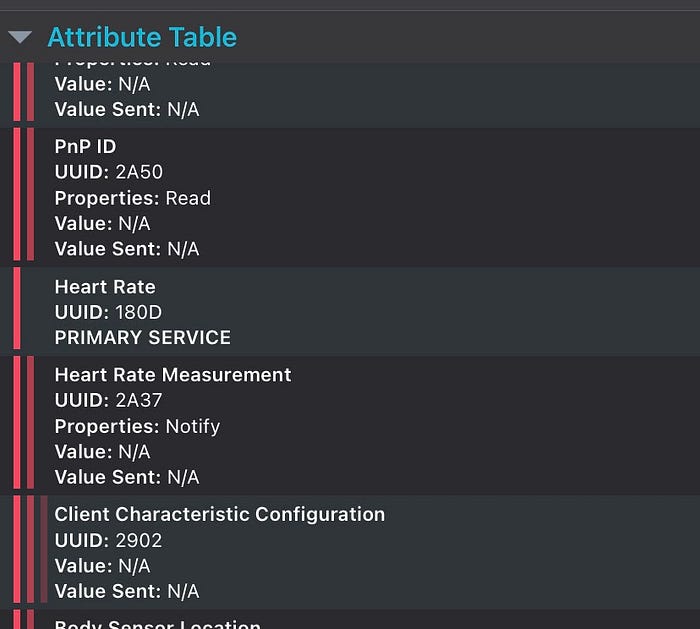
The advertised service we want here is the heart rate so we note that its UUID is 180D. Next we look for the characteristics inside the service we are looking for. It looks something like this:

This can be found in the attribute table. Because we are looking for Heart Rate Measurement, we note down 2A37. If you want to verify these values are correct you can look for the listing of official characteristic values found on the Bluetooth website. The Bluetooth specification for heart rate devices can be found in many places throughout the internet but you can read all the services for all BLE devices under the 16-bit UUID section if you are really curious. You’ll need to match up the hex value you noted here with the full value in the table of Bluetooth services and characteristics and note those values.
To start retrieving data from the device, you’ll want to first create a method startStreamingData. This method discovers the characteristics of a Bluetooth peripheral and will subscribe to updates from the peripheral. We add this method to our BLE Manager singleton. The full method looks like this:
const HEART_RATE_UUID = '0000180d-0000-1000-8000-00805f9b34fb';
const HEART_RATE_CHARACTERISTIC = '00002a37-0000-1000-8000-00805f9b34fb';startStreamingData = async (
  emitter: (arg0: {payload: number | BleError}) => void,
) => {
  await this.device?.discoverAllServicesAndCharacteristics();
  this.device?.monitorCharacteristicForService(
    HEART_RATE_UUID,
    HEART_RATE_CHARACTERISTIC,
    (error, characteristic) =>
      this.onHeartRateUpdate(error, characteristic, emitter),
    );
};
Notice the parameter emitter here. This will come into play later when I show the Redux-Saga part of this. The order of the methods called in this method is also important. discoverAllServicesAndCharacteristics allows you to subscribe to the services and characteristics on the device. You cannot get any data until this has been called at least once. monitorCharacteristicForService then tells the Bluetooth device to start sending us data. HEART_RATE_UUID and HEART_RATE_CHARACTERISTIC are the values we discovered earlier from NRFConnect. Finally the onHeartRateUpdate method parses the data from the Bluetooth device and sends it to Redux-Saga. Let’s have a look at it now:
onHeartRateUpdate = (
  error: BleError | null,
  characteristic: Characteristic | null,
  emitter: (arg0: {payload: number | BleError}) => void,
) => {
  if (error) {
    emitter({payload: error});
  }
  const data = base64.decode(characteristic?.value);

  let heartRate: number = -1;
  const firstBitValue: number = data[0] & 0x01;

  if (firstBitValue === 0) {
    heartRate = data[1].charCodeAt(0);
  } else {
    heartRate = Number(data[1].charCodeAt(0) << 8) + Number(data[2].charCodeAt(2));
  }
  emitter({payload: heartRate});
};
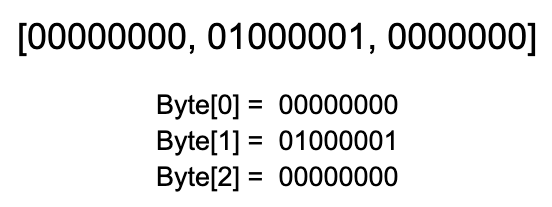
At first glance this method looks a little intimidating because of the bit manipulation but I promise it’s really not that bad. The react-native-ble-plx Bluetooth library sends us a characteristic value as a base64 string. Problem is, heart rate monitor data is meant to be read in binary. To make this happen we can npm install react-native-base64. This is a really simple library that parses base64 into its binary representation. With Bluetooth heart rate values, the heart rate can either be in the second byte, or the second and third byte if you have an especially fast heart rate. For those who haven’t done binary in awhile here is a bit of a visualization of most heart rates

Because the first bit of Byte[0] is 0, we only look at the byte at location 1 in the array. The value of this byte is 65. For most heart rates this is the type of value you will be seeing. In cases where the first bit of Byte[0] is 1 we would take the values of the second and third bytes and shift them together into one large integer.
Now that we have the heart rate, let’s add the method for getting heart rate updates to our Bluetooth saga file.
We start by adding a type for using take on a heart rate:
type TakeableHeartRate = {
  payload: {};
  take: (cb: (message: any | END) => void) => string;
};
Next we add the method for getting heart rate updates and sending them to the Redux Store
function* getHeartRateUpdates(): Generator<
  AnyAction,
  void,
  TakeableHeartRate
> {
  const onHeartrateUpdate = () => eventChannel(emitter => {
    bluetoothLeManager.startStreamingData(emitter);
    return () => {
      bluetoothLeManager.stopScanningForPeripherals();
    };
  });  const channel: TakeableChannel<string> = yield call(onHeartrateUpdate);

  try {
    while (true) {
      const response = yield take(channel);
      yield put({
        type: sagaActionConstants.UPDATE_HEART_RATE,
        payload: response.payload,
      });
    }
  } catch (e) {
     console.log(e);
  }
}
Altogether, your saga file should look like this:
import {Device} from 'react-native-ble-plx';
import {AnyAction} from 'redux';
import {END, eventChannel, TakeableChannel} from 'redux-saga';
import {call, put, take, takeEvery} from 'redux-saga/effects';
import {sagaActionConstants} from './bluetooth.reducer';
import bluetoothLeManager from './BluetoothLeManager';

type TakeableDevice = {
  payload: {id: string; name: string; serviceUUIDs: string};
  take: (cb: (message: any | END) => void) => Device;
};

type TakeableHeartRate = {
  payload: {};
  take: (cb: (message: any | END) => void) => string;
};

function* watchForPeripherals(): Generator<AnyAction, void, TakeableDevice> {
  const onDiscoveredPeripheral = () =>
    eventChannel(emitter => {
      return bluetoothLeManager.scanForPeripherals(emitter);
    });

  const channel: TakeableChannel<Device> = yield call(onDiscoveredPeripheral);

  try {
    while (true) {
      const response = yield take(channel);

      yield put({
        type: sagaActionConstants.ON_DEVICE_DISCOVERED,
        payload: {
          id: response.payload.id,
          name: response.payload.name,
          serviceUUIDs: response.payload.serviceUUIDs,
        },
      });
    }
  } catch (e) {
    console.log(e);
  }
}

function* connectToPeripheral(action: {
  type: typeof sagaActionConstants.INITIATE_CONNECTION;
  payload: string;
}) {
  const peripheralId = action.payload;
  yield call(bluetoothLeManager.connectToPeripheral, peripheralId);
  yield put({
    type: sagaActionConstants.CONNECTION_SUCCESS,
    payload: peripheralId,
  });
  yield call(bluetoothLeManager.stopScanningForPeripherals);
}

function* getHeartRateUpdates(): Generator<AnyAction, void, TakeableHeartRate> {
  const onHeartrateUpdate = () =>
    eventChannel(emitter => {
      bluetoothLeManager.startStreamingData(emitter);

      return () => {
        bluetoothLeManager.stopScanningForPeripherals();
      };
    });

  const channel: TakeableChannel<string> = yield call(onHeartrateUpdate);

  try {
    while (true) {
      const response = yield take(channel);
      yield put({
        type: sagaActionConstants.UPDATE_HEART_RATE,
        payload: response.payload,
      });
    }
  } catch (e) {
    console.log(e);
  }
}

export function* bluetoothSaga() {
  yield takeEvery(
    sagaActionConstants.SCAN_FOR_PERIPHERALS,
    watchForPeripherals,
  );
  yield takeEvery(sagaActionConstants.INITIATE_CONNECTION, connectToPeripheral);
  yield takeEvery(
    sagaActionConstants.START_HEART_RATE_SCAN,
    getHeartRateUpdates,
  );
}
Again we are using the generator infinite loop pattern. Here we loop and pause on the onHeartRateUpdate function until we get an update from Bluetooth. Whenever there is an update we use a put action to send this data to redux. In my case I added the following action to redux:
updateHeartRate: (state, action) => {
  state.heartRate = action.payload
},
I then added an initial value to the state:
const initialState: BluetoothState = {
  ...
  heartRate: -1,
};
And finished up by adding update to my saga action constants:
export const sagaActionConstants = {
  ....
  UPDATE_HEART_RATE: bluetoothReducer.actions.updateHeartRate.type,
};
Taken together, your slice should look like this:
import {createSlice, PayloadAction} from '@reduxjs/toolkit';
import {BluetoothPeripheral} from '../../models/BluetoothPeripheral';

type BluetoothState = {
  availableDevices: Array<BluetoothPeripheral>;
  isConnectingToDevice: boolean;
  connectedDevice: string | null;
  heartRate: number;
  isRetrievingHeartRateUpdates: boolean;
  isScanning: boolean;
};

const initialState: BluetoothState = {
  availableDevices: [],
  isConnectingToDevice: false,
  connectedDevice: null,
  heartRate: 0,
  isRetrievingHeartRateUpdates: false,
  isScanning: false,
};

const bluetoothReducer = createSlice({
  name: 'bluetooth',
  initialState: initialState,
  reducers: {
    scanForPeripherals: state => {
      state.isScanning = true;
    },
    initiateConnection: (state, _) => {
      state.isConnectingToDevice = true;
    },
    connectPeripheral: (state, action) => {
      state.isConnectingToDevice = false;
      state.connectedDevice = action.payload;
    },
    updateHeartRate: (state, action) => {
      state.heartRate = action.payload;
    },
    startHeartRateScan: state => {
      state.isRetrievingHeartRateUpdates = true;
    },
    bluetoothPeripheralsFound: (
      state: BluetoothState,
      action: PayloadAction<BluetoothPeripheral>,
    ) => {
      // Ensure no duplicate devices are added
      const isDuplicate = state.availableDevices.some(
        device => device.id === action.payload.id,
      );
      const isCorsenseMonitor = action.payload?.name
        ?.toLowerCase()
        ?.includes('corsense');
      if (!isDuplicate && isCorsenseMonitor) {
        state.availableDevices = state.availableDevices.concat(action.payload);
      }
    },
  },
});

export const {
  bluetoothPeripheralsFound,
  scanForPeripherals,
  initiateConnection,
  startHeartRateScan,
} = bluetoothReducer.actions;

export const sagaActionConstants = {
  SCAN_FOR_PERIPHERALS: bluetoothReducer.actions.scanForPeripherals.type,
  ON_DEVICE_DISCOVERED: bluetoothReducer.actions.bluetoothPeripheralsFound.type,
  INITIATE_CONNECTION: bluetoothReducer.actions.initiateConnection.type,
  CONNECTION_SUCCESS: bluetoothReducer.actions.connectPeripheral.type,
  UPDATE_HEART_RATE: bluetoothReducer.actions.updateHeartRate.type,
  START_HEART_RATE_SCAN: bluetoothReducer.actions.startHeartRateScan.type,
};

export default bluetoothReducer;
Building the final UI
Wow, that was a lot wasn’t it. After all this background logic to handle Bluetooth data let’s finish off in true TypeScript/Front End fashion by making a nice looking interface to this that users will appreciate. I mean, what kind of a JavaScript Bro would I be if I didn’t show you how?
To start, just steal my CTAButton and Modal Files. They are just some UI you can straight copy paste into a file in your project. Since there is no real logic here you aren’t cheating on the tutorial or anything. You can find them in my GitHub project here.
Next let’s write out the new Home component. Don’t copy paste this part, there is some actual substance for this one!. Start by making sure we have selectors for devices, heart rate and the connection status of the peripheral
const Home: FC = () => {
  const dispatch = useDispatch();
  const devices = useSelector(
    (state: RootState) => state.bluetooth.availableDevices,
  );
  const heartRate = useSelector(
    (state: RootState) => state.bluetooth.heartRate,
  );
  const isConnected = useSelector(
    (state: RootState) => !!state.bluetooth.connectedDevice,
  );
Next we’ll set some state for whether the modal is showing or being hidden:
const [isModalVisible, setIsModalVisible] = useState<boolean>(false);
const closeModal = () => setIsModalVisible(false);
We will have to create a method to connect to our device. We can use the method we created earlier for initiating a Bluetooth connection
const connectToPeripheral = (device: BluetoothPeripheral) =>
dispatch(initiateConnection(device.id));
Let’s now add the area for the text
<SafeAreaView style={styles.container}>
  <View style={styles.heartRateTitleWrapper}>
    {isConnected ? (
      <>
        <Text style={styles.heartRateTitleText}>
           Your Heart Rate Is:
        </Text>
        <Text style={styles.heartRateText}>{heartRate} bpm</Text>
      </>
    ) : (
      <Text style={styles.heartRateTitleText}>
        Please Connect to a Heart Rate Monitor
      </Text>
    )}
</View>
You can see here that we are changing the text when a peripheral is actually connected. The next step is to add a button to show our connection modal.
<CTAButton
  title="Connect"
  onPress={() => {
    dispatch(scanForPeripherals());
    setIsModalVisible(true);
  }}
/>
It will next be important to add the heart rate scanning button. This button shouldn’t appear until the device is connected. Obviously we can’t read a heart rate until we are connected to the device
{isConnected && (
  <CTAButton
    title="Get Heart Rate"
    onPress={() => {
      dispatch(startHeartRateScan());
    }}
  />
)}
Finally, we finish up by placing the device modal at the bottom of the file so it can pop up when we want to scan for devices.
<DeviceModal
  devices={devices}
  visible={isModalVisible}
  closeModal={closeModal}
  connectToPeripheral={connectToPeripheral}
/>
When its all said and done your Home file should look like this:
import React, {FC, useState} from 'react';
import {SafeAreaView, StyleSheet, Text, View} from 'react-native';
import {Provider, useDispatch, useSelector} from 'react-redux';
import CTAButton from './components/CTAButton';
import DeviceModal from './components/DeviceConnectionModal';
import {BluetoothPeripheral} from './models/BluetoothPeripheral';
import {
  initiateConnection,
  scanForPeripherals,
  startHeartRateScan,
} from './modules/Bluetooth/bluetooth.reducer';
import {RootState, store} from './store/store';

const App: FC = () => {
  return (
    <Provider store={store}>
      <Home />
    </Provider>
  );
};

const Home: FC = () => {
  const dispatch = useDispatch();
  const devices = useSelector(
    (state: RootState) => state.bluetooth.availableDevices,
  );

  const heartRate = useSelector(
    (state: RootState) => state.bluetooth.heartRate,
  );

  const isConnected = useSelector(
    (state: RootState) => !!state.bluetooth.connectedDevice,
  );

  const [isModalVisible, setIsModalVisible] = useState<boolean>(false);

  const closeModal = () => setIsModalVisible(false);

  const connectToPeripheral = (device: BluetoothPeripheral) =>
    dispatch(initiateConnection(device.id));

  return (
    <SafeAreaView style={styles.container}>
      <View style={styles.heartRateTitleWrapper}>
        {isConnected ? (
          <>
            <Text style={styles.heartRateTitleText}>Your Heart Rate Is:</Text>
            <Text style={styles.heartRateText}>{heartRate} bpm</Text>
          </>
        ) : (
          <Text style={styles.heartRateTitleText}>
            Please Connect to a Heart Rate Monitor
          </Text>
        )}
      </View>
      <CTAButton
        title="Connect"
        onPress={() => {
          dispatch(scanForPeripherals());
          setIsModalVisible(true);
        }}
      />
      {isConnected && (
        <CTAButton
          title="Get Heart Rate"
          onPress={() => {
            dispatch(startHeartRateScan());
          }}
        />
      )}
      <DeviceModal
        devices={devices}
        visible={isModalVisible}
        closeModal={closeModal}
        connectToPeripheral={connectToPeripheral}
      />
    </SafeAreaView>
  );
};

const styles = StyleSheet.create({
  container: {
    flex: 1,
    backgroundColor: '#f2f2f2',
  },
  heartRateTitleWrapper: {
    flex: 1,
    justifyContent: 'center',
    alignItems: 'center',
  },
  heartRateTitleText: {
    fontSize: 30,
    fontWeight: 'bold',
    textAlign: 'center',
    marginHorizontal: 20,
  },
  heartRateText: {
    fontSize: 25,
    marginTop: 15,
  },
});

export default App;
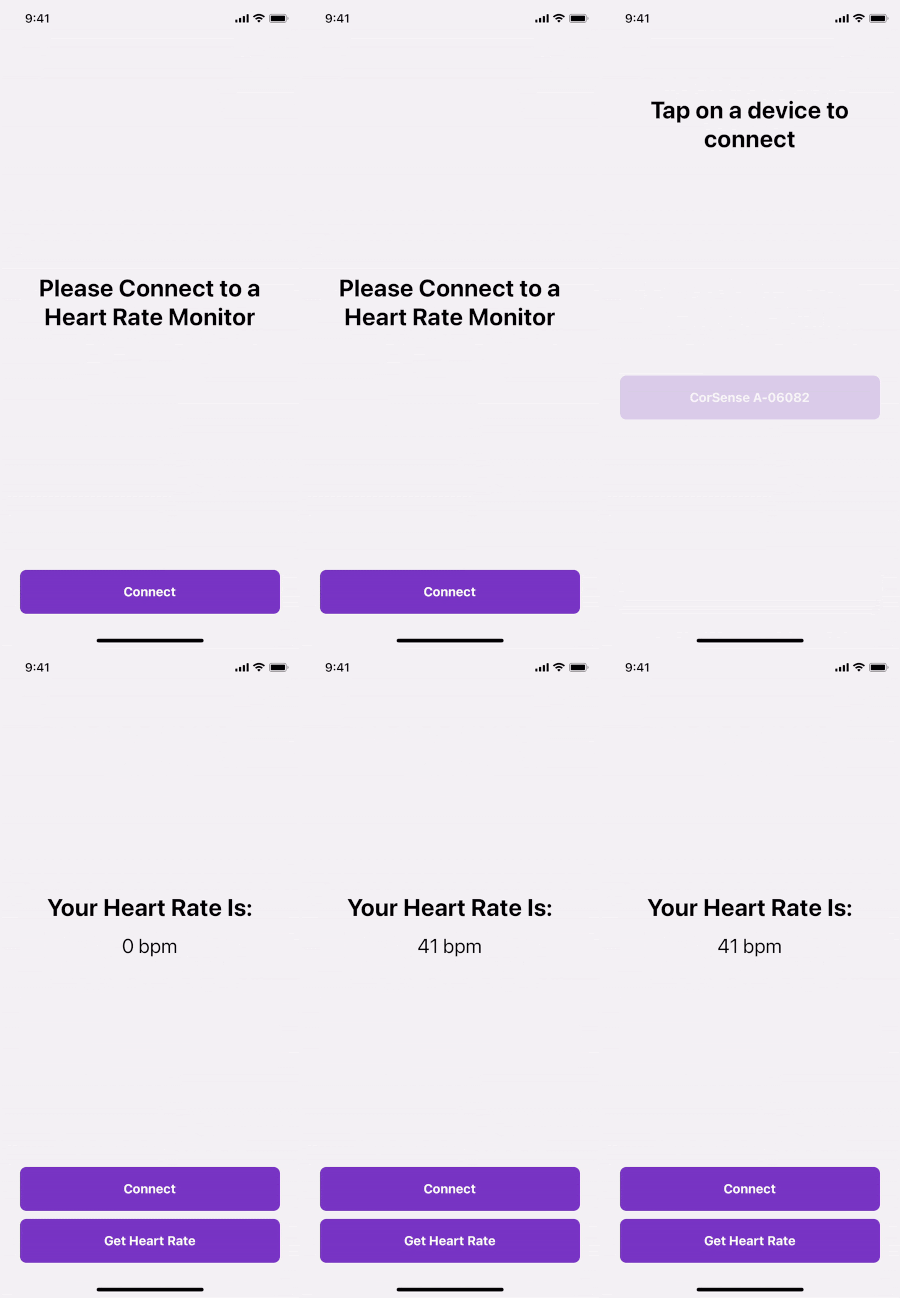
The result of all this UI work is an app that works just like the GIF I showed in the first article.

Congratulations on your first Bluetooth project . I hope you found this useful and look forward to making your own in the future!!!
Comments
Post a Comment
Thank You.