Set Self-Sizing Cells
For a long time, a big challenge for iOS developers was custom heights and sizes for
UITableView and also UICollectionView Cells. There were ways to achieve this such as ‘Auto Layout’, but they were ‘hacky’ and not fully implemented.
Previously to calculate height, developers had two options.
If using Auto Layout, a developer could create an offscreen cell, layout the content in
tableView:heightForRowAtIndexPath: and then get the height (using systemLayoutSizeFittingSize:).
If not using Auto Layout, the height had to be calculated manually for each cell and the values cached to avoid slowdown.
With iOS 8,
UITableViews and UICollectionViews have embraced Auto Layout. In this post, we will cover what you need to know to support UITableViews in your apps.
We will create a small sample application, that you can also find on Github.
The assets used in the app can be found here.
Project Setup
In this app we will display a series of quotes with a photo of the quoter if available. We’ll write the app in Swift 2.1 on Xcode 7.2, but will target iOS 8.1 and above.
In Xcode, go to File -> New -> Project, and create a new Single View Application. This will generate a new project with a plain
UIViewController for you to get started with. Since we won’t be needing it, delete ViewController.swift.
After creating the project, we need to create the view controllers and custom cells. These should be a subclasses of
UITableViewController and UITableViewCell.
Inside the project, create two new groups (folders), View Controllers and Cells to hold the above.
Let’s create our View Controller. Right-click the View Controllers group, select New File and choose Cocoa Touch Class in the panel that appears.
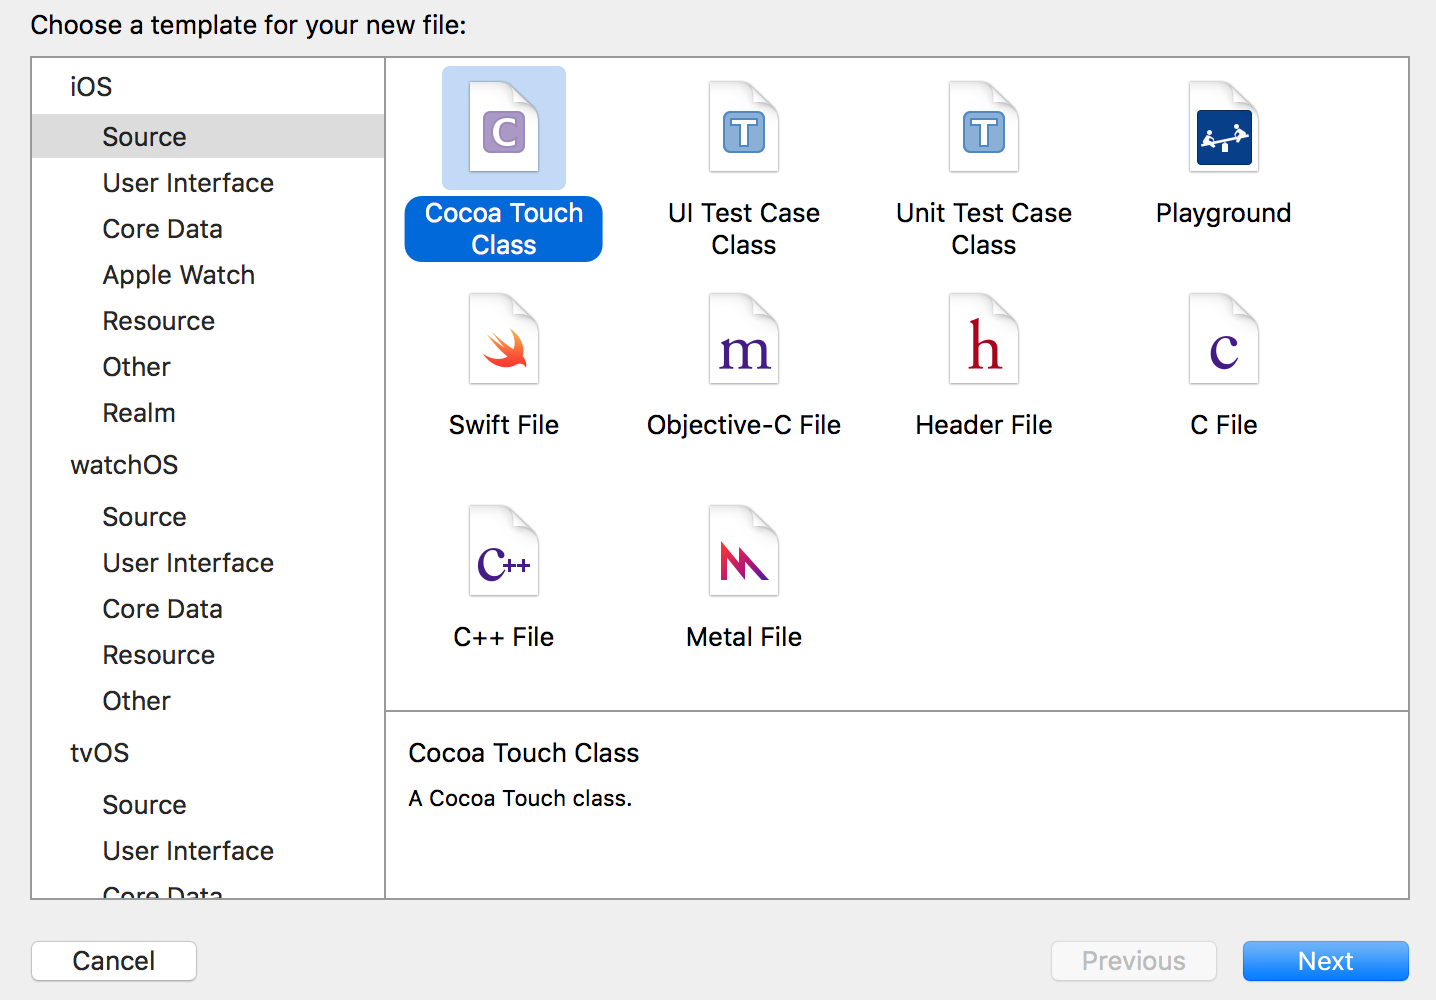
Then create a sub-class of
UITableViewController. Since we’ll be using Storyboards in the app, you can leave the Also create XIB file option unchecked.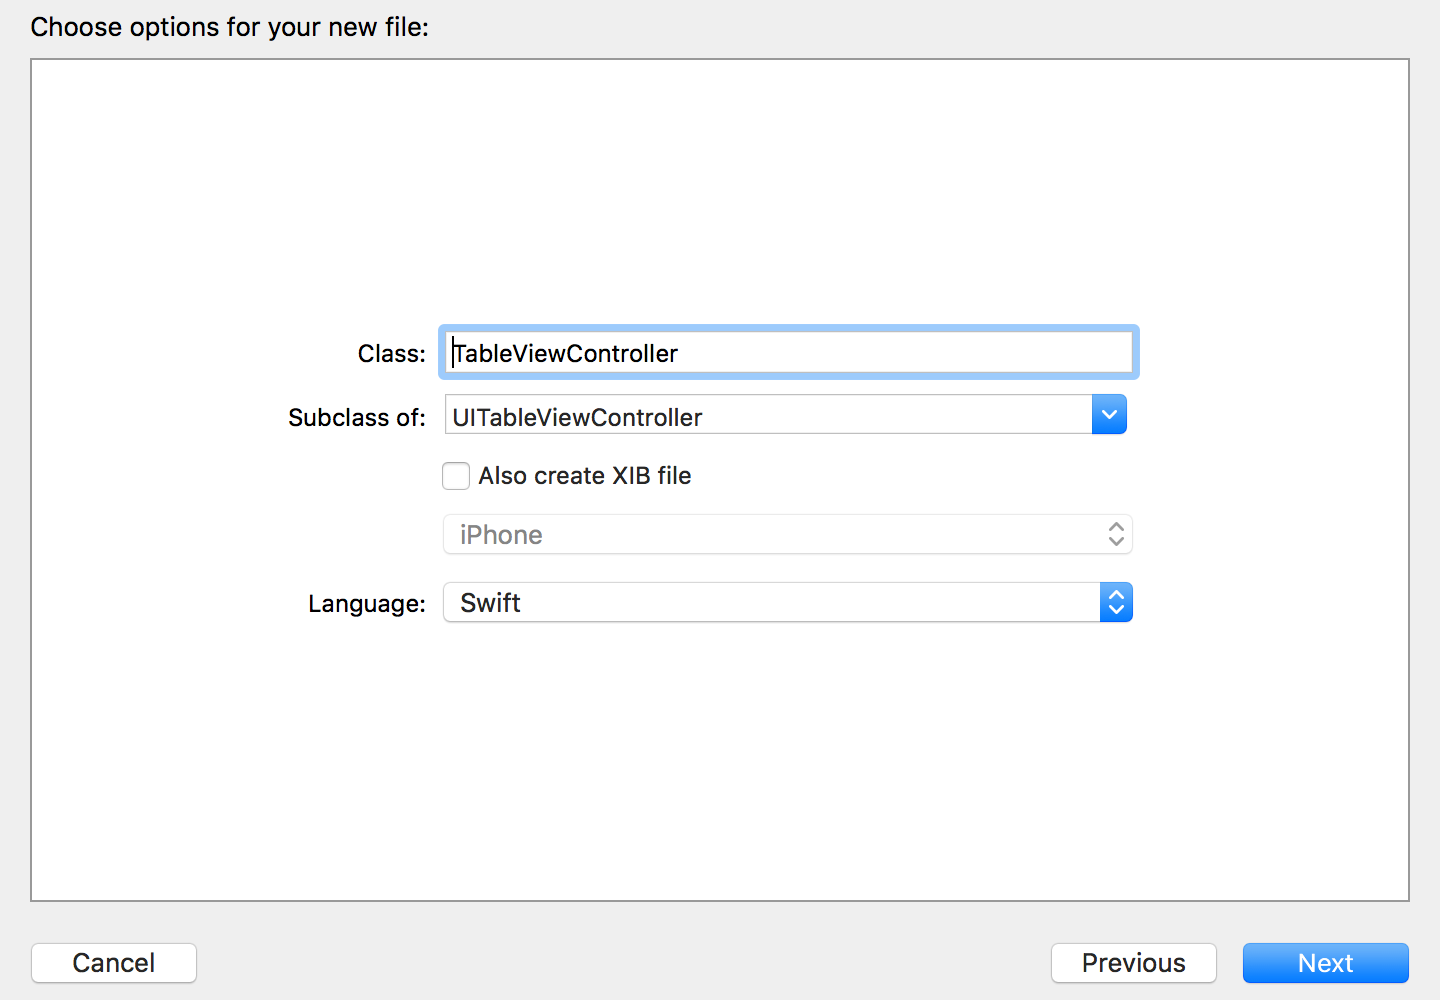
Under the Cells group, create a sub-class of
UITableViewCell.
This time, we will check the XIB option, as we’ll be using it to setup the cell later.
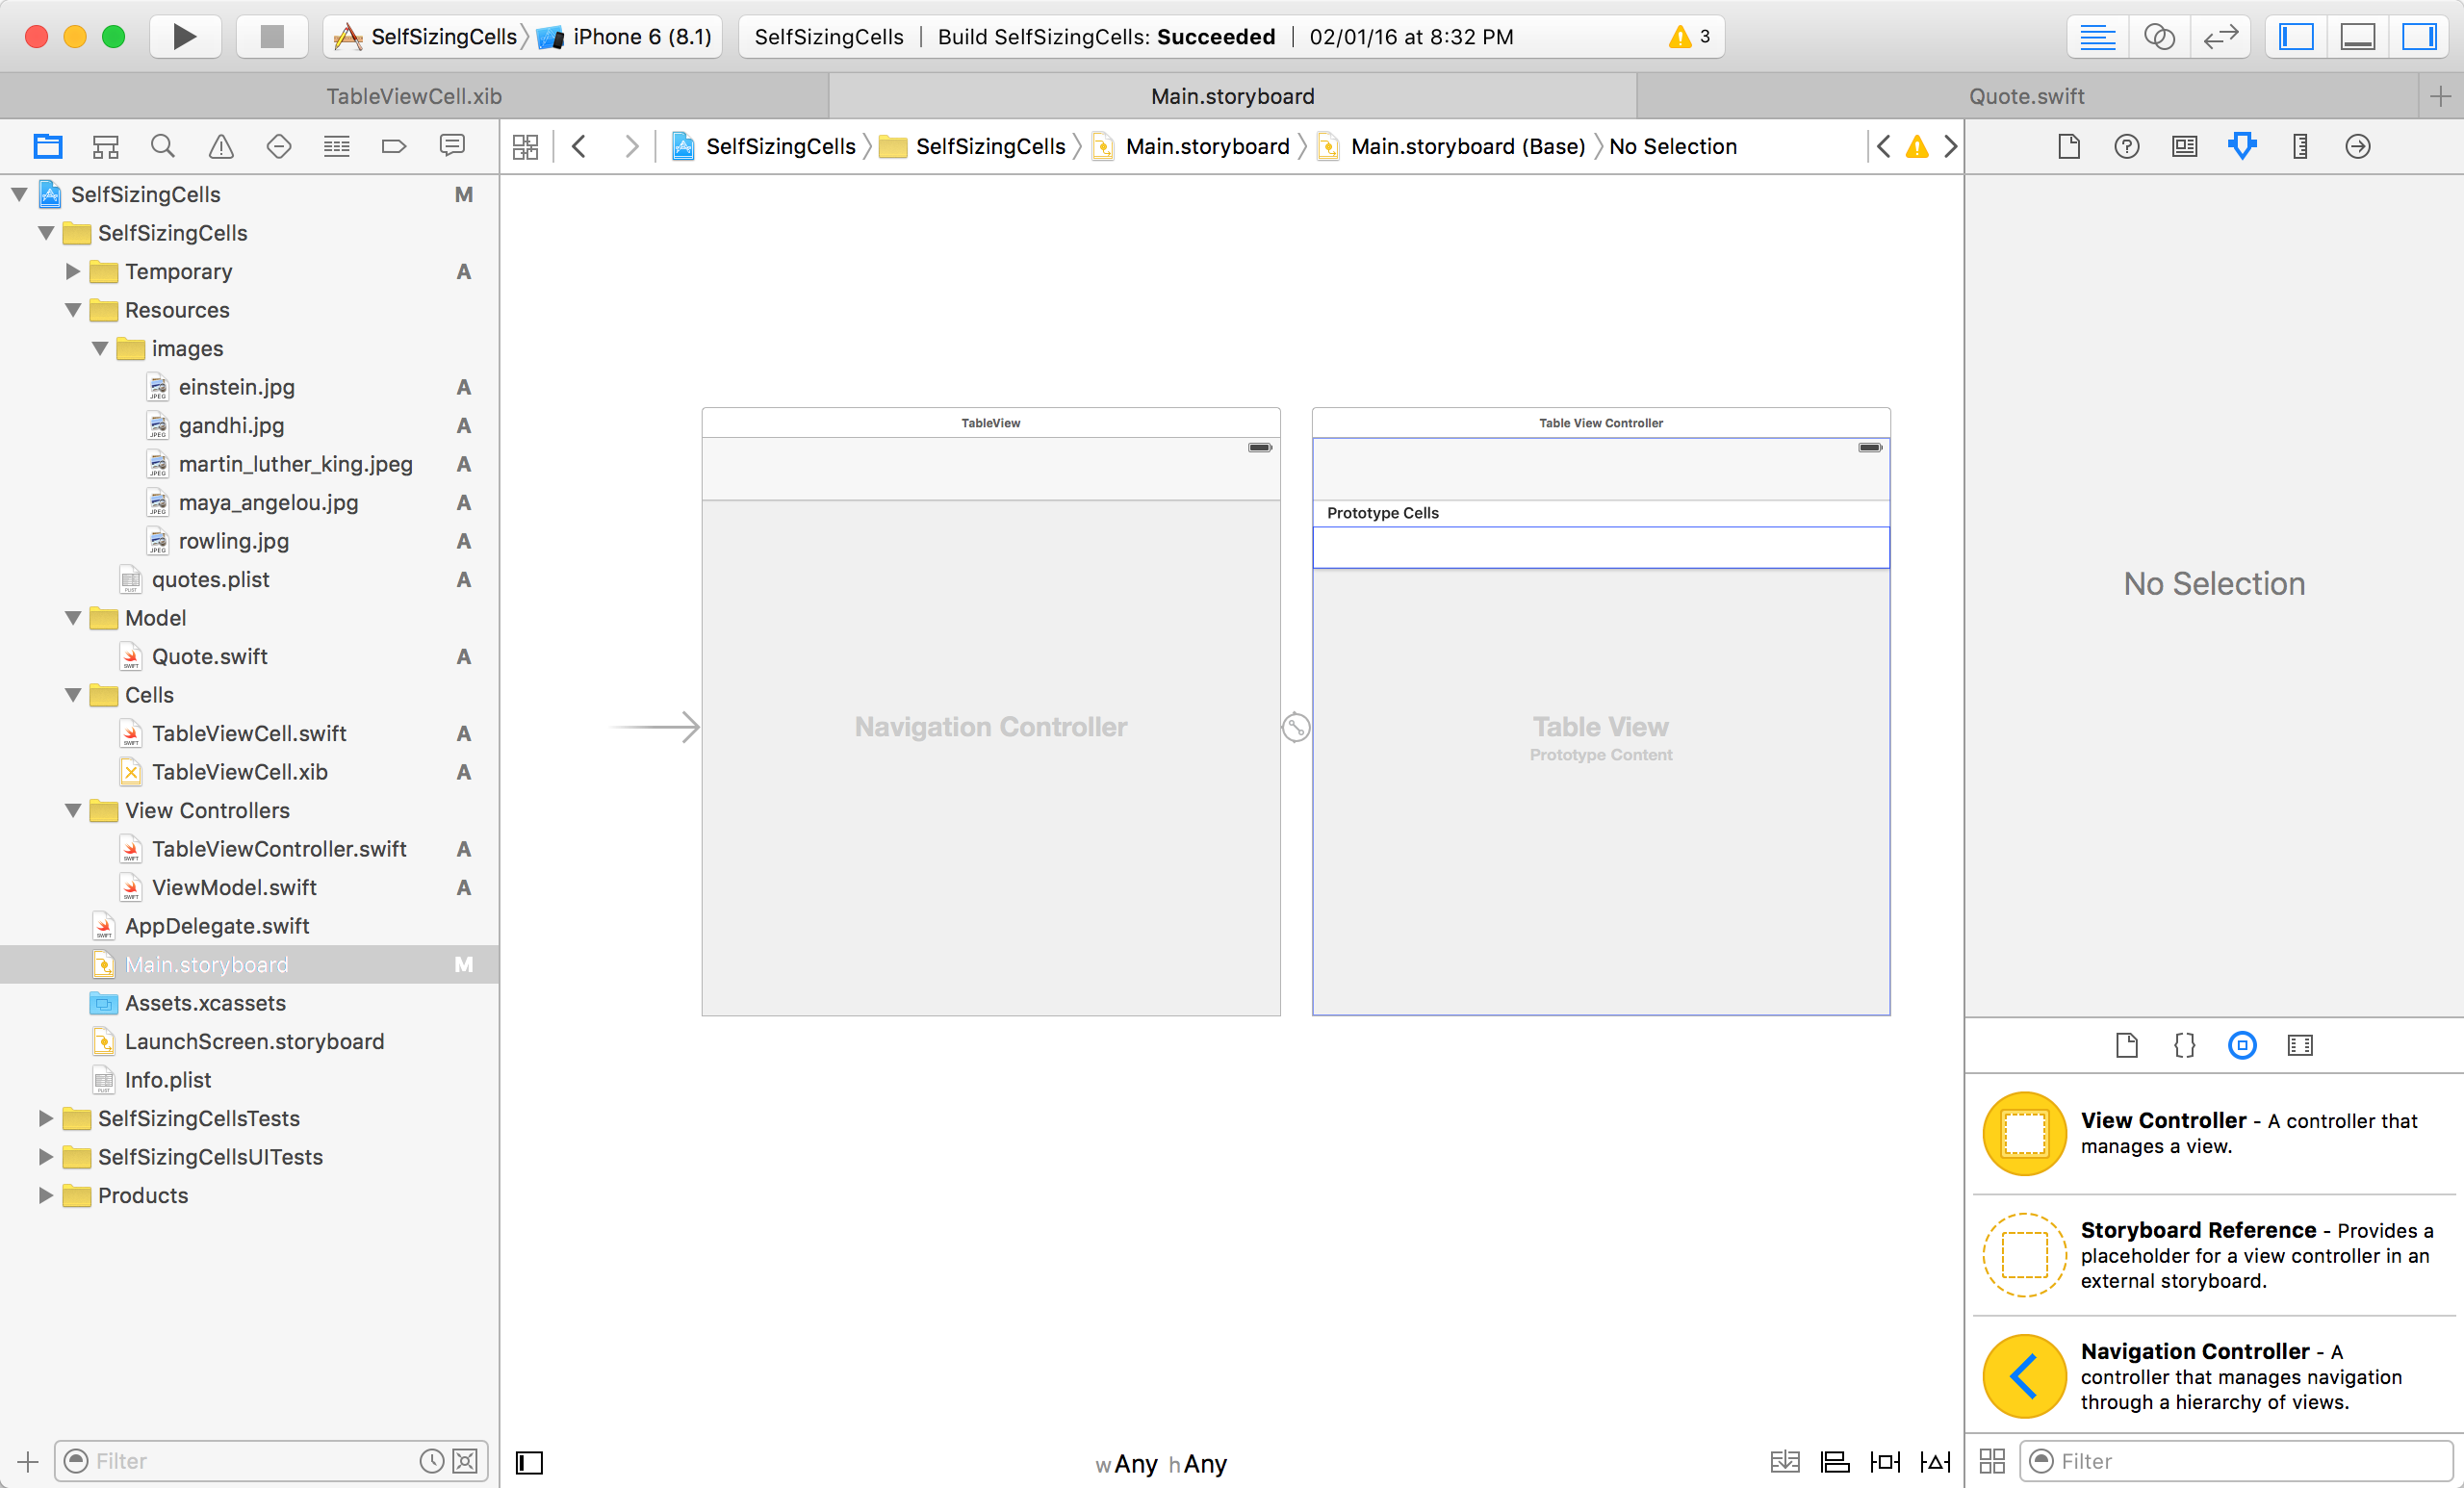
Next we need to use the view controller we created in the app. Open Main.storyboardand delete any existing scenes generated by Xcode. Then click and drag a
UITableViewController from the object library onto the storyboard and change it into an instance of TableViewController.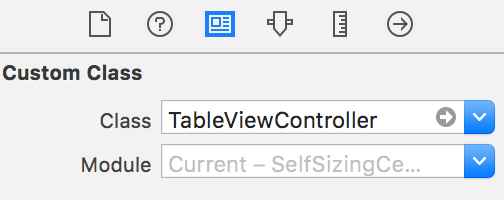
Embed this view controller in a
UINavigationController by selecting the TableViewController scene and choosing Editor -> Embed In -> Navigation Controller. This is optional for our purposes, but it’ll make the app look better.
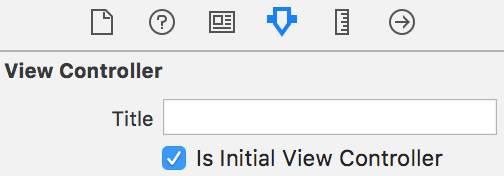
Finally, make sure that the navigation controller is the entry point of the app. Select the controller, and in the attributes inspector, enable Is Initial View Controller.
The storyboard should now look like this:
We’ll configure the cells and view controllers later.
Next, we’ll create:
- A Model representing Quotes as an
NSObjectsubclass - Another
NSObjectsubclass for aViewModelthat acts as a datasource for the Controller. This will simplify our view controllers and let’s us re-use code where possible. For instance, if we need to move from using atableViewto acollectionView, it would be trivial to do so.
Create Quote.swift inside a new Models group and add the following:
import Foundation

class Quote: NSObject {
    var text: String!
    var imageName:String?
    var personName:String?

    convenience init(text:String!, imageName:String?, personName:String?) {
        self.init()
        self.text = text
        self.imageName = imageName
        self.personName = personName
    }
}
Next we’ll create the
ViewModel which loads and holds the quotes that will populate the ViewController, acting as a data source for the UITableView. Create ViewModel.swift inside the View Controllers group and add the following:import UIKit
class ViewModel: NSObject,UITableViewDelegate, UITableViewDataSource {
var quotes:[Quote] = []
override init() {
super.init()
self.loadQuotes()
}
private func loadQuotes(){
quotes = []
if let path = NSBundle.mainBundle().pathForResource("quotes", ofType: "plist"),let quotesArray = NSArray(contentsOfFile: path){
for dictionary in quotesArray {
let dictionary = dictionary as! NSDictionary
let text = dictionary.valueForKey("text") as? String ?? ""
let imageName = dictionary.valueForKey("imageName") as? String
let personName = dictionary.valueForKey("person") as? String
let quote = Quote(text: text, imageName: imageName, personName: personName)
quotes.append(quote)
}
}
}
// TODO: TableView datasource methods
}
Here we’re loading a static set of quotes from a plist file in our bundle.
Configuring UITableViewCell and UITableView
Now that we have our data and models in place, it’s time to setup the views.
For each quote, we’ll display the quote itself, the name of the quoter, and a photo of the person if available.
Note that the image is optional. This means that we may or may not want an
imageView in the cell and this affects the space available for text, which in turn affects the height.
There are two approaches to deal with this:
- Use different re-use identifiers and cell subclasses for each type of quote, or
- Dynamically change constraints in a single cell subclass and get the layout we want.
The approach taken depends on the complexity of changes to constraints. If you find you need an entirely different set of Auto Layout constraints for each cell class, you’re better off with the first.
In this case, it’s simple enough change to the constraints so we’ll follow the second.
Open TableViewCell.xib and add elements like the below:
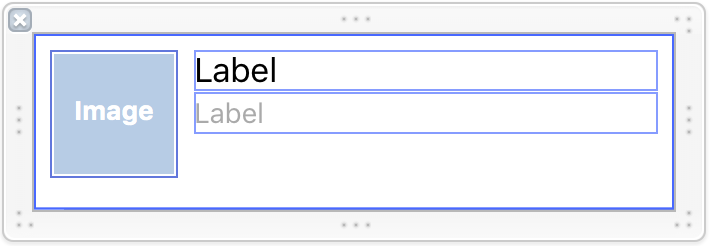
The cell consists of a
photoView to display the image, quoteTextLabel to display the quote, and a nameLabel to display the name.ImageView
We set the size of the
photoView to a fixed 64×64, and set the constraints accordingly.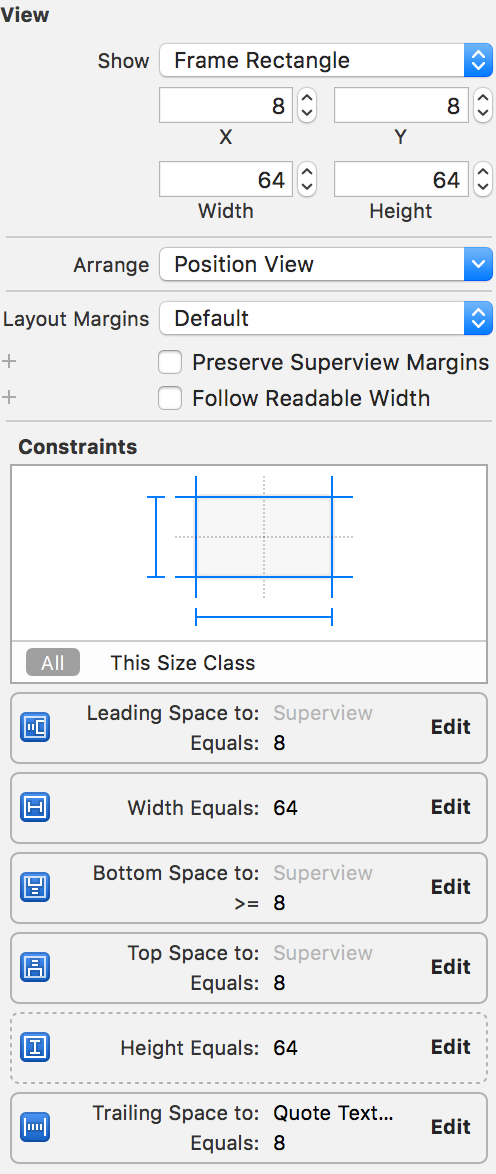
Note: Width and Height constraints are set to a priority of 1000 by default. There might be instances where your constraints don’t work. If you check the debug logs, it should include a system-added constraint called
UIView-Encapsulated-Layout-Height and other constraints removed by the system. The solution is to set such constraints to a lesser priority, like 999. In this case, we’ve set the imageView height constraint to this priority, hence the dotted line around it.Quote Text Label
Set the font and number of lines as follows. We set the number of lines to
0 as we want the label to display all the text of the quote.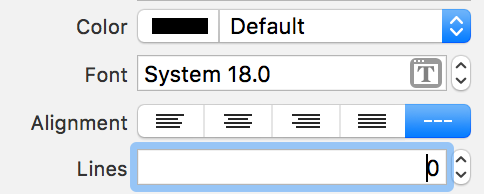
When setting the constraints of the label, set the Content Hugging priority to a value of 751, i.e high, which will ensure the label will resize to fit its content.

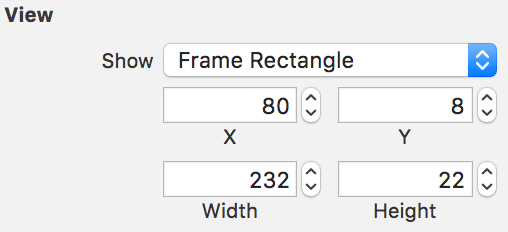
Name Label
Since the name is unlikely to be long and require multiple lines, we set the number of lines to 1 and the height to a fixed 21 pts.
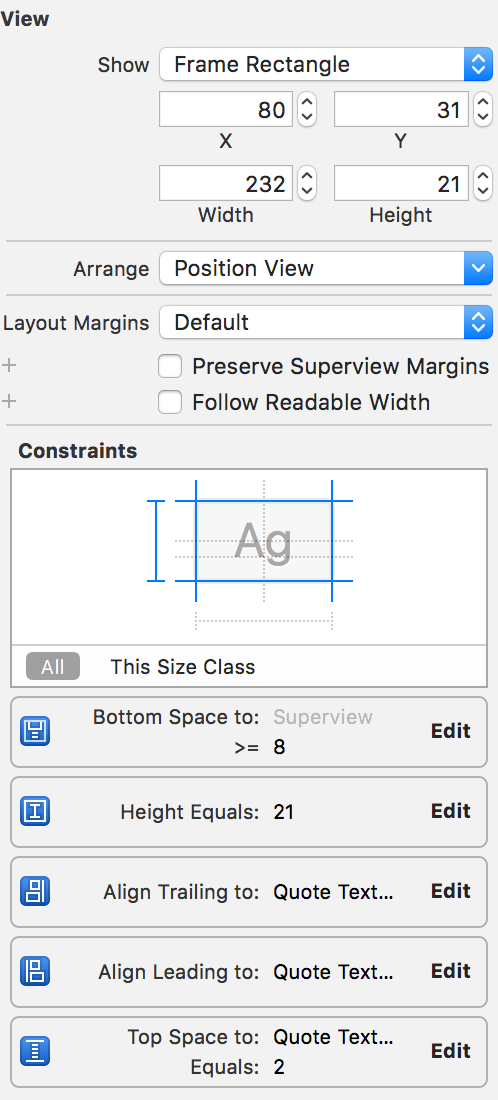
Note: There’s a chance that either the
nameLabel or the photoView is the bottom most view in the cell, depending on the length of the quote. Therefore, we set a >=constraint for both their respective bottom spacing constraint.
Note: It’s important that the Auto Layout constraints are unambiguous. They should be
solvableby the system
Next, drag and drop from the views to create outlets in the cell:
@IBOutlet weak var photoView: UIImageView!
@IBOutlet weak var quoteTextLabel: UILabel!
@IBOutlet weak var nameLabel: UILabel!
Finally, remember how the
imageView is optional? To achieve this, we’ll maintain references to a set of constraints, specifically, the photoView’s width constraint and the spacing constraint between the photoView and quoteTextLabel. By updating just these 2 constraints, we can make it look like the photoView is not even in the cell.@IBOutlet weak var photoWidthConstraint: NSLayoutConstraint!
@IBOutlet weak var photoRightMarginConstraint: NSLayoutConstraint!
Creating outlets for constraints is the same as for views. Just select the constraint in Interface Builder, and ctrl-click + drag to the assistant editor.
After setting up the cell, it’s time to setup the data source methods in the ViewModel.swift to display content.
...

// TODO: TableView datasource methods

func tableView(tableView: UITableView, numberOfRowsInSection section: Int) -> Int {
    return quotes.count
}

func tableView(tableView: UITableView, cellForRowAtIndexPath indexPath: NSIndexPath) -> UITableViewCell {
    let cell = tableView.dequeueReusableCellWithIdentifier(tableViewCellIdentifier, forIndexPath: indexPath) as! TableViewCell

    let quote = quotes[indexPath.row]
    cell.quoteTextLabel.text = quote.text
    cell.nameLabel.text = quote.personName

    if let imageName = quote.imageName where !imageName.isEmpty{
        cell.photoView?.image = UIImage(named: imageName)
        cell.photoWidthConstraint.constant = kDefaultPhotoWidth
        cell.photoRightMarginConstraint.constant = kDefaultPhotoRightMargin
    }
    else {
        cell.photoView?.image = nil
        cell.photoWidthConstraint.constant = 0
        cell.photoRightMarginConstraint.constant = 0
    }

    cell.contentView.setNeedsLayout()
    cell.contentView.layoutIfNeeded()

    return cell
}
And add the variable used here into TableViewCell.swift:
import UIKit

let tableViewCellIdentifier = "TableViewCell"
let kDefaultPhotoWidth: CGFloat = 64
let kDefaultPhotoRightMargin: CGFloat = 8

class TableViewCell: UITableViewCell {
  ...
}
The data source populates each cell with the contents. Note how we make use of the constraints previously stored as outlets. Before we return the cell, we can make changes to these constraints. If the image is not present, the
photoView is set to a width of 0, and so is its right margin. Effectively, we’re preventing the photoViewfrom being displayed in the cell.
It’s not enough to just use the numeric value of the constraints. We also need to let the cell’s
contentView know that its constraints have changed, and it needs to be re-laid out. Hence, the calls to setNeedsLayout: and layoutIfNeeded:
Note: The above seems to be necessary only on iOS 8, and not on iOS 9.
Finally, we come to the
tableView setup, where all the magic happens.
In TableViewController.swift:
...

var viewModel:ViewModel!

override func viewDidLoad() {
    super.viewDidLoad()

    //Create the ViewModel, and set it as the delegate + datasource.
    self.viewModel = ViewModel()
    self.tableView.delegate = viewModel
    self.tableView.dataSource = viewModel

    //Register our custom cell subclass.
    self.tableView.registerNib(UINib(nibName: "TableViewCell", bundle: NSBundle.mainBundle()), forCellReuseIdentifier: tableViewCellIdentifier)

    // Self-sizing magic!
    self.tableView.rowHeight = UITableViewAutomaticDimension
    self.tableView.estimatedRowHeight = 50; //Set this to any value that works for you.

}
All that’s required to enable self-sizing cells on
UITableView are the last two lines. Because the row height is now a non-explicit value, iOS will first use the estimatedRowHeight to setup the cells and will then calculate the row height before cells appear on screen. All the work we did with Auto Layout setup pays off here.
How does it work? iOS calculates the height, by
solvingthe linear equation represented by Auto Layout constraints, using a known set of variables: The width of the cell’s
contentView (which is usually the width of the tableView minus things like indentation, accessoryViews etc), and the constraints themselves. This information is the minimum required to calculate height in any way.
Since
rowHeight has already been set, it’s not necessary to implement tableView:heightForRowAtIndexPath: anymore.
A note about estimatedHeight: This is just that, an estimation. If your estimated value varies greatly from the actual height, you might see some jumpiness while scrolling, as iOS expands or collapses the cell to its proper height. If you need granular control over the estimated height, use the
UITableView Datasource method tableView:estimatedHeightForRowAtIndexPath: and calculate the estimated height for each row individually.
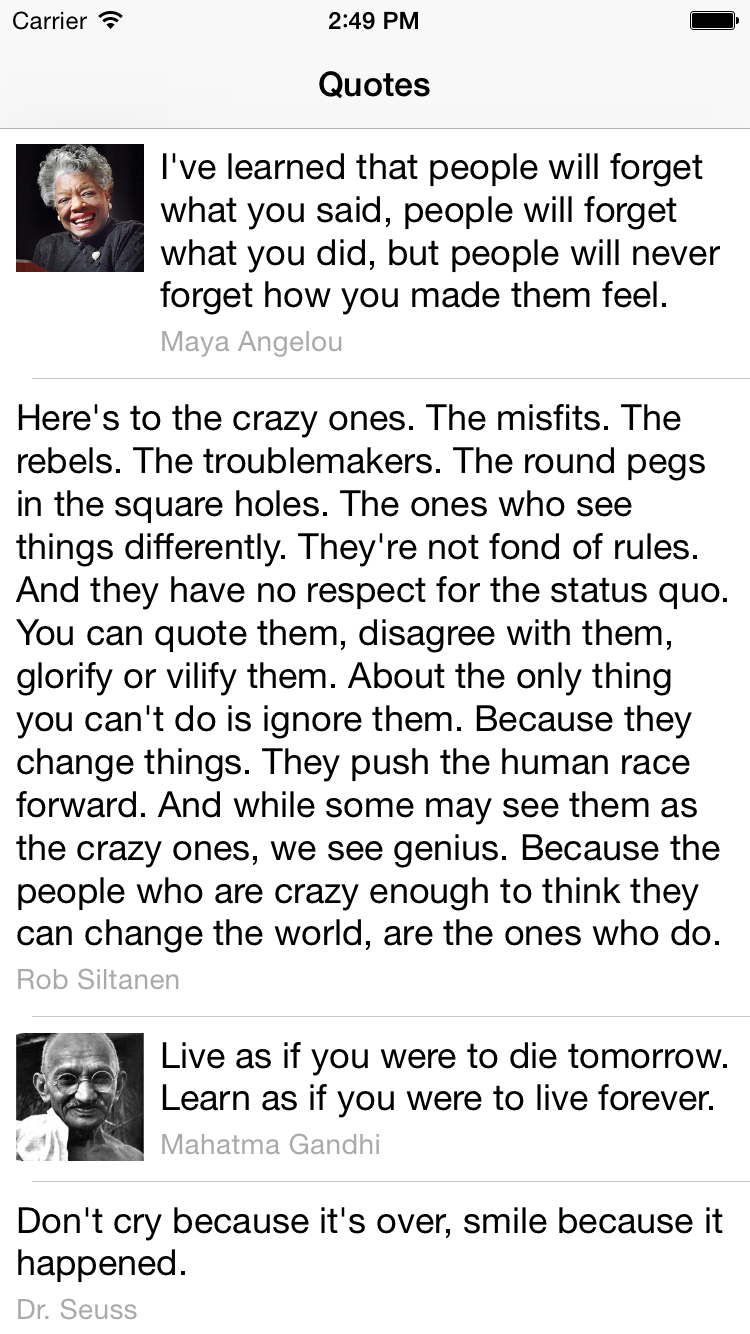
Now that you’ve done all the hard work, it’s time to run the app. The final app should look like this:
Please let me know if you have any questions or comments below.
Comments
Post a Comment
Thank You.