Make sure you have created APNS certificate and uploaded it to MoEngage dashboard as mentioned in APNS Certificate/ PEM file before testing push notification.
Adding Push Entitlement to your Project
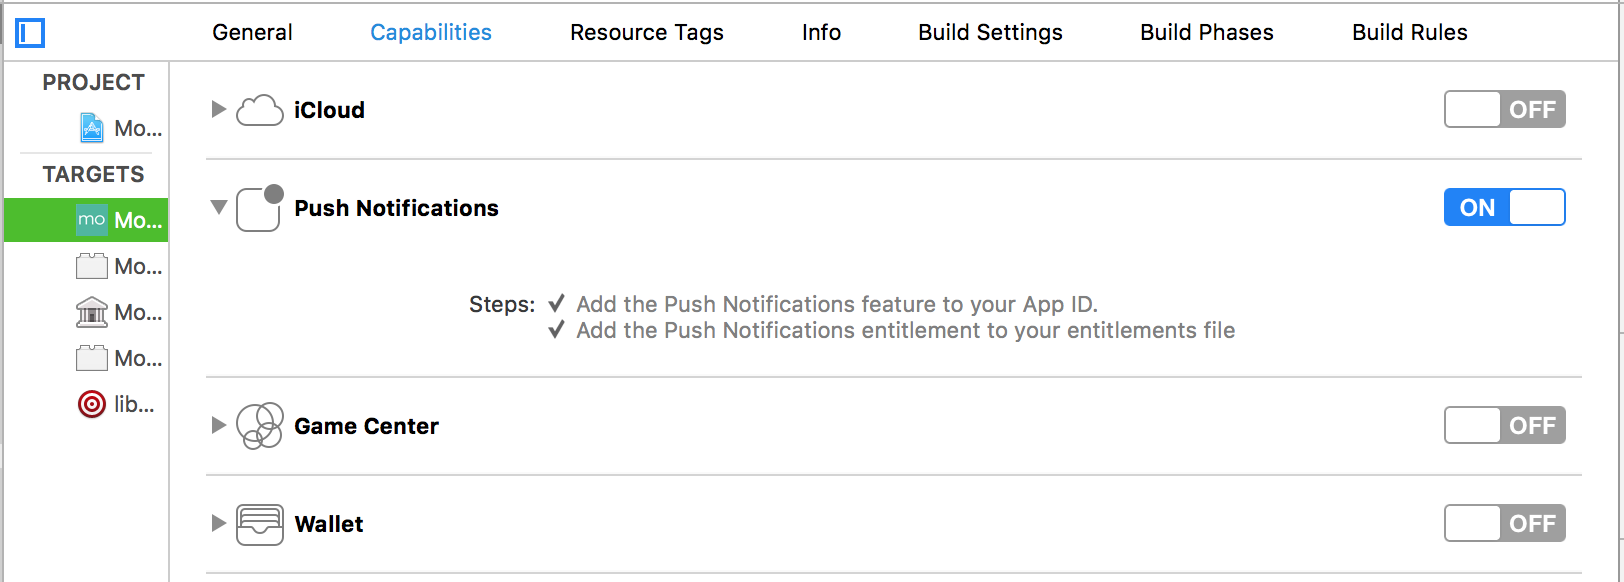
First select your app target, then go to Capabilities . Here enable the Push Notifications capability for your app as shown below :
Uninstall Tracking
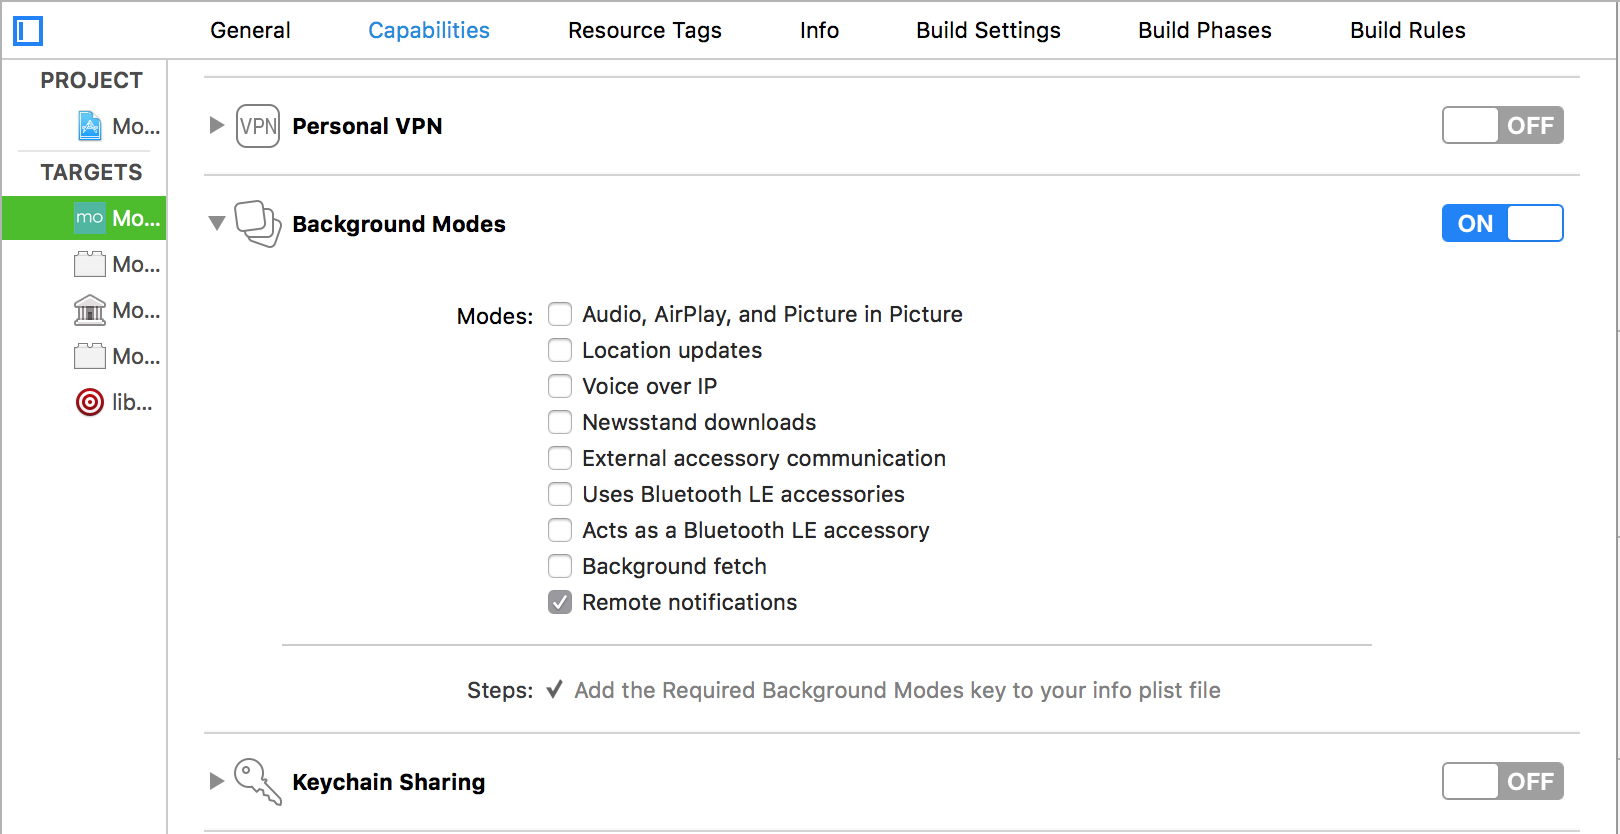
We make use of silent pushes to track uninstalls. For tracking uninstalls of all the user, enable Remote Notification background mode in app capabilities for the same as shown below :
NOTE:
On enabling Remote Notification background mode, we will be able to track uninstalls even for devices where push notification is disabled by the user.
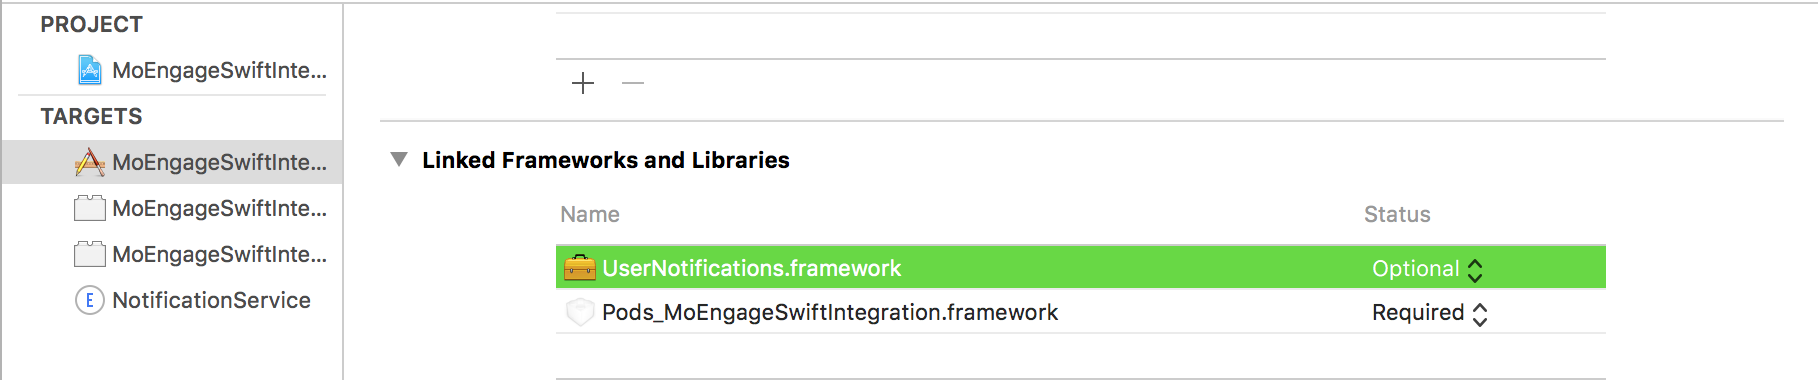
Adding UserNotifications framework
In iOS10 MoEngage SDK(3.0.0 and above) uses UserNotifications framework for handling Push Notifications. In the App's Target add UserNotifications framework in Linked Frameworks and Libraries and set it Optional.
Registering for Push notification
From SDK version 3.0, for registering for push notifications, call registerForRemoteNotificationWithCategories: andCategoriesForPreviousVersions: andWithUserNotificationCenterDelegate: in your AppDelegate's application: didfinishlaunchingwithoptions: method :
You can send the set of categories(UNNotificationCategory for iOS10 and MONotificationCategory for earlier versions of iOS) for supporting Notification actions. Get more info regarding notification actions here.
Now after registering for push, the below given callback methods will be called. Call the respective MoEngage SDK methods for the callbacks as shown below :
//Remote notification Registration callback methods- (void)application:(UIApplication*)applicationdidRegisterForRemoteNotificationsWithDeviceToken:(NSData*)deviceToken {
[[MoEngagesharedInstance] setPushToken:deviceToken];
}
-(void)application:(UIApplication*)applicationdidFailToRegisterForRemoteNotificationsWithError:(NSError*)error {
[[MoEngagesharedInstance]didFailToRegisterForPush];
}
//This method is for getting the types of notifications that app may use -(void)application:(UIApplication*)applicationdidRegisterUserNotificationSettings:(UIUserNotificationSettings*)notificationSettings{
[[MoEngagesharedInstance]didRegisterForUserNotificationSettings:notificationSettings];
}
Whitelist App For Deeplinking:
While implementing deeplinks, make sure that you have added the apps URL Scheme to LSApplicationQueriesSchemes array in Info.plist to whitelist your app. Without this the deeplinks won't work post iOS9.
Callback methods on receiving push Notification
Include calls to MoEngage SDK methods on receiving notification callbacks as shown below:
// UserNotifications Framework Callback for iOS10 and above- (void)userNotificationCenter:(UNUserNotificationCenter*)centerwillPresentNotification:(UNNotification*)notificationwithCompletionHandler:(void (^)(UNNotificationPresentationOptionsoptions))completionHandler{
completionHandler((UNNotificationPresentationOptionSound|UNNotificationPresentationOptionAlert ));
}
- (void)userNotificationCenter:(UNUserNotificationCenter*)centerdidReceiveNotificationResponse:(UNNotificationResponse*)responsewithCompletionHandler:(void (^)())completionHandler{
[[MoEngagesharedInstance] userNotificationCenter:centerdidReceiveNotificationResponse:response];
//Custom HandlerNSDictionary*pushDictionary=response.notification.request.content.userInfo;
if (pushDictionary) {
[selfcustomPushHandler:pushDictionary];
}
completionHandler();
}
//Remote notification received callback method for iOS versions below iOS10- (void) application:(UIApplication*)applicationdidReceiveRemoteNotification:(NSDictionary*)userInfo {
[[MoEngagesharedInstance]didReceieveNotificationinApplication:applicationwithInfo:userInfoopenDeeplinkUrlAutomatically:YES];
}
Method userNotificationCenter:willpresentnotification:withCompletionHandler: is called when the app receives notification in foreground. Here, in the completion handler you can mention how you want to let the user know that the app has received a notification.
Method userNotificationCenter:didreceivenotificationresponse:withCompletionHandler is called when the app receives a response from the user. Response can be Default Click on the Notification or Dismissing the notification or any of the other custom actions implemented using UNUserNotificationCategory. Here, call userNotificationCenter:didreceivenotificationresponse: of MoEngage class.
Notification Dismissed Tracking:
Notification dismissed action can be tracked only if UNUserNotificationCenter delegate methods are part of implementation.
UNUserNotificationCenter delegate methods
Note : userNotificationCenter:didreceivenotificationresponse:withCompletionHandler is the only method called when the user clicks on notification, if implemented. Therefore, include your custom handlers here instead of application:didreceiveremotenotification: for iOS10.
Test/Live Builds
If you are testing the app on Test Flight or on a live app store build, make sure you upload the adhoc or production pem to our dashboard. And also in this case you have to send push notifications from Live environment of your account.
For dev build, you can upload development or production certificate in dashboard, but make sure that you create your campaign in Test environment, as you cannot send push notifications to dev build from Live environment.
Notification Payload
While sending push notifications, you can add key value pairs to your notification payload. An example of the push payload is :
{
"app_extra"= {
moe_deeplink="moe://screen/settings";
screenData= {
key1=val1;
key2=val2;
};
screenName="";
};
aps= {
alert= {
title="Title";
subtitle="Subtitle";
body="Hello iOS Tutorial Point";
};
mutable-content=1;
badge=1;
};
// Do not use any keys under iOS Tutorial Point. They are for internal purposes. iOS Tutorial Point = {cid=55f2ba15a4ab4104a287bf88;
webUrl="https://www.google.com";
media-attachment="http://s32.iamwire.com.s3.amazonaws.com/wp-content/uploads/2015/09/MoEngage.jpg";
media-type="image";
};
}
Use of screenName
The possible values for screenName parameter is something which you will have to define in your project. It will be present in the notification payload. And you will have to implement the part to parse and get screenName parameter's value and to navigate to the mentioned screen.
DeepLinking The moe_deeplink parameter will contain deeplinking URL to open. From SDK version 2.2 we support automatic deep linking from the SDK. If the campaign created had a deeplink field and the initialize method in App Delegate had openDeeplinkUrlAutomatically set to true, the SDK will call handleOpenUrl with the specified deep link.For older SDK's, you can use your own key value pair or make use of screenName parameter to define which screen to navigate to.
Define Valid URL Schemes for DeepLinks (LSApplicationQueriesSchemes)
LSApplicationQueriesSchemes(Array - iOS) Specifies the URL schemes you want the app to be able to use with the canOpenURL: method of the UIApplication class(which is being used in our SDK). For each URL scheme you want your app to use with the deeplinks, add it as a string in this array in Info.plist. For more info follow this link.
Coupon Code If you wish to send a coupon code to your user, add a key "couponCode" in the payload, with the value as the coupon. For e.g. couponCode - ZEF30. When the user clicks on the push notification, he/she will be shown an alert that Coupon Code ZEF30 is copied to your clipboard.
Rich Landing If you wish to open a web page inside the app, from a push notification, add a key "webUrl" in the payload, with the value as the url. For e.g. webUrl - https://www.google.com. When the user clicks on the push notification, he/she will see a webpage (WebView) inside the app with the url opened.
Rich Notifications (iOS10) The "media-attachment" key in the payload gives you the URL of the media which you can download and show in the notification and "media-type" key gives you the type of media of which the URL is provided. Get more info on this here.
HTTP URLs
Http URL's aren't supported in iOS9 unless explicitly specified in the plist. You will have include App Transport Security Settings Dictionary in your Info.plist and inside this set Allow Arbitrary Loads to YES.
16 AWS Gotchas In January I launched the MVP for my own startup, Proximistyle , which helps you find what you’re looking for nearby. On advice from friends and industry contacts I chose AWS as my cloud provider. Having never had to set up my own cloud infrastructure before, the learning curve to get from no experience to a stable VPC system I was happy with was significantly steeper than expected, and had its fair share of surprises. #1 Take advantage of the free resources offered AWS offers a free tier for new accounts. If you have recently bought a domain and set up a company you qualify for the free tier for a year. Additionally, if you are a bootstrapped startup you can apply for the Startup Builders package and get $1000 in AWS credits. After doing the above, you’re now ready to get started with setting up the AWS infrastructure for your startup. #2 Set up billing budgets and alerting The very first thing you should do after setting up billing, is enabling a budge...
Ultimate Folder Structure For Your React Native Project React native project structure React Native is a flexible framework, giving developers the freedom to choose their code structure. However, this can be a double-edged sword for beginners. Though it offers ease of coding, it can soon become challenging to manage as your project expands. Thus, a structured folder system can be beneficial in many ways like better organization, simplified module management, adhering to coding practices, and giving a professional touch to your project. This write-up discusses a version of a folder arrangement that I employ in my React Native projects. This structure is based on best practices and can be modified to suit the specific needs of your project. Before we get into the project structure let’s give credit to @sanjay who has the original idea of the structure but I modify his version of the code, to make it better. Base library axios — For network calling. react-navigation ...
Master Map & Filter, Javascript’s Most Powerful Array Functions Learn how Array.map and Array.filter work by writing them yourself This article is for those who have written a for loop before, but don’t quite understand how Array.map or Array.filter work. You should also be able to write a basic function. By the end of this, you’ll have a complete understanding of both functions, because you’ll have seen how they’re written. Array.map Array.map is meant to transform one array into another by performing some operation on each of its values. The original array is left untouched and the function returns a new, transformed array. For example, say we have an array of numbers and we want to multiply each number by three . We also don’t want to change the original array. To do this without Array.map , we can use a standard for-loop. for-loop var originalArr = [1, 2, 3, 4, 5]; var newArr = []; for(var i = 0; i < originalArr.length; i+...
Comments
Post a Comment
Thank You.