
React Native - Debugging

React native offers a couple of methods that help in debugging your code.

In App Developer Menu

You can open the developer menu on the IOS simulator by pressing command + D.
On Android emulator, you need to press command + M.
React Native Debugging Developer Menu
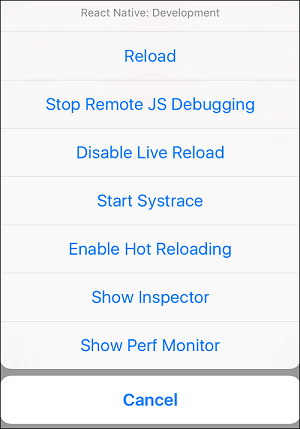
  • Reload − Used for reloading simulator. You can use shortcut command + R
  • Debug JS Remotely − Used for activating debugging inside browser developer console.
  • Enable Live Reload − Used for enabling live reloading whenever your code is saved. The debugger will open at localhost:8081/debugger-ui.
  • Start Systrace − Used for starting Android marker based profiling tool.
  • Show Inspector − Used for opening inspector where you can find info about your components. You can use shortcut command + I
  • Show Perf Monitor − Perf monitor is used for keeping track of the performance of your app.

Comments

Popular Posts

What are the Alternatives of device UDID in iOS? - iOS7 / iOS 6 / iOS 5 – Get Device Unique Identifier UDID

Get Device Unique Identifier UDID Following code will help you to get the unique-device-identifier known as UDID. No matter what iOS user is using, you can get the UDID of the current iOS device by following code. - ( NSString *)UDID { NSString *uuidString = nil ; // get os version NSUInteger currentOSVersion = [[[[[UIDevice currentDevice ] systemVersion ] componentsSeparatedByString: @" . " ] objectAtIndex: 0 ] integerValue ]; if (currentOSVersion <= 5 ) { if ([[ NSUserDefaults standardUserDefaults ] valueForKey: @" udid " ]) { uuidString = [[ NSUserDefaults standardDefaults ] valueForKey: @" udid " ]; } else { CFUUIDRef uuidRef = CFUUIDCreate ( kCFAllocatorDefault ); uuidString = ( NSString *) CFBridgingRelease ( CFUUIDCreateString ( NULL ,uuidRef)); CFRelease (uuidRef); [[ NSUserDefaults standardUserDefaults ] setObject: uuidString ForKey: @" udid " ]; [[ NSUserDefaults standardUserDefaults ] synchro...

Ultimate Folder Structure For Your React Native Project

  Ultimate Folder Structure For Your React Native Project React native project structure React Native is a flexible framework, giving developers the freedom to choose their code structure. However, this can be a double-edged sword for beginners. Though it offers ease of coding, it can soon become challenging to manage as your project expands. Thus, a structured folder system can be beneficial in many ways like better organization, simplified module management, adhering to coding practices, and giving a professional touch to your project. This write-up discusses a version of a folder arrangement that I employ in my React Native projects. This structure is based on best practices and can be modified to suit the specific needs of your project. Before we get into the project structure let’s give credit to @sanjay who has the original idea of the structure but I modify his version of the code, to make it better. Base library axios  — For network calling. react-navigation ...

16 AWS Gotchas

16 AWS Gotchas In January I launched the MVP for my own startup,  Proximistyle , which helps you find what you’re looking for nearby. On advice from friends and industry contacts I chose AWS as my cloud provider. Having never had to set up my own cloud infrastructure before, the learning curve to get from no experience to a stable VPC system I was happy with was significantly steeper than expected, and had its fair share of surprises. #1 Take advantage of the free resources offered AWS offers a free tier for new accounts. If you have recently bought a domain and set up a company you qualify for the free tier for a year. Additionally, if you are a bootstrapped startup you can apply for  the Startup Builders package  and get $1000 in AWS credits. After doing the above, you’re now ready to get started with setting up the AWS infrastructure for your startup. #2 Set up billing budgets and alerting The very first thing you should do after setting up billing, is enabling a budge...