
React Native - Router

In this chapter, we will understand navigation in React Native.

Step 1: Install Router

To begin with, we need to install the Router. We will use the React Native Router Flux in this chapter. You can run the following command in terminal, from the project folder.
npm i react-native-router-flux --save

Step 2: Entire Application

Since we want our router to handle the entire application, we will add it in index.ios.js. For Android, you can do the same in index.android.js.

App.js

import React, { Component } from 'react';
import { AppRegistry, View } from 'react-native';
import Routes from './Routes.js'

class reactTutorialApp extends Component {
   render() {
      return (
         <Routes />
      )
   }
}
export default reactTutorialApp
AppRegistry.registerComponent('reactTutorialApp', () => reactTutorialApp)

Step 3: Add Router

Now we will create the Routes component inside the components folder. It will return Router with several scenes. Each scene will need key, componentand title. Router uses the key property to switch between scenes, component will be rendered on screen and the title will be shown in the navigation bar. We can also set the initial property to the scene that is to be rendered initially.

Routes.js

import React from 'react'
import { Router, Scene } from 'react-native-router-flux'
import Home from './Home.js'
import About from './About.js'

const Routes = () => (
   <Router>
      <Scene key = "root">
         <Scene key = "home" component = {Home} title = "Home" initial = {true} />
         <Scene key = "about" component = {About} title = "About" />
      </Scene>
   </Router>
)
export default Routes

Step 4: Create Components

We already have the Home component from previous chapters; now, we need to add the About component. We will add the goToAbout and the goToHome functions to switch between scenes.

Home.js

import React from 'react'
import { TouchableOpacity, Text } from 'react-native';
import { Actions } from 'react-native-router-flux';

const Home = () => {
   const goToAbout = () => {
      Actions.about()
   }
   return (
      <TouchableOpacity style = {{ margin: 128 }} onPress = {goToAbout}>
         <Text>This is HOME!</Text>
      </TouchableOpacity>
   )
}
export default Home

About.js

import React from 'react'
import { TouchableOpacity, Text } from 'react-native'
import { Actions } from 'react-native-router-flux'

const About = () => {
   const goToHome = () => {
      Actions.home()
   }
   return (
      <TouchableOpacity style = {{ margin: 128 }} onPress = {goToHome}>
         <Text>This is ABOUT</Text>
      </TouchableOpacity>
   )
}
export default About
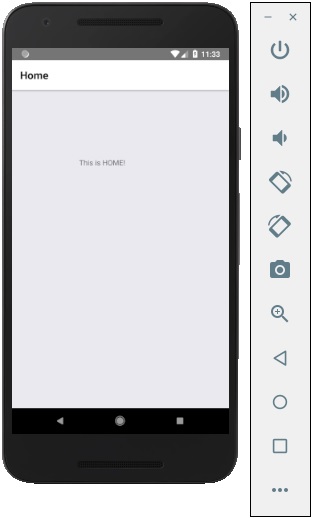
The app will render the initial Home screen.
React Native Router
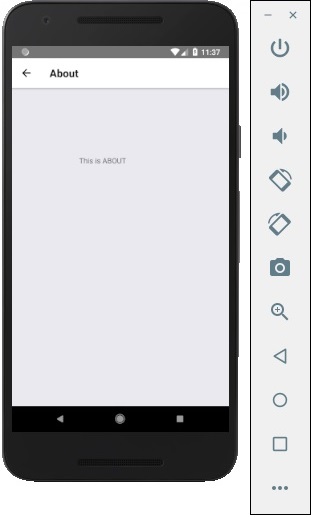
You can press the button to switch to the about screen. The Back arrow will appear; you can use it to get back to the previous screen.
React Native Router

Comments

Popular Posts

What are the Alternatives of device UDID in iOS? - iOS7 / iOS 6 / iOS 5 – Get Device Unique Identifier UDID

Get Device Unique Identifier UDID Following code will help you to get the unique-device-identifier known as UDID. No matter what iOS user is using, you can get the UDID of the current iOS device by following code. - ( NSString *)UDID { NSString *uuidString = nil ; // get os version NSUInteger currentOSVersion = [[[[[UIDevice currentDevice ] systemVersion ] componentsSeparatedByString: @" . " ] objectAtIndex: 0 ] integerValue ]; if (currentOSVersion <= 5 ) { if ([[ NSUserDefaults standardUserDefaults ] valueForKey: @" udid " ]) { uuidString = [[ NSUserDefaults standardDefaults ] valueForKey: @" udid " ]; } else { CFUUIDRef uuidRef = CFUUIDCreate ( kCFAllocatorDefault ); uuidString = ( NSString *) CFBridgingRelease ( CFUUIDCreateString ( NULL ,uuidRef)); CFRelease (uuidRef); [[ NSUserDefaults standardUserDefaults ] setObject: uuidString ForKey: @" udid " ]; [[ NSUserDefaults standardUserDefaults ] synchro...

Ultimate Folder Structure For Your React Native Project

  Ultimate Folder Structure For Your React Native Project React native project structure React Native is a flexible framework, giving developers the freedom to choose their code structure. However, this can be a double-edged sword for beginners. Though it offers ease of coding, it can soon become challenging to manage as your project expands. Thus, a structured folder system can be beneficial in many ways like better organization, simplified module management, adhering to coding practices, and giving a professional touch to your project. This write-up discusses a version of a folder arrangement that I employ in my React Native projects. This structure is based on best practices and can be modified to suit the specific needs of your project. Before we get into the project structure let’s give credit to @sanjay who has the original idea of the structure but I modify his version of the code, to make it better. Base library axios  — For network calling. react-navigation ...

16 AWS Gotchas

16 AWS Gotchas In January I launched the MVP for my own startup,  Proximistyle , which helps you find what you’re looking for nearby. On advice from friends and industry contacts I chose AWS as my cloud provider. Having never had to set up my own cloud infrastructure before, the learning curve to get from no experience to a stable VPC system I was happy with was significantly steeper than expected, and had its fair share of surprises. #1 Take advantage of the free resources offered AWS offers a free tier for new accounts. If you have recently bought a domain and set up a company you qualify for the free tier for a year. Additionally, if you are a bootstrapped startup you can apply for  the Startup Builders package  and get $1000 in AWS credits. After doing the above, you’re now ready to get started with setting up the AWS infrastructure for your startup. #2 Set up billing budgets and alerting The very first thing you should do after setting up billing, is enabling a budge...