For those of you who do not know what is Flutter then


Flutter is an open-source mobile application development SDK created by Google. It is used to develop applications for Android and iOS.
or you can visit https://flutter.dev
let's talk about JSON parsing in flutter.
I know it is really confusing for beginners to understand how to parse JSON data.
Let’s Start with a JSON example

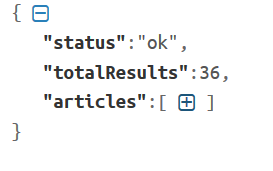
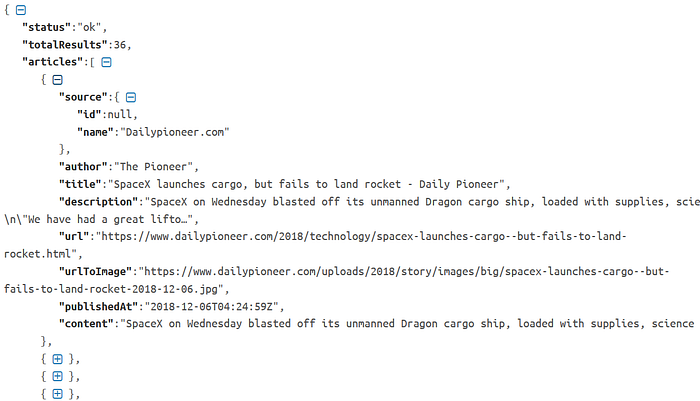
Suppose I want to access the articles list but the articles have many attributes and we need to parse the article array into our app.
Let's see what we have in the article

So How we are going to do that?
Step 1: Create a PODO
First of all, we have to create a PODO (Plain Old Dart Object) for a particular article.
To access source in the Article we also have to create a PODO for Source.
| class Article { | |
| Source source; | |
| String author; | |
| String title; | |
| String description; | |
| String url; | |
| String urlToImage; | |
| String publishedAt; | |
| String content; | |
| Article( | |
| {this.source, | |
| this.author, | |
| this.title, | |
| this.description, | |
| this.url, | |
| this.urlToImage, | |
| this.publishedAt, | |
| this.content}); | |
| factory Article.fromJson(Map<String, dynamic> json) { | |
| return Article( | |
| source: Source.fromJson(json["source"]), | |
| author: json["author"], | |
| title: json["title"], | |
| description: json["description"], | |
| url: json["url"], | |
| urlToImage: json["urlToImage"], | |
| publishedAt: json["publishedAt"], | |
| content: json["content"]); | |
| } | |
| } | |
| class Source { | |
| String id; | |
| String name; | |
| Source({this.id, this.name}); | |
| factory Source.fromJson(Map<String, dynamic> json) { | |
| return Source( | |
| id: json["id"] as String, | |
| name: json["name"] as String, | |
| ); | |
| } | |
| } |
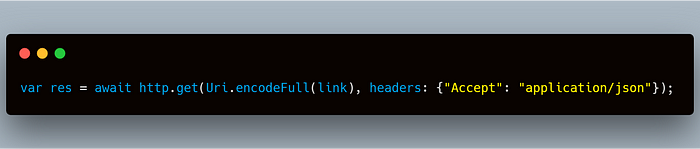
Step 2: Make the network request


I am using the NewsApi to retrieve the JSON data
I have the URL and I want the response when I request to the URL.

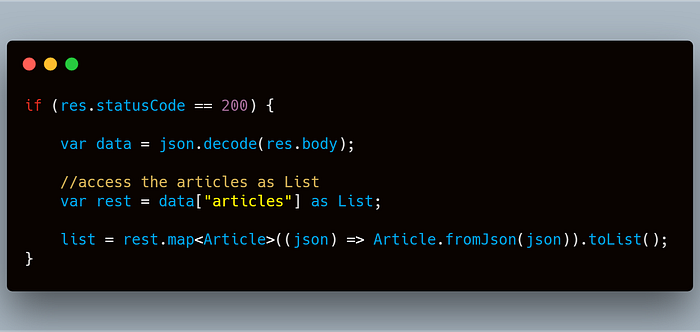
Step 3: Decode the response
Now I have the response I can get the list of articles.
If you are an android developer and you know the traditional way of parsing the JSON data then you must remember that first we retrieve the JSON data and get the JSON array then iterate the JSON array and map to the Java objects we have done the same here.
var rest = data["articles"] as List;
Now the rest will have the JSON array and we will iterate the JSON array and map to the Dart objects.
Step 3: Map the JSON objects to Dart Objects

Complete method of parsing the JSON array
| Future<List<Article>> getData(String newsType) async { | |
| List<Article> list; | |
| String link = | |
| "https://newsapi.org/v2/top-headlines?country=in&apiKey=API_KEY"; | |
| var res = await http | |
| .get(Uri.encodeFull(link), headers: {"Accept": "application/json"}); | |
| print(res.body); | |
| if (res.statusCode == 200) { | |
| var data = json.decode(res.body); | |
| var rest = data["articles"] as List; | |
| print(rest); | |
| list = rest.map<Article>((json) => Article.fromJson(json)).toList(); | |
| } | |
| print("List Size: ${list.length}"); | |
| return list; | |
| } |
| import 'dart:async'; | |
| import 'dart:convert'; | |
| import 'package:flutter/material.dart'; | |
| import 'package:flutter_news_web/model/news.dart'; | |
| import 'package:flutter_news_web/news_details.dart'; | |
| import 'package:http/http.dart' as http; | |
| class NewsListPage extends StatefulWidget { | |
| @override | |
| _NewsListPageState createState() => _NewsListPageState(); | |
| } | |
| class _NewsListPageState extends State<NewsListPage> { | |
| Future<List<Article>> getData(String newsType) async { | |
| List<Article> list; | |
| String link = | |
| "https://newsapi.org/v2/top-headlines?country=in&apiKey=API_KEY"; | |
| var res = await http | |
| .get(Uri.encodeFull(link), headers: {"Accept": "application/json"}); | |
| print(res.body); | |
| if (res.statusCode == 200) { | |
| var data = json.decode(res.body); | |
| var rest = data["articles"] as List; | |
| print(rest); | |
| list = rest.map<Article>((json) => Article.fromJson(json)).toList(); | |
| } | |
| print("List Size: ${list.length}"); | |
| return list; | |
| } | |
| Widget listViewWidget(List<Article> article) { | |
| return Container( | |
| child: ListView.builder( | |
| itemCount: 20, | |
| padding: const EdgeInsets.all(2.0), | |
| itemBuilder: (context, position) { | |
| return Card( | |
| child: ListTile( | |
| title: Text( | |
| '${article[position].title}', | |
| style: TextStyle( | |
| fontSize: 18.0, | |
| color: Colors.black, | |
| fontWeight: FontWeight.bold), | |
| ), | |
| leading: Padding( | |
| padding: const EdgeInsets.all(8.0), | |
| child: SizedBox( | |
| child: article[position].urlToImage == null | |
| ? Image( | |
| image: AssetImage('images/no_image_available.png'), | |
| ) | |
| : Image.network('${article[position].urlToImage}'), | |
| height: 100.0, | |
| width: 100.0, | |
| ), | |
| ), | |
| onTap: () => _onTapItem(context, article[position]), | |
| ), | |
| ); | |
| }), | |
| ); | |
| } | |
| void _onTapItem(BuildContext context, Article article) { | |
| Navigator.of(context).push(MaterialPageRoute( | |
| builder: (BuildContext context) => NewsDetails(article, widget.title))); | |
| } | |
| @override | |
| Widget build(BuildContext context) { | |
| return Scaffold( | |
| backgroundColor: Colors.black, | |
| appBar: AppBar( | |
| title: Text(widget.title), | |
| ), | |
| body: FutureBuilder( | |
| future: getData(widget.newsType), | |
| builder: (context, snapshot) { | |
| return snapshot.data != null | |
| ? listViewWidget(snapshot.data) | |
| : Center(child: CircularProgressIndicator()); | |
| }), | |
| ); | |
| } | |
| } |
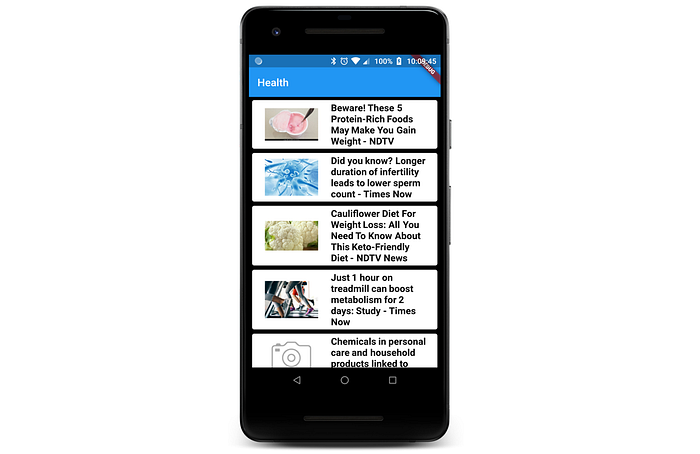
The final app will look like this:

Thanks for reading this article ❤
If I got something wrong? Let me know in the comments. I would love to improve.
Comments
Post a Comment
Thank You.