With the growing trend of ‘BYOD’ (Bring Your Own Device), many small and medium enterprises (SME’s) are employing the use of mobile apps to train, inform and enhance their workforce. In order to publish your app – you will need to obtain an Enterprise App Developer Licence from Apple.
Read our Step by Step guide to creating one…
Step 1
Go to https://developer.apple.com/programs/ios/enterprise/
An enterprise app licence will cost you $299 per year.
An enterprise app licence will cost you $299 per year.
Step 2
Before you click the ‘Apply Now’ button, note that there are a few criteria you must meet to before applying for an enterprise license:
- The apps you build are for internal (in-house) distribution only
- You have the legal binding authority to be the person enrolling the business into the enterprise developing programme
- Your organisation must have a D-U-N-S Number. (Read our blog, ‘What is a D-U-N-S Number and how do I get one?)
- You must have an Intel-based Mac running OS X Mavericks (10.9) or later to develop iOS apps

Step 3
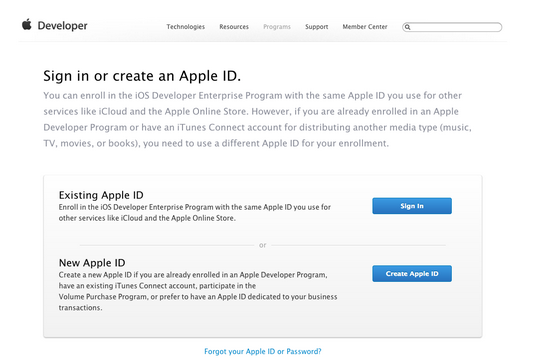
You will need an Apple ID to create your enterprise developer account. If you are making an enterprise app for your business, it might be a good idea to create a new account specifically for Enterprise.
Step 4
If you’re making a new account, click on the ‘Create Apple ID’ button. You will then be directed to a page where you can input all of your information. (Name, address, billing details, password, security questions, etc.) Once you have done this, click the ‘Create Apple ID’ button at the bottom of the page.
Step 5
Once you have inputted all of your information, you will have to verify your email address. You should receive an email from Apple to the account that you signed up with, click on the ‘verify now’ button as instructed and you will be re-directed to the Apple site and your email will now be verified. You are now ready to begin the licence process.

Step 6
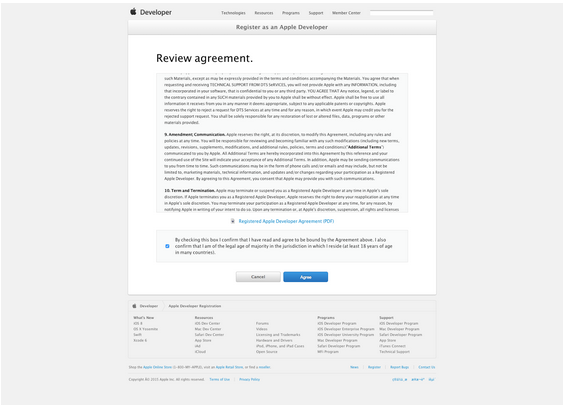
Go back to the first page https://developer.apple.com/programs/ios/enterprise/ and log in with your new Apple ID. You will be greeted with Apple’s terms and conditions to becoming a registered apple developer. Review the conditions and if you approve, check the box and agree.
Step 7
You will then be greeted with a ‘Tell us about yourself’ screen. Fill in all the details and click the ‘Register’ button to continue.
Step 8
You will then have to enter your account information regarding legalities of the owner of the account. Ensure that you are either the owner or you have been given authority.

Step 9
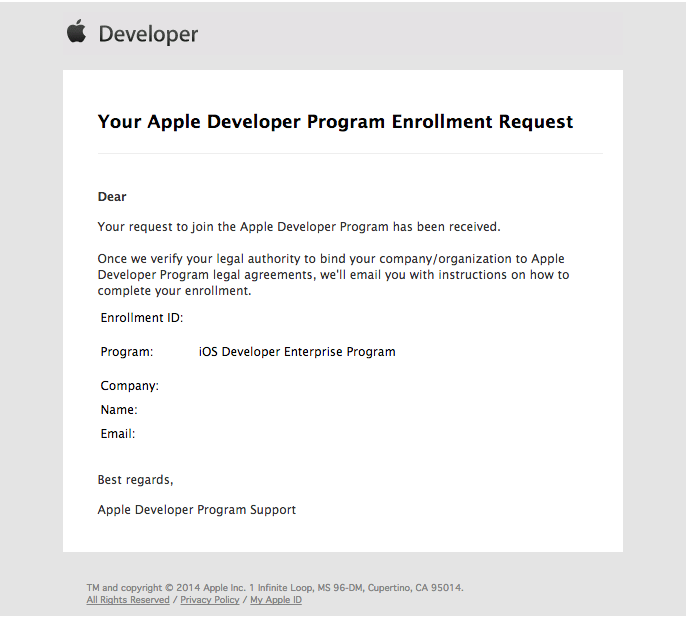
Once you have clicked continue you will then be asked to fill in your organisation details, including your D-U-N-S Number. Please note that your D-U-N-S number will automatically pull in your businesses address so please make sure your D-U-N-S details are up to date. Once you have done this, you’ll be directed to review and submit your final details. Once you click ‘Continue’, your enrolment process will begin. You will be given an enrolment ID and automatically sent an email.
Step 10
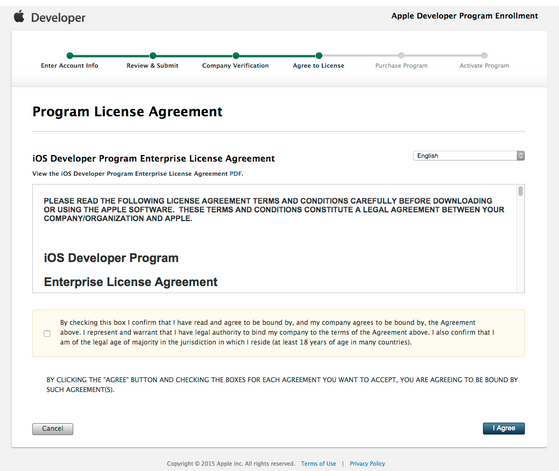
Once you have done this, you will have to wait for Apple to confirm your legal authority to create the Apple ID. This process may take anywhere between 1 & 4 weeks. You’ll then get a phone call from Apple asking you two questions to ensure your understanding of what an enterprise licence is for. Remember, an enterprise app licence is a licence that allows you to distribute apps internally to your own staff, if you’re looking to do anything other than this, then an enterprise licence is not what you need. The first question is; ‘How do you intend to distribute your apps? The second questions is ‘Do you have the authority to make this agreement on behalf of the business?’. This is just to ensure that you have authority within a business or are the person paying for the licence. If you answer the questions correctly, Apple will approve your application. You’ll then receive an email to complete the process.

Step 11
Click the link, log in, read the agreement and accept if you approve
Step 12
You’ll then be instructed to pay for the licence. Fill in your payment details and submit the order.

Step 13
You will then receive a confirmation email after the payment and another confirmation email once the account is activated.


You are now ready to start developing you enterprise apps!
We hope these instructions have helped you complete what can sometimes be a confusing process. At this point it’s worth pointing out that, under the licence agreement (section below) you can still hire agencies to build your enterprise apps under your enterprise licence. If DIY app development is not for you and you would rather someone just build your enterprise apps for you.
Excerpt from License Agreement
Note: For the sake of clarity, you may authorise contractors to develop Internal Use Applications on Your behalf, but any such Internal Applications must be owned by You, developed under Your own developer account, and deployed as Internal Use Applications only as expressly permitted herein. You are responsible to Apple for Your contractors’ activities under Your account (e.g., adding them to Your team to perform development work for You) and their compliance with this Agreement. Any actions undertaken by Your contractors arising out of this Agreement shall be deemed to have been taken by You, and You (in addition to Your contractors) shall be responsible to Apple for all such actions.
Comments
Post a Comment
Thank You.