
React Native Button

Most users interact with mobile through touches. There are combinations of gestures that work on it, such as tapping on the button, zooming the map, scrolling a list, etc. A button is one of the components that work on its click.
React Native Button is a basic component that works by clicking on it. It imports the Button class of react-native.

Props of Button

PropTypeRequiredDescription
onPressfunctionyesCall the handler when user clicks the button.
titlestringyesDisplay the text inside the button.
accessibilityLabelstringnoDisplay the text for blindness accessibility features.
colorColornoSet the background color of the Android button or set the color of iOS text.
disabledboolnoIt disables all interactions for this component, if true.
textIDstringnoUsed to locate this view in end-to-end tests.
hasTVPreferredFocusboolnoIt preferred TV focus work only for Apple TV.

React Native Button Example

In this example, we will work on the button component. React Native Button component imports the Button class of react-native library. It has several props such as title, onPress, accessibilityLabel, etc. which are mentioned above.

In the previous article Positioning Element with Flex, we learned how to position elements in View.
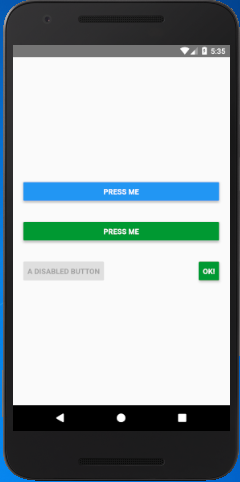
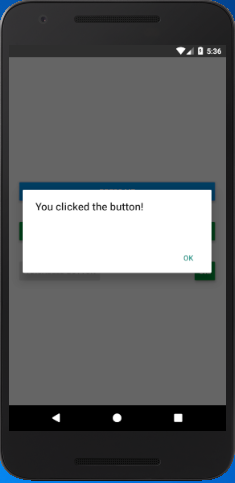
In the below code the title prop sets the title of a button, onPress prop calls the mention function and performs an event. The color prop sets the color of the button, and disabled={true} makes the button to disable.
  1. import React, { Component } from 'react';  
  2. import { Alert, AppRegistry, Button, StyleSheet, View } from 'react-native';  
  3.   
  4. export default class ButtonBasics extends Component {  
  5.     onPressButton() {  
  6.         Alert.alert('You clicked the button!')  
  7.     }  
  8.   
  9.     render() {  
  10.         return (  
  11.             <View style={styles.container}>  
  12.                 <View style={styles.buttonContainer}>  
  13.                     <Button  
  14.                         onPress={this.onPressButton}  
  15.                         title="Press Me"  
  16.                     />  
  17.                 </View>  
  18.                 <View style={styles.buttonContainer}>  
  19.                     <Button  
  20.                         onPress={this.onPressButton}  
  21.                         title="Press Me"  
  22.                         color="#009933"  
  23.                     />  
  24.                 </View>  
  25.                 <View style={styles.multiButtonContainer}>  
  26.                     <Button  
  27.                         onPress={this.onPressButton}  
  28.                         title="A disabled button"  
  29.                         disabled={true}  
  30.                     />  
  31.                     <Button  
  32.                         onPress={this.onPressButton}  
  33.                         title="OK!"  
  34.                         color="#009933"  
  35.                     />  
  36.                 </View>  
  37.             </View>  
  38.         );  
  39.     }  
  40. }  
  41.   
  42. const styles = StyleSheet.create({  
  43.     container: {  
  44.         flex: 1,  
  45.         justifyContent: 'center',  
  46.     },  
  47.     buttonContainer: {  
  48.         margin: 20  
  49.     },  
  50.     multiButtonContainer: {  
  51.         margin: 20,  
  52.         flexDirection: 'row',  
  53.         justifyContent: 'space-between'  
  54.     }  
  55. })  
Output:
React Native Button React Native Button

Comments

Popular Posts

What are the Alternatives of device UDID in iOS? - iOS7 / iOS 6 / iOS 5 – Get Device Unique Identifier UDID

Get Device Unique Identifier UDID Following code will help you to get the unique-device-identifier known as UDID. No matter what iOS user is using, you can get the UDID of the current iOS device by following code. - ( NSString *)UDID { NSString *uuidString = nil ; // get os version NSUInteger currentOSVersion = [[[[[UIDevice currentDevice ] systemVersion ] componentsSeparatedByString: @" . " ] objectAtIndex: 0 ] integerValue ]; if (currentOSVersion <= 5 ) { if ([[ NSUserDefaults standardUserDefaults ] valueForKey: @" udid " ]) { uuidString = [[ NSUserDefaults standardDefaults ] valueForKey: @" udid " ]; } else { CFUUIDRef uuidRef = CFUUIDCreate ( kCFAllocatorDefault ); uuidString = ( NSString *) CFBridgingRelease ( CFUUIDCreateString ( NULL ,uuidRef)); CFRelease (uuidRef); [[ NSUserDefaults standardUserDefaults ] setObject: uuidString ForKey: @" udid " ]; [[ NSUserDefaults standardUserDefaults ] synchro...

16 AWS Gotchas

16 AWS Gotchas In January I launched the MVP for my own startup,  Proximistyle , which helps you find what you’re looking for nearby. On advice from friends and industry contacts I chose AWS as my cloud provider. Having never had to set up my own cloud infrastructure before, the learning curve to get from no experience to a stable VPC system I was happy with was significantly steeper than expected, and had its fair share of surprises. #1 Take advantage of the free resources offered AWS offers a free tier for new accounts. If you have recently bought a domain and set up a company you qualify for the free tier for a year. Additionally, if you are a bootstrapped startup you can apply for  the Startup Builders package  and get $1000 in AWS credits. After doing the above, you’re now ready to get started with setting up the AWS infrastructure for your startup. #2 Set up billing budgets and alerting The very first thing you should do after setting up billing, is enabling a budge...

Ultimate Folder Structure For Your React Native Project

  Ultimate Folder Structure For Your React Native Project React native project structure React Native is a flexible framework, giving developers the freedom to choose their code structure. However, this can be a double-edged sword for beginners. Though it offers ease of coding, it can soon become challenging to manage as your project expands. Thus, a structured folder system can be beneficial in many ways like better organization, simplified module management, adhering to coding practices, and giving a professional touch to your project. This write-up discusses a version of a folder arrangement that I employ in my React Native projects. This structure is based on best practices and can be modified to suit the specific needs of your project. Before we get into the project structure let’s give credit to @sanjay who has the original idea of the structure but I modify his version of the code, to make it better. Base library axios  — For network calling. react-navigation ...