The ScrollView is a generic scrollable container, which scrolls multiple child components and views inside it. In the ScrollView, we can scroll the components in both direction vertically and horizontally. By default, the ScrollView container scrolls its components and views in vertical. To scroll its components in horizontal, it uses the props horizontal: true (default, horizontal: false).
Props of ScrollView
| alwaysBounceVertical | onScroll | horizontal | |
| contentContainerStyle | scrollEnabled | bouncesZoom | zoomScale |
| onScrollBeginDrag | onContentSizeChange | maximumZoomScale | minimumZoomScale |
| onScrollBeginDrag | onContentSizeChange | maximumZoomScale | minimumZoomScale |
| onScrollEndDrag | centerContent | contentInset | refreshControl |
| pagingEnabled | scrollsToTop | snapToAlignment | showsHorizontalScrollIndicator |
| snapToStart | snapToEnd | indicatorStyle | showsHorizontalScrollIndicator |
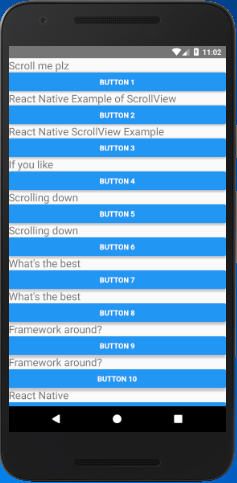
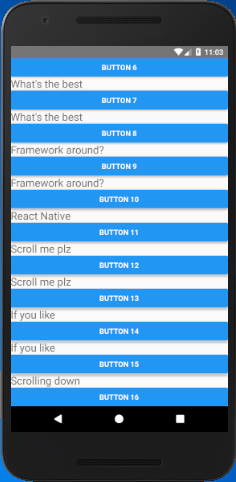
React Native ScrollView Example
In this example, we create a vertical ScrollView using Text and Button components.
App.js
- import React, { Component } from 'react';
- import { AppRegistry, ScrollView, Image, Text, Button, StyleSheet } from 'react-native';
-
- export default class ScrolledViewExample extends Component {
- onPressButton() {
- alert('You clicked the button!')
- }
-
- render() {
- return (
- <ScrollView >
- <Text style={{fontSize:20}}>Scroll me plz</Text>
- <Button title={'Button 1'} onPress={this.onPressButton} />
- <Text style={{fontSize:20}}>React Native Example of ScrollView</Text>
- <Button title={'Button 2'} onPress={this.onPressButton}/>
- <Text style={{fontSize:20}}>React Native ScrollView Example</Text>
- <Button title={'Button 3'} onPress={this.onPressButton}/>
- <Text style={{fontSize:20}}>If you like</Text>
- <Button title={'Button 4'} onPress={this.onPressButton}/>
- <Text style={{fontSize:20}}>Scrolling down</Text>
- <Button title={'Button 5'} onPress={this.onPressButton}/>
- <Text style={{fontSize:20}}>Scrolling down</Text>
- <Button title={'Button 6'} onPress={this.onPressButton}/>
- <Text style={{fontSize:20}}>What's the best</Text>
- <Button title={'Button 7'} onPress={this.onPressButton}/>
- <Text style={{fontSize:20}}>What's the best</Text>
- <Button title={'Button 8'} onPress={this.onPressButton}/>
- <Text style={{fontSize:20}}>Framework around?</Text>
- <Button title={'Button 9'} onPress={this.onPressButton}/>
- <Text style={{fontSize:20}}>Framework around?</Text>
- <Button title={'Button 10'} onPress={this.onPressButton}/>
- <Text style={{fontSize:20}}>React Native</Text>
- <Button title={'Button 11'} onPress={this.onPressButton}/>
- <Text style={{fontSize:20}}>Scroll me plz</Text>
- <Button title={'Button 12'} onPress={this.onPressButton} />
- <Text style={{fontSize:20}}>Scroll me plz</Text>
- <Button title={'Button 13'} onPress={this.onPressButton}/>
- <Text style={{fontSize:20}}>If you like</Text>
- <Button title={'Button 14'} onPress={this.onPressButton}/>
- <Text style={{fontSize:20}}>If you like</Text>
- <Button title={'Button 15'} onPress={this.onPressButton}/>
- <Text style={{fontSize:20}}>Scrolling down</Text>
- <Button title={'Button 16'} onPress={this.onPressButton}/>
- </ScrollView>
- );
- }
- }
-
- AppRegistry.registerComponent('AwesomeProject', () => ScrolledViewExample);
Output:
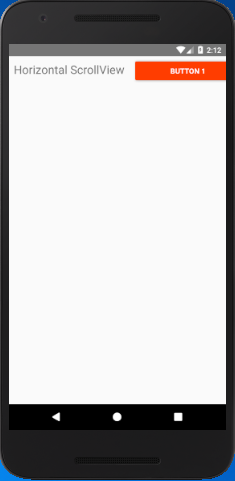
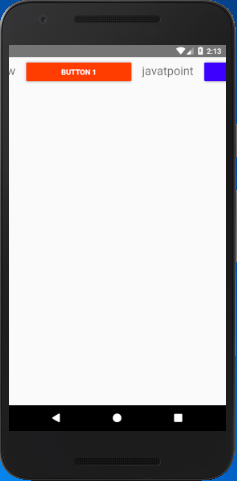
React Native Horizontal ScrollView Example
The horizontal ScrollView scrolls the components and views from left to right. It will be implemented by setting the props horizontal to true (horizontal={true}).
App.js
- import React, { Component } from 'react';
- import { AppRegistry, ScrollView, View, Image, Text, Button, StyleSheet } from 'react-native';
-
- export default class ScrolledViewExample extends Component {
- onPressButton() {
- alert('You clicked the button!')
- }
-
- render() {
- return (
- <ScrollView horizontal={true} style={styles.container}>
- <Text style={{fontSize:22, padding: 10}}>Horizontal ScrollView</Text>
- <View style={[{ width: 220,height: 70,padding: 10 }]}>
- <Button
- onPress={this.onPressButton}
- title="Button 1"
- color="#FF3D00"
- />
- </View>
- <Text style={{fontSize:22, padding: 10}}>javatpoint</Text>
- <View style={[{ width: 220,height: 70,padding: 10 }]}>
- <Button
- onPress={this.onPressButton}
- title="Button 2"
- color="#3D00FF"
- />
- </View>
- <Text style={{fontSize:22, padding: 10}}>React Native ScrollView Example</Text>
- <View style={[{ width: 220,height: 70,padding: 10 }]}>
- <Button
- onPress={this.onPressButton}
- title="Button 3"
- color="#FFFF3D"
- />
- </View>
- <Text style={{fontSize:22, padding: 10}}>If you like</Text>
- <View style={[{ width: 220,height: 70,padding: 10 }]}>
- <Button
- onPress={this.onPressButton}
- title="Button 4"
- color="#FF3DFF"
- />
- </View>
- <Text style={{fontSize:22, padding: 10}}>Scrolling horizontal</Text>
- <View style={[{ width: 220,height: 70,padding: 10 }]}>
- <Button
- onPress={this.onPressButton}
- title="Button 5"
- color="#3DFF00"
- />
- </View>
- </ScrollView>
- );
- }
- }
- const styles = StyleSheet.create({
- container:{
- flex: 1,
- },
-
-
-
-
- })
-
- AppRegistry.registerComponent('AwesomeProject', () => ScrolledViewExample);
Output:
The details that you mentioned regarding scroll view in react native is really great. I have gone through all the screenshots and the code also that you attached as sample and I believe that nothing could explain better than this.
ReplyDeleteI was searching for react native development company and got your blog.
Thanks sharing such a great blog.