This article is for the developers who’ve heard of or have been using Realm Database in their Android apps.
This is a tutorial that aims to help you set up your Android project in a way that takes less space than it normally would.
A Time Before Realm…
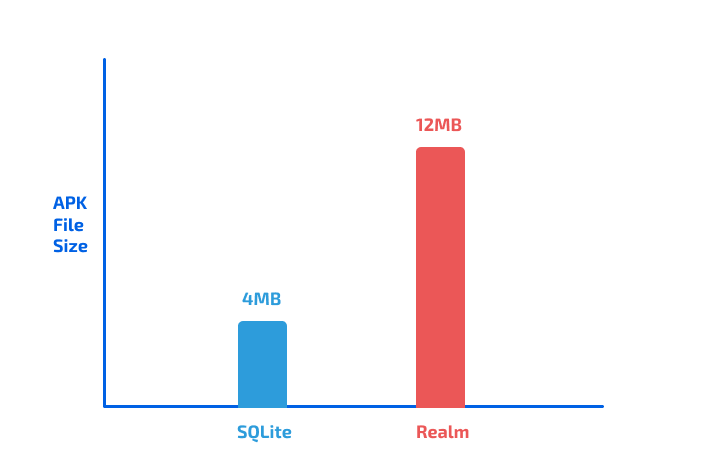
Let’s go back to a time when I’d implemented a normal, boring SQLite database in app. The APK size of the app was 4MB.
But as most of you know, writing a SQLite database is quite boring and consists of a lot of boilerplate code. Changing the database schema meant making a lot of changes in other parts of the code as well.
Enter, Realm
When I first heard about Realm from someone on Reddit, I was blown away by how easy it was to set it up and get a database up and running, one that even came with cloud syncing functionalities! It was easy to make changes to the database schema without having to change much of the code I’d already written.
It was super easy and quick to perform CRUD operations. Every single line of Realm code was effortless to read and understand, even for a newbie. It was hassle-free to work with threads as well. Database encryption? Just write two extra lines of code and you’re done!
Now, of course, this article is neither an advertisement for Realm nor a tutorial for Realm. So let’s move on to the problem at hand with using Realm.
What’s Wrong With Realm?
Once I added the dependencies for Realm in my app, set up Realm, and removed all SQLite code, my app’s APK size increased from 4MB to 12MB! Now, for a simple app like mine, this difference might not be a lot. But what if your app had a huge database with a lot of entities? The increment would be much higher.

The Cause
Android phones have processors that support the following architectures:
x86x86_64armeabi-v7aarm64-v8aarmeabi(Obsolete)mips(Obsolete)mips64(Obsolete)
When you build your app’s APK, the Realm library gets compiled for all of these architectures. That’s why the APK size is so huge.
Your APK that’s being built by Android Studio has native Realm code for all of the above-mentioned architectures. But your users’ phones only need an app that has native Realm code for their processor’s architecture. They don’t need an app that has Realm compiled for all architectures. That would only increase the size of the app they’d have to download from the Play Store.
The Solution
This can be done in two ways:
- ABI Filters (less effective)
- APK Splitting (more effective)
For brevity purposes, in this article, I’ll cover only APK splitting. Here’s what it really means:
APK splitting is building multiple APKs, specific to each architecture, for your app.
This can be done in the app-level
build.gradle file of your Android project.
Since the
armeabi, mips, and mips64 architectures are now obsolete, let’s focus on building separate APKs for x86, x86_64, armeabi-v7a and arm64-v8a architectures.If you’re doing this for an app that you need to upload to the Play Store:
Since multiple APKs will be generated, the version codes for all of them need to be different, because the Google Play Console doesn’t let you upload APKs with the same version codes.
So, if your current version code for the single APK is 1, the next version of your app with multiple APKs shouldn’t be 2 (
x86), 3 (x86_64), 4 (armeabi-v7a), and 5 (arm64-v8a). That’s a bad practice and would be harder for you to manage.
Instead, it’s better to have a huge decimal number and assign “codes” to each architecture, as follows:
x86: 0x86_64: 1armeabi-v7a: 2arm64-v8a: 3
Then, your version codes for your app would look something like 2000 (
x86), 2001 (x86_64), 2002(armeabi-v7a), and 2003(arm64-v8a), and the next version codes would be 3000, 3001, 3002, and 3003. You get the idea.
Now, let’s get to the practical part and dive into our app-level build.gradle file:
Here’s how your app-level
build.gradle file, enabled with APK splitting should look:apply plugin: 'com.android.application'
android {
...
...
defaultConfig {
...
versionCode 2000
...
}
...
...
// APK splitting
splits {
abi {
// Enable APK splitting wrt architecture
enable true
// Reset the architectures for which you need to build the APKs for
reset()
// Include the architectures for which Gradle is building APKs
include 'x86', 'x86_64', 'armeabi-v7a', 'arm64-v8a'
// Set this to false if you don't want an APK that has native code for all architectures
universalApk false
}
}
// Assign codes to each architecture
project.ext.versionCodes = ['x86': 0, 'x86_64': 1, 'armeabi-v7a': 2, 'arm64-v8a': 3]
// Add the architecture-specific codes above to base version code, i.e. the version code specified in the defaultConfig{} block
// Example: 2000 is the base version code -> 2000 (x86), 2001 (x86_64), 2002 (armeabi-v7a) & 2003 (arm64-v8a) would be the version codes for the generated APK files
android.applicationVariants.all { variant ->
variant.outputs.each { output ->
output.versionCodeOverride = project.ext.versionCodes.get(output.getFilter(com.android.build.OutputFile.ABI), 0) * 1 + android.defaultConfig.versionCode
}
}
}
Now, generate your new APKs, and you should see a significant decrease in the size of the individual, architecture-specific APKs!
You can upload the 4 APKs generated onto the Google Play Console for the same release of the app since they all have different version codes.
The users will only be able to download the version of the APK from the Play Store that’s specific to their phone’s architecture, all of it happening behind-the-scenes, thanks to the magic of the Google Play Console.
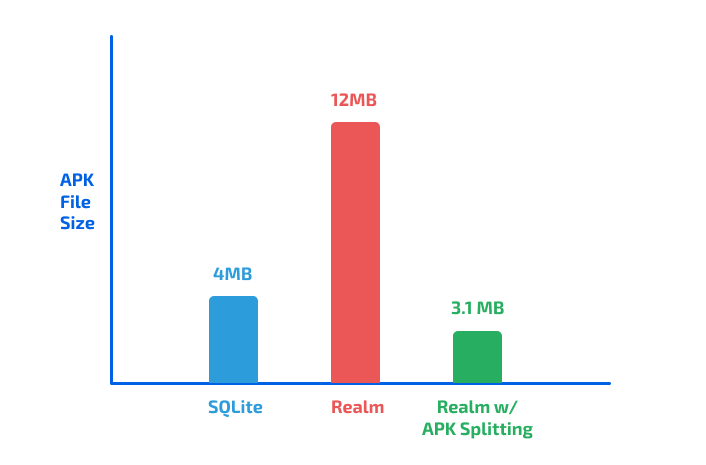
The best part? The APK size for my app, SilverScreener, was now 3.1MB!
Here’s a comparison of before and after APK splitting:

The Takeaway
Realm is a great database, but it’s also one that increases the APK size significantly.
Go ahead, start using APK splitting in your app without compromising the file size.
Read your blog and I believe this is really a nice blog. One can easily understand about the react native with the help of this blog. I was looking to hire react native app developer and got your blog. Thanks for sharing such a nice blog.
ReplyDeleteSynsoft Global